Removal
Warning! Stop the engine when refueling or servicing the fuel system. Do not smoke or allow open flame or sparks near gasoline. Gasoline is extremely flammable and highly explosive, which could result in death or serious injury.
1. Remove the fuel tank. See 4.5 FUEL TANK: XR 1200X.
2. Remove the air box. See 1.7 AIR FILTER, XR 1200X.
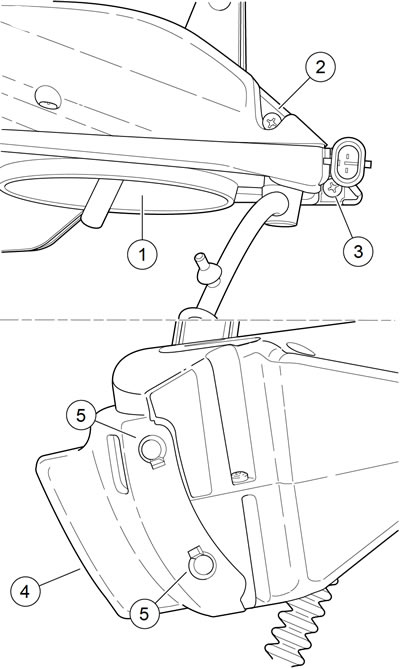
3. See Figure 1-11. Remove the two screws (2, 3) securing the air filter cover (4) to air box (1).

Figure 1-11. Unbolting Air Filter Cover: 1. Air box assembly; 2. Screw; 3. Screw; 4. Air filter cover; 5. Button head clip (2)
4. Using a small flat blade screwdriver, gently pry two button head clips (5) securing air filter cover to air box. Discard button head clips.
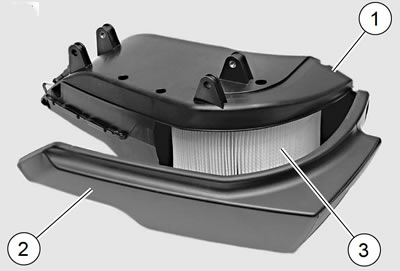
5. See Figure 1-12. Gently pull rear end of air filter cover (2) away from air box. Disengage front of air filter cover from the air box and set the cover aside.

Figure 1-12. Removing Air Filter Cover: 1. Air box assembly; 2. Air filter cover; 3. Air filter element
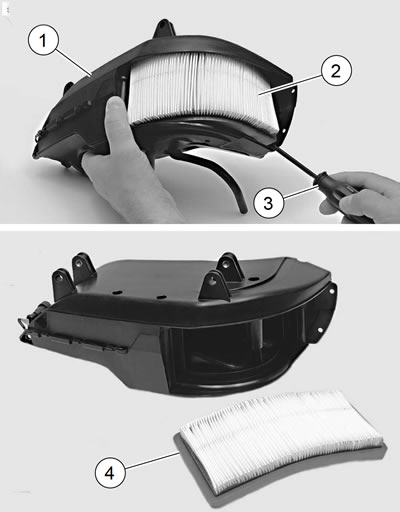
6. See Figure 1-13. Using a flat blade screwdriver, gently pry the lower front corner of the filter (2) out of the air box. Work screwdriver around bottom of filter gasket (4) to free the filter.

Figure 1-13. Removing Air Filter Element: 1. Air box assembly; 2. Air filter element; 3. Screwdriver; 4. Gasket (built into air filter element)
7. Carefully pull the filter out of the air box.
8. Clean the inside of the air box housing and cover.
9. Inspect the air filter seal. Replace if necessary.

Figure 1-14. Filter Element Channel
Installation
1. See Figure 1-13. Form a new air filter into a curved shape. Slide top of air filter up into opening in air box. Top of the air filter must fit into channel in top of air box.
2. Press bottom and ends of air filter into air box. The air filter must fit into the air box opening.
3. See Figure 1-12. Position front of air filter cover (2) onto air box. Do not install button head clips at this time.
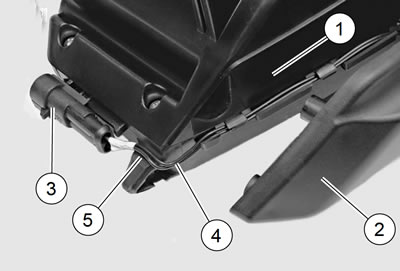
4. Active Intake Models: See Figure 1-15.

Figure 1-15. Installing Air Filter Cover: 1. Air box assembly; 2. Air filter cover; 3. Active intake connector [178] (if equipped); 4. Wiring harness; 5. Recess
- a. Verify that the active intake connector wiring harness (4) is in the air box recess (5).
- b. Position the breather hose assembly inside the to air box. The breather hose cannot interfere with the active air solenoid flapper.
Note. Do not pinch the active intake connector wiring harness with the air filter cover.
5. Install rear of air filter cover (2) onto air box. Secure with two screws.
6. Install new button head clips. Press in firmly.
7. Install the air box. See 1.7 AIR FILTER, XR 1200X.
8. Install the fuel tank. See 4.5 FUEL TANK: XR 1200X.
