
| FASTENER | TORQUE VALUE | |
| Clutch inspection cover screws | 90-120 in·lbs | 10.3-13.6 Nm |
| Primary chaincase drain plug | 14-30 ft·lbs | 19.0-40.7 Nm |
| Clutch inspection cover screws | 90-120 in·lbs | 10.3-13.6 Nm |
Check lubricant level
1. Ride motorcycle until engine is warmed up to normal operating temperature.
Note. Support motorcycle upright to equalize lubricant level in the transmission compartments.
2. Position motorcycle upright.
Warning! To prevent accidental vehicle start-up, which could cause death or serious injury, remove main fuse before proceeding.
3. Remove main fuse.
4. Remove foot controls:
- a. XL Models with Mid-mount Controls: Remove left side rider footrest and mounting bracket assembly. See 2.40 RIDER FOOT CONTROLS: XL MID-MOUNT CONTROLS.
- b. XR 1200X: Remove left side rider footrest, mounting bracket assembly, and shift linkage. See 2.42 RIDER FOOT CONTROLS: XR 1200X.
5. See Figure 1-21. Remove screws with washers and remove clutch inspection cover (1).

Figure 1-21. Primary Cover: XL Model: 1. Clutch inspection cover; 2. Drain plug; 3. Primary chain inspection cover
6. See Figure 1-22. Verify that lubricant level is even with bottom of clutch diaphragm spring (1).

Figure 1-22. Chaincase Lubricant Level: 1. Clutch diaphragm spring; 2. Clutch adjusting screw; 3. Quad ring; 4. Primary cover; 5. Chaincase lubricant level
Notice: When draining or adding lubricant, do not allow dirt, debris or other contaminants to enter the engine.
Notice: Do not overfill the primary chaincase with lubricant. Overfilling can cause rough clutch engagement, incomplete disengagement, clutch drag and/or difficulty in finding neutral at engine idle.
7. If the level is low, add FORMULA+ TRANSMISSION AND PRIMARY CHAINCASE LUBRICANT through clutch inspection cover opening. Verify that lubricant level is even with bottom of clutch diaphragm spring.
8. Install the clutch inspection cover:
- a. Install a new quad ring. Verify that the quad ring is fully seated in groove of primary cover.
- b. See Figure 1-23. Install cover and tighten screws in sequence to 90-120 in·lbs (10.3-13.6 Nm).
9. Install left side rider footrest:
- a. XL Models with Mid-mount Controls: Install left side rider footrest and mounting bracket assembly. See 2.40 RIDER FOOT CONTROLS: XL MID-MOUNT CONTROLS.
- b. XR 1200X: Install left side rider footrest, mounting bracket assembly, and shift linkage. See 2.42 RIDER FOOT CONTROLS: XR 1200X.
10. Install main fuse.
11. Run engine. Check for leaks.
Change lubricant
Warning! Be sure that no lubricants or fluids get on tires, wheels or brakes when changing fluid. Traction can be adversely affected, which could result in loss of control of the motorcycle and death or serious injury.
1. Ride motorcycle until engine is warmed up to normal operating temperature.
2. Turn the engine off and position motorcycle on jiffy stand. This will allow the chaincase lubricant to drain out of transmission.
Warning! To prevent accidental vehicle start-up, which could cause death or serious injury, remove main fuse before proceeding.
3. Remove main fuse.
4. See Figure 1-21. Position a suitable container under transmission drain plug (2).
5. Remove drain plug. Drain lubricant.
6. Position the motorcycle straight up and level. This allows additional fluid to be drained from clutch compartment.
Note. Dispose of lubricant in accordance with local regulations.
Notice: Do not over-tighten filler or drain plug. Doing so could result in a lubricant leak.
7. Clean magnetic drain plug. Replace O-ring if damaged.
8. Apply LOCTITE 565 THREAD SEALANT and install drain plug. Tighten to 14-30 ft·lbs (19.0-40.7 Nm).
9. Remove the clutch inspection cover.
10. See Figure 1-22. Add 1.00 qt (0.95 L) of FORMULA+ TRANSMISSION AND PRIMARY CHAINCASE LUBRICANT through clutch inspection cover opening. Verify that lubricant level is even with bottom of clutch diaphragm spring (1).
11. Install the clutch inspection cover:
- a. Install a new quad ring. Verify that the quad ring is fully seated in groove of the primary cover.
- b. See Figure 1-23. Install cover and tighten screws in sequence to 90-120 in·lbs (10.3-13.6 Nm).
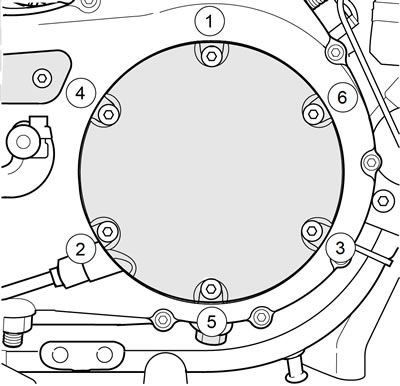
Figure 1-23. Clutch Inspection Cover Torque Sequence
12. Install main fuse.
13. Run engine. Check for lubricant leaks.