
Removal
Notes:
- If a lift is not available, remove and install one shock absorber at at time.
- If necessary to remove saree guards, see 2.36 SAREE GUARD: INDIA MODELS, Saree Guard: XL 883R, XL 1200C/C ANV (India).
1. Note the shock absorber settings.
- a. All Models: Preload.
- b. XR 1200X: Rebound and compression.
2. See Figure 2-165. Remove fastener (1), washer (2) and locknut (3) from bottom end of the shock absorber (4 or 5).
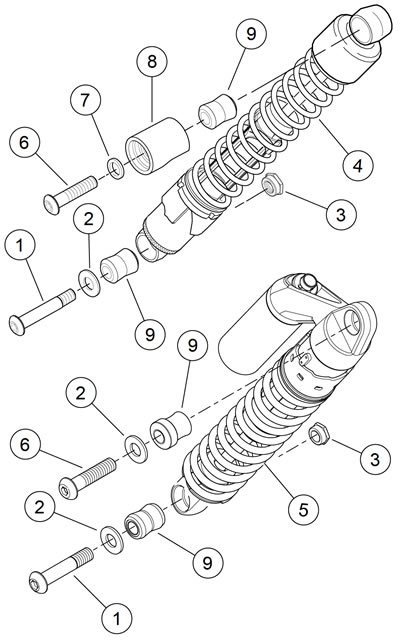
Figure 2-165. Shock absorbers: all models: 1. Mounting bolt; 2. Washer; 3. Locknut; 4. Shock absorber: XL models; 5. Shock absorber: XR 1200X; 6. Mounting bolt; 7. Washer; 8. Stud cover: XL models; 9. Damper bushing
3. Remove the fastener (6) and washer (7 or2) from top end of shock absorber.
4. XL Models: Remove the stud cover (8).
5. Remove the shock absorber.
Cleaning and inspection
Note. Replace shock absorbers as set if either unit is damaged.
1. Clean and inspect all parts for wear and damage.
2. Check rubber bushings for wear, cracking and stiffness.
3. Examine shock absorber for signs of leakage.
Installation
| FASTENER | TORQUE VALUE | |
| Shock absorber mounting bolt | 45-50 ft·lbs | 61-68 Nm |
| Shock absorber mounting bolt | 45-50 ft·lbs | 61-68 Nm |
1. See Figure 2-165. Assemble the upper fastener stack.
- a. XL Models: Assemble the upper fastener (6), the washer (7) and the stud cover (8).
- b. XR 1200X: Assemble the upper fastener (6) and the washer (2).
2. Install shock absorber mounting stack through the shock absorber (4 or 5).
3. Position bottom end of shock absorber against outboard side of rear fork mount. Insert mounting bolt (1) and washer (2) through the damper bushing (9) and the rear fork mount.
4. Thread on the locknut (3).
5. Remove the upper mounting bolt and apply 2-3 drops of LOCTITE 243 MEDIUM STRENGTH THREADLOCKER AND SEALANT (blue) to the threads.
6. Install the mounting bolt into the frame boss. Tighten to 45-50 ft·lbs (61-68 Nm).
7. Tighten the lower shock absorber locknut to 45-50 ft·lbs (61-68 Nm).
8. Adjust the shock absorber to the original settings.
- a. All Models: Preload.
- b. XR 1200X: Rebound and Compression.
Shock disposal: schrader valve models
1. Remove the shock.
2. See Figure 2-166. Locate the valve.
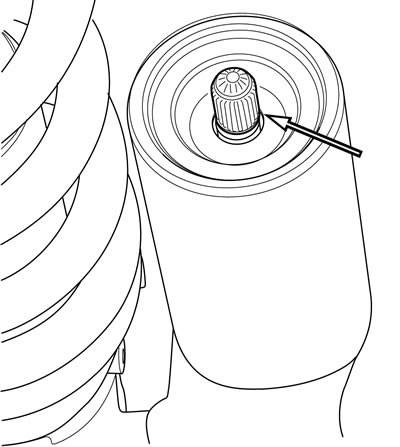
Figure 2-166. Schrader valve location: XR 1200X
Note. Cap may require pliers to remove.
3. Remove the valve cap.
Warning! Discharging pressurized oil and gas can pierce skin and cause flying debris, which could cause serious injury. Wear safety glasses and gloves.
4. Press the valve stem with a flat blade screwdriver to release the gas.
5. Dispose of the shock.