1. The horn fails to sound.
1. Horn switch
Check the forn switch for continuity. Refer to "Checking the switches". Is the horn switch OK?
NO: Replace the left handlebar switch.
YES:
2. Voltage
Connect the pocket tester (DC 20 V) to the horn connector at the horn terminal as shown.
- Tester positive probe → brown (1)
- Tester negative probe → ground
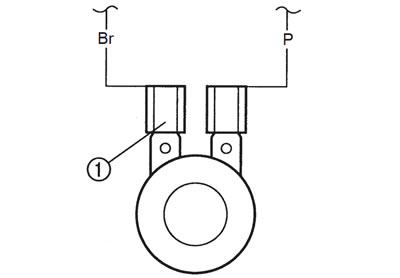
Set the main switch to "ON".
Measure the voltage (12 V) of brown at the horn terminal.
Is the voltage within specification?
NO: The wiring circuit from the main switch to the horn connector is faulty and must be repaired.
YES:
3. Horn
Disconnect the black connector at the horn terminal.
Connect a jumper lead (1) to the horn terminal and ground the jumper lead.
Set the main switch to "ON".
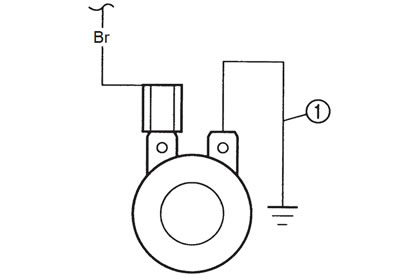
Does the horn sound?
NO: The horn is OK.
YES:
4. Voltage
Connect the pocket tester (DC 20 V) to the horn connecter at the black terminal as shown.
- Tester positive probe → black (1)
- Tester negative probe → ground
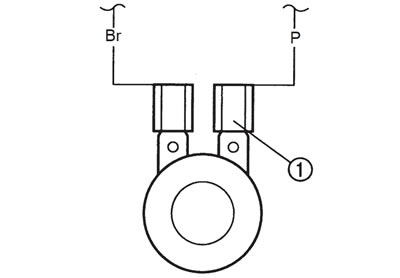
Set the main switch to "ON".
Measure the voltage (12 V) of black (1) at the horn terminal.
Is the voltage within specification?
NO: Replace the horn.
YES: Repair or replace the horn.
2. A tail/brake light fails to come on.
1. Tail/brake light bulb and socket
Check the tail/brake light bulb and socket for continuity.. Refer to "Checking the bulbs and bulb sockets".
Are the tail/brake light bulb and socket OK?
NO: Replace the tail/brake light bulb, socket or both.
YES:
2. Brake light switches
Check the brake light switches for continuity. Refer to "Checking the switches".
Is the brake light switch OK?
NO: Replace the brake light switch.
YES:
3. Voltage
Connect the pocket tester (DC 20 V) to the tail/brake light coupler (wire harness side) as shown.
- Tester positive probe → yellow (1)
- Tester negative probe → black (2)
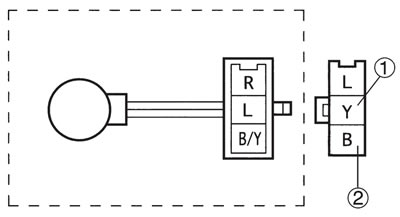
Set the main switch to "ON".
Pull in the brake lever or push down on the brake pedal.
Measure the voltage (12 V) of yellow at the tail/brake light coupler (wire harness side).
Is the voltage within specification?
NO: The wiring circuit from the main switch to the tail/brake light coupler is faulty and must be repaired.
YES: This circuit is OK.
3. A turn signal light, turn signal indicator light or both fail to blink.
1. Turn signal light bulb and socket
Check the turn signal light bulb and socket for continuity. Refer to "Checking the bulbs and bulb sockets".
Are the turn signal light bulb and socket OK?
NO: Replace the turn signal light bulb, socket or both.
YES:
2. Turn signal switch
Check the turn signal for continuity. Refer to "Checking the switches".
Is the turn signal switch OK?
NO: Replace the left handlebar switch.
YES:
3. Voltage
Connect the pocket tester (DC 20 V) to the flasher relay coupler (wire harness side) as shown.
- Tester positive prove → brown (1)
- Tester negative prove → ground
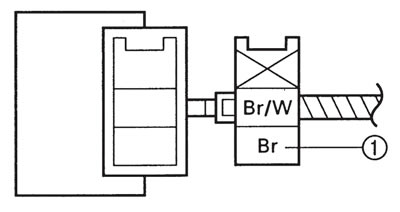
Set the main switch to "ON".
Measure the voltage (12 V) of brown (1) at the flasher relay coupler (wire harness side).
Is the voltage within specification?
NO: The wiring circuit from the main switch to the flasher relay coupler (flasher relay side) is faulty and must be repaired.
YES:
4. Voltage
Connect the tester (DC 20 V) to the flasher relay coupler (wire harness side) as shown.
- Tester positive probe → brown/white (1)
- Tester negative probe → ground
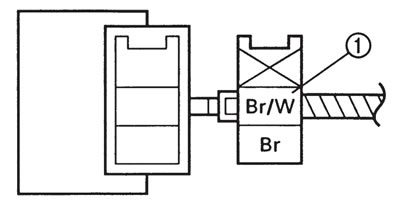
Set the main switch to "ON".
Set the turn signal switch to "
Measure the voltage (12 V) or brown/white at the flasher relay coupler (wire harness side).
Is the voltage within specification?
NO: The flasher relay is faulty and must be replaced.
YES:
5. Voltage
Connect the pocket tester (DC 20 V) to the turn signal light connectors or the meter assembly coupler (wire harness side) as shown.
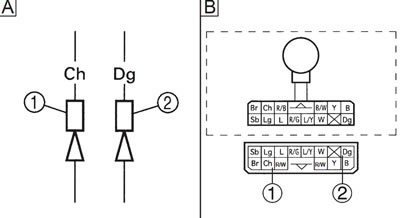
[A] Turn signal light; [B] Turn signal indicator light
Left turn signal light:
- Tester positive probe → chocolate (1)
- Tester negative probe → ground
Right turn signal light:
- Tester positive probe → dark green (2)
- Tester negative probe → ground
Set the main switch to "ON".
Set the turn signal switch to "
Measure the voltage (12 V) of chocolate (1) or dark green (2) at the turn signal light connector (wire harness side).
Is the voltage within specification?
NO: The wiring circuit from the turn signal switch to the turn signal light connector is faulty and must repaired.
YES: This circuit is OK.
4. The neutral indicator light fails to come on.
1. Neutral indicator light bulb and socket
Check the neutral indicator light bulb and socket for continuity. Refer to "Checking the bulbs and bulb sockets".
Are the neutral indicator light bulb and socket OK?
NO: Replace the neutral indicator light bulb, socket or both.
YES:
2. Neutral switch
Check the neutral switch for continuity. Refer to "Checking the switches".
Is the neutral switch OK?
NO: Replace the neutral switch.
YES:
3. Voltage
Connect the pockt tester (DC 20V) to the meter assembly coupler (wire harness side) as shwon.
- Tester positive probe → brown (1)
- Tester negative probe → sky blue (2)
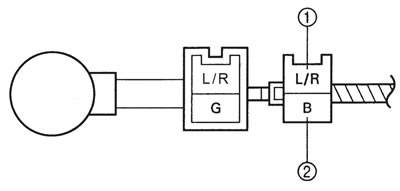
Set the main switch to "ON".
Measure the voltage (12 V) of brown (1) and sky blue (2) at the meter assembly coupler.
Is the voltage with specification?
NO: The wiring circuit from the main switch to the meter light bulb coupler is faulty and must be repaired.
YES: This circuit is OK.
5. The oil level warning light fails to come on.
1. Oil level warning light bulb and socket
Check the oil level warning light bulb and socket for continuity. Refer to "Checking the bulbs and bulb sockets"
Are the oil level warning light bulb and socket OK?
NO: Replace the oil level warning light bulb, socket or both.
YES:
2. Oil level switch
Drain the engine oil and remove the oil level switch from the oil pan.
Check the oil level switch for continuity. Refer to "Checking the switches".
Is the oil level switch OK?
NO: Replace the oil level switch.
YES:
3. Oil lamp relay
Disconnect the oil lamp relay from the coupler.
Connect the pocket tester (Ω x 1) and battery (12 V) to the oil lamp relay terminals as shown.
- Battery positive terminal → red/white (1)
- Battery negative terminal → black/red (2)
- Tester positive probe → black/white (3)
- Tester negative probe → black (4)
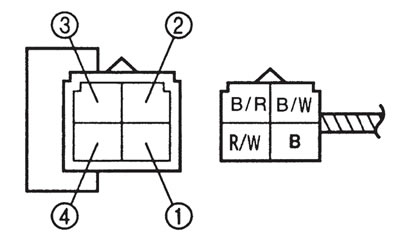
Does the oil lamp relay have continuity between red/blue and black?
NO: Replace the oil lamp relay.
YES:
4. Voltage
Connect the pocket tester (DC 20 V) to the meter assembly coupler (wire harness side) as shown.
- Tester positive probe → red/white (1)
- Tester negative probe → black/white (2)
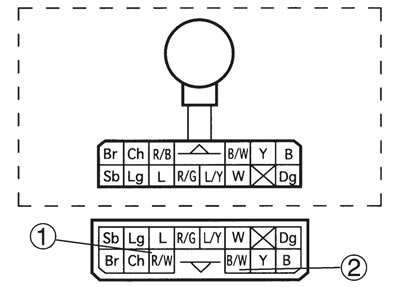
Set the main switch to "ON".
Measure the voltage (12 V) of brown (1) and black/red at the meter assembly coupler.
Is the voltage within specification?
NO: The wiring circuit from the main switch to the meter assembly coupler is faulty and must be repaired.
YES: This circuit is OK.
