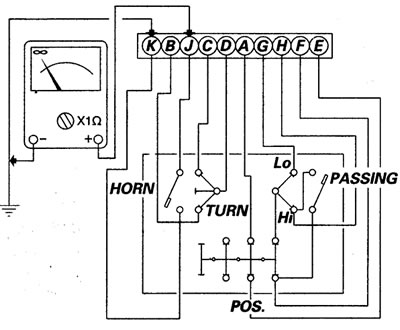
Left handlebar switch
In the event of a fault, the internal connections of the switch must be checked in all the operating positions of the switch. To do this, disconnect the main cable connector and use a tester set at the + position on the smallest scale range.

Proceed as follows:
Press the HORN button and check that the tester goes to the end of the scale range across points (K) and (J).
Move the indicator switch to the RIGHT position and check that the tester goes to the end of the scale range across points (D) and (B).
Move the indicator switch to the LEFT position and check that the tester goes to the end of the scale range across points (D) and (C).
Move the light switch to the P position and check that the tester goes to the end of the scale range across points (A) and (E).
Move the light switch to the H position and the light selector switch to the Lo position. The tester must go to the end of the scale range across points (G) and (F) and across points (A) and (E).
Keeping the light switch in the H position, move the light selector switch to the Hi position and check that the tester goes to the end of the scale range across points (H) and(F).
Move the light switch to the OFF symbol and the indicator switch to the central OFF position. Then press the PASSING button and check that the tester goes to the end of the scale range across points (F) and (H).
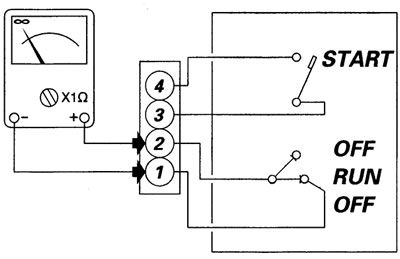
Right handlebar switch
Disconnect the main cable connector and, using a tester, check the internal switch connections as follows:
Move the switch to the RUN position and check that the tester goes to the end of the scale range across points (1) and (2).
Keeping the switch in the RUN position, press the START button and check that the tester goes to the end of the scale range across points (4) and (3).

