
Warning: The dust created by the brake system may contain asbestos, which is harmful to your health. Never blow it out with compressed air and don't inhale any of it. An approved filtering mask should be worn when working on the brakes. Do not, under any circumstances, use petroleum-based solvents to clean brake parts. Use clean brake fluid, brake cleaner or denatured alcohol only.
Rear brake drum - XL600V-H to L (1987 to 1990) models
Removal
1. Remove the rear wheel (see Section 14).
2. Lift the brake plate out of the drum in the wheel hub (see illustration 2.24).
Inspection
3. Visually inspect the surface of the drum for score marks, cracks and other damage. Light scratches are normal after use and won't affect brake operation, but deep grooves,
cracks and heavy score marks will reduce braking efficiency and accelerate shoe wear. If the drum is in bad condition the wheel hub must be replaced with a new one.
4. Measure the internal diameter of the drum.
If it has worn beyond the service limit specified at the beginning of the Chapter the wheel hub must be replaced with a new one.
5. If the hub needs to be renewed, obtain the new one then take the whole wheel to a specialist wheel builder who will have the correct equipment for rebuilding spoked wheels. Although it is not that difficult to actually rebuild, it is tricky to set up so that it is all correctly aligned, tensioned and balanced.
Installation
6. Fit the brake plate assembly into the drum in the rear wheel hub. Install the wheel (see Section 14).
Brake discs - front and rear
Note: Honda recommend using new disc mounting bolts when the old ones are removed. This is because the bolts are pretreated with a locking compound. It is possible, however, to clean up the old bolts and reinstall them using a suitable nonpermanent thread locking compound that is commercially available.
Inspection
7. Visually inspect the surface of the disc for score marks and other damage. Light scratches are normal after use and won't affect brake operation, but deep grooves and heavy score marks will reduce braking efficiency and accelerate pad wear. If a disc is badly grooved it must be machined or replaced with a new one.
8. To check disc runout, position the bike on its centrestand if fitted or on an auxiliary stand so that the wheel being checked is off the ground.
Mount a dial gauge to a fork leg or on the swingarm, according to wheel, with the plunger on the gauge touching the surface of the disc about 10 mm (1/2 in) from the outer edge (see illustration). Rotate the wheel and watch the indicator needle, comparing the reading with the limit listed in the Specifications at the beginning of the Chapter. If the runout is greater than the service limit, check the wheel bearings for play (see Chapter 1). If the bearings are worn, replace them with new ones (see Section 15) and repeat this check. It is also worth removing the disc (see below) and checking for built-up corrosion (see Step 12) as this will cause runout. If the runout is still excessive, it will have to be replaced with a new one, although machining by an engineer may be possible.
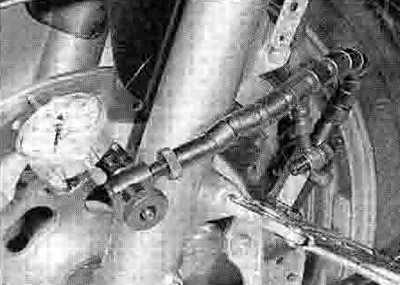
3.8. Checking disc runout
9. The disc must not be machined or allowed to wear down to a thickness less than the service limit as listed in this Chapter's Specifications and as marked on the disc itself (see illustration). Check the thickness of the disc using a micrometer (see illustration). If the thickness of the disc is less than the service limit, it must be replaced with a new one.
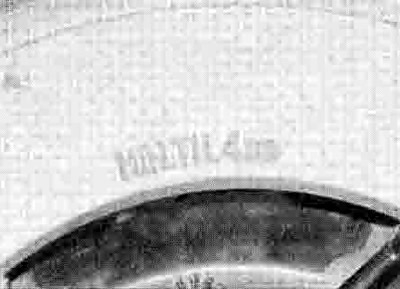
3.9a. The minimum thickness is marked on each disc
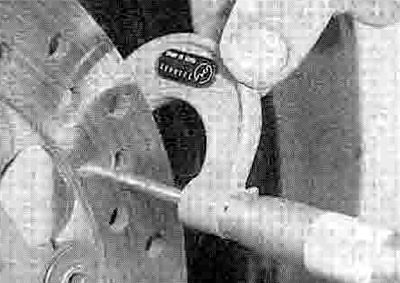
3.9b. Checking disc thickness
Removal
Note: Always renew the brake pads if fitting new discs. On models with twin front discs, always renew both front brake discs at the same time.
10. Remove the wheel (see Section 13 or 14).
11. Mark the relationship of the disc to the wheel, so it can be installed in the same position. Unscrew the disc retaining bolts, loosening them a little at a time in a crisscross pattern to avoid distorting the disc, then remove the disc from the wheel (see illustration). On the front wheel also remove the hub cover if required, noting how it fits.

3.11. Disc mounting bolts (arrowed) - XL600V rear disc shown
Installation
12. Before installing the disc, make sure there is no dirt or corrosion where the disc seats on the hub, particularly right in the angle ot the seat, as this will not allow the disc to sil flat when it is bolted down and it will appear to be warped when checked or when using the brake.
13. If removed, fit the hub cover onto the front wheel, making sure it locates correctly and, or, XRV750 models, is on the correct side (the one with the larger internal diameter fits on the right-hand side). Install the disc on the wheel making sure the directional arrow is on the outside and pointing in the direction of normal (i.e. forward) rotation. Also note any R or I marking on twin front disc models that denotes on which side of the wheel it must be mounted. Align the previously applied matchmarks (il you're reinstalling the original disc).
14. Install the disc mounting bolts, either using new ones or cleaning and applying a suitable non-permanent thread locking compound to the threads of the old ones (see Note above), and tighten them evenly in a criss-cross pattern to the torque setting specified at the beginning of the Chapter (see illustration 3.11). Clean off all grease from the brake disc(s) using acetone or brake system cleaner. If a new brake disc has been installed, remove any protective coating from its working surfaces.
15. Install the wheel (see Section 13 or 14).
16 Operate the brake lever and pedal several times to bring the pads into contact with the disc. Check the operation of the brakes carefully before riding the bike.