
Inspections I, II and III
Checking the front brake fluid level
Caution: The fluid level in the brake fluid reservoir must be at the MAX mark with new brake pads. It is not possible to check the maximum fill level at the inspection glass. The fluid level must be checked by opening the brake fluid reservoir.
- Place motorcycle on its centre stand.
- Turn the handlebars to full left lock.
Note: The volume of brake fluid (MIN/MAX) is sufficient for pad thicknesses from new to the wear limit. It is not normally necessary to top up the fluid to compensate for pad wear.
A level below MIN indicates the possibility of other faults.

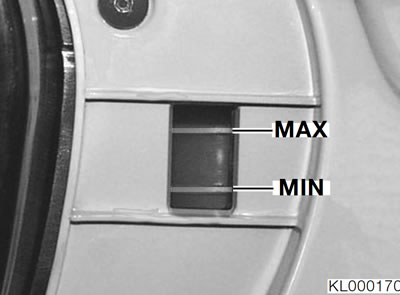
- Check the level of brake fluid on the inspection glass.
Centre of the inspection glass (arrow) if brake pads are worn to the wear limit — MIN
Warning: Never permit the brake fluid level to fall below the centre of the inspection glass (arrow). Otherwise, there is a danger that air will be sucked into the braking system as the brakes are operated.
Checking the fluid level with brake fluid reservoir open
Caution: Do not allow brake fluid to come into contact with painted parts of the motorcycle, because brake fluid destroys paint.
- Place the motorcycle on its centre stand so that it is level.
- Remove the top and bottom right handlebar trim panels.
- Remove the combination switch.
- Turn the handlebars to full left lock.
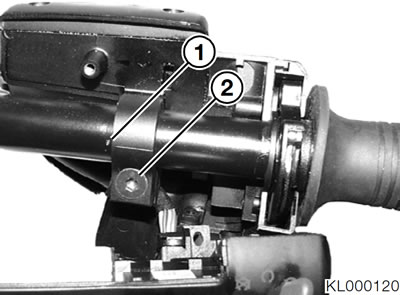
- Loosen the clamping screw (2).
- Rotate the brake fitting so that the sealing surface on the reservoir cap is horizontal when viewed from the side.
- Tighten the clamping screw (2).
- Remove the reservoir cap together with the diaphragm.
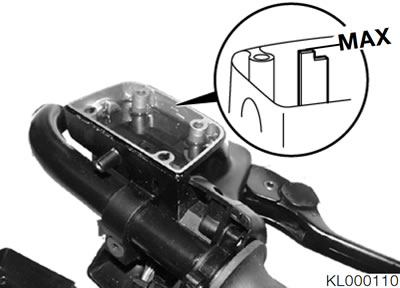
Required level with new brake pads mark on the reservoir — MAX
- Top up the fluid level and, if necessary, check the brake system for leaks if the brake fluid level is below the MAX mark with new brake pads.
- Installation is the reverse of the removal procedure: pay particular attention to the following.
Note: Wipe the rim of the reservoir, the rubber gaiter and the cap to remove brake fluid, and carefully re-assemble the components.
- Hand-tighten the screws securing the reservoir cap.
- Return the brake fitting to the marked position (1).
Note: Take care with the routing of the wires and cables when fitting the handlebar trim.
Brake fluid grade — DOT 4
Tightening torque:
- Clamping screw — 5 Nm
Checking the rear brake fluid level (Inspections I, II and III)
Note: The volume of brake fluid (MIN/MAX) is sufficient for pad thicknesses from new to the wear limit.
It is not normally necessary to add fluid to compensate for pad wear.
A level below MIN indicates the possibility of other faults.
- Place motorcycle on its centre stand.
- Open the right-hand side case.
Caution: The fluid level in the brake fluid reservoir must be at the MAX mark with new brake pads.
- Read off the level of brake fluid in the reservoir. You may need to use a torch to light up the reservoir from behind.
- Do not permit the brake fluid to drop below the MIN level.
- Check the brake system for leaks if the brake fluid level is below the MAX mark with new brake pads.
Required level — MAX
Brake fluid grade — DOT 4
Checking operation of brake system and freedom from leaks, repairing/ replacing if necessary (Inspection III)
- Check all brake lines for damage and correct positioning.
- Wipe down all threaded unions on the brake lines and check them.
- Apply the brake hard and hold on in this position for a short time.
- After this, inspect the brake lines for leaks.
Warning: Immediately replace defective lines and threaded unions in the brake system.