MotoInstruction.ru
Mobile
version
Articles
& news
Site
map
Feed
back
Add to
bookmark
English Русский
Aprilia
BMW
Ducati
Harley
Honda
Kawasaki
Suzuki
Triumph
Yamaha
Honda:
Africa Twin▾
XRV750 (1989-2003) CRF1000L (2015-2020)
CB series▾
CB400SF [1] (1992-1999)
VTX series▾
VTX1800C (2001-2008)

Primary drive gear — removal, inspection and installation (Honda XRV750 Africa Twin)

  • Main
  • Honda
  • Africa Twin
  • XRV 750
  • Engine and systems
  • Transmission
  • Primary drive gear — removal, …
0
Note: On XL models, the timing rotor is mounted on the right-hand end of the crankshaft along with the primary drive gear.


On XRV models, the ignition timing triggers are incorporated in the alternator rotor, so ignore references to the rotor when removing the primary drive gear.

Removal


1. Remove the clutch (see Section 18).

2. On XL models, remove the ignition pulse generator coil(s) (see Chapter 5).

3. To unscrew the primary drive gear bolt the crankshaft must be prevented from turning. To do this, either unscrew the crankshaft end cap from the alternator cover (see illustration 9.2a) and counter-hold the crankshaft using a socket on the alternator rotor bolt (there is no danger of the bolt coming undone as it has a left-hand thread, and no danger if it being overtightened as it has a higher torque setting than the primary drive gear bolt), or alternatively obtain the gear-jamming tool (part No.07724-0010100), then refit the clutch housing and locate the tool between the primary drive and driven gears at the top.

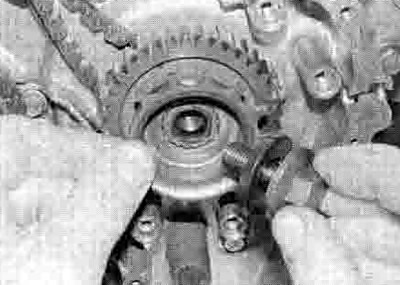
4. With the crankshaft locked, unscrew the primary drive gear bolt and remove the washer (see illustrations). On XL models remove the timing rotor, noting how it fits (see illustration).


21.4a. Unscrew the bolt (arrowed)...


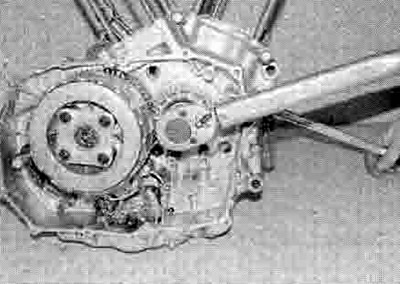
21.4b ... ocking the crankshaft as described...


21.4c ...and on XL models remove the timing rotor


5. Slide the primary drive gear off the end of the crankshaft, noting which way round it fits (see illustration).


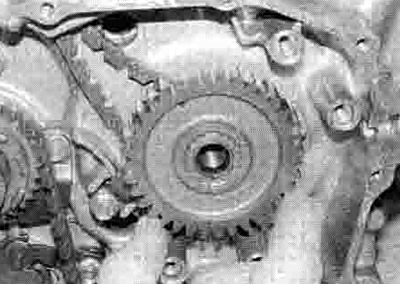
21.5. Slide the primary drive gear off the shaft


Inspection


6. Check the teeth of the primary drive gear and the corresponding teetn of the primary driven gear on the back of the clutch housing. Renew the clutch housing and/or primary drive gear if worn or chipped teeth are discovered.


Installation


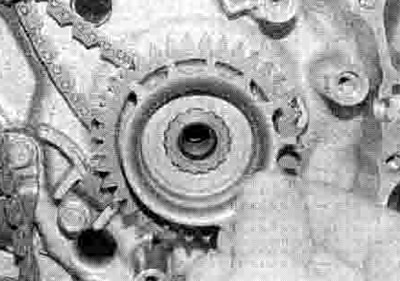
7. Slide the primary drive gear onto the crankshaft, aligning the wide splines, and making sure on XL models the 'OUT' mark on the gear faces outwards, and on XRV models the thinner sub-gear is on the outside (see illustration).


21.7. Slide the primary drive gear onto the shaft...


8. On XL models install the timing rotor, aligning the wide splines (see illustration).


21.8 ...and on XL models the timing rotor


9. Install the bolt with its washer and tighten it finger-tight (see illustration 21.4c). Lock the crankshaft using the same method as on removal (see Step 3). With the crankshaft locked, tighten the primary drive gear bolt to the torque setting specified at the beginning of the Chapter (see illustration). Note that if you are using the alternator rotor bolt to counter-hold the crankshaft there should be no danger of it coming loose as it is set to a higher torque setting.


21.9. Tighten the bolt to the specified torque


10. On XL models, install the ignition pulse generator coil(s) (see Chapter 5).

11. Install the clutch (see Section 18).
See this article in russian language
◀ Previous
Honda XRV750 : Transmission
Next ▶

Gearchange mechanism — removal, inspection and installation
Clutch cable — removal and installation
Clutch — removal, inspection and installation
Selector drum and forks — removal, inspection and installation
Transmission shafts — removal and installation
Transmission shafts — disassembly, inspection and reassembly
Similar articles about motorcycles of other brands
Suzuki V-Strom DL-1000K2/K9 (2002-2012): Primary drive gear Ducati ST2 (1997-2003): Disassembly primary drive gear Yamaha YZF-R1 (2009-2014): Checking the primary drive gear Kawasaki ZX6R/ZX600J (2000-2002): Oil pump drive gear — removal and installation Harley-Davidson XL1200 (2012-2023): Primary drive and clutch: XL models — removal, installation, disassembly and assembly БМВ F 650 GS (2000-2007): Removing double drive gear Triumph Rocket III (2004-2018): Exploded view — camshaft and cam drive Aprilia RS 125/3 (1998-2005): Drive chain maintenance
Link to this article in different formats
TEXTHTMLBB Code
Comments and feedback from visitors
No comments yet, you will be the first!


Add up two numbers: 42 + 22


CRF1000L (2015-2020) 
  • Information for owner
  • Introduction to manual
  • Technical characteristics
  • Maintenance
  • Engine and systems
  • Engine repair
  • Cooling system
  • Lubrication system
  • Ignition system
  • Fuel system
  • Fuel injection
  • Transmission
  • Dual clutch transmission
  • Running gear and frame
  • Frame and hinged elements
  • Front suspension and handlebar
  • Rear suspension
  • Brake system
  • ABS (anti-lock brake system)
  • Electric equipment
  • Starting and charging system
  • Equipment and devices
  • Immobilizer system
  • Electrical circuits
XRV750 (1989-2003) 
  • Information for owner
  • Introduction to manual
  • Weekly checks
  • Maintenance
  • Troubleshooting
  • Engine and systems
  • Engine repair
  • Transmission
  • Cooling system
  • Fuel and exhaust systems
  • Ignition system
  • Running gear and frame
  • Brake system
  • Wheels and tires
  • Frame and hinged elements
  • Electric equipment
  • Equipment and devices
  • Lighting and lamps
  • Starting and charging system
  • Electrical circuits
Aprilia BMW Ducati Harley Honda Kawasaki Suzuki Triumph Yamaha
MotoInstruction.ru © 2021–2025 | Sitemap | Articles | Contacts | Site search | Add to bookmarks | Mobile version