MotoInstruction.ru
Mobile
version
Articles
& news
Site
map
Feed
back
Add to
bookmark
English Русский
Aprilia
BMW
Ducati
Harley
Honda
Kawasaki
Suzuki
Triumph
Yamaha
Honda:
Africa Twin▾
XRV750 (1989-2003) CRF1000L (2015-2020)
CB series▾
CB400SF [1] (1992-1999)
VTX series▾
VTX1800C (2001-2008)

Clutch cable — removal and installation (Honda XRV750 Africa Twin)

  • Main
  • Honda
  • Africa Twin
  • XRV 750
  • Engine and systems
  • Transmission
  • Clutch cable — removal and ins…
0
Caution: Take care not to burn your hands on the exhaust if the engine is hot.


Removal


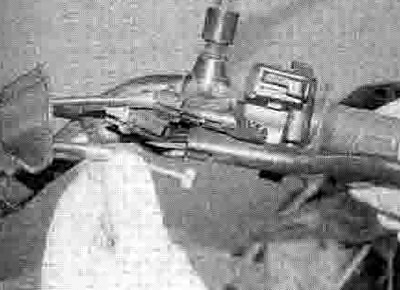
1. Fully slacken the cable adjuster locknuts from the cable holder mounted to the righthand side crankcase cover (see illustration). Access to it can be improved by removing either the belly-pan, the fairing side panel (XL600V and XRV750) or the fairing (XL650V), though this is not essential (just be careful not to let the spanner slip). Release the adjuster from the holder, noting how it fits and disconnect the cable end from the clutch release mechanism lever (see illustrations).


19.1a. Slacken the locknuts (arrowed)...


19.1b ...then slip the cable out of the holder


19.1c ...and free the end from the release arm


2. If necessary, unscrew the bolt securing the cable holder to the crankcase and remove the bracket (see illustration 18.35c).

3. Unscrew the bolt and remove the collar from the hand guard (see illustration). Counter-hold the screwhead and undo the nut on its bottom (see illustration). Remove the handguard (see illustration).


19.3a. Unscrew the bolt...


19.3b ...and the nut...


19.3c ...and remove the handguard


4. Pull back the rubber cover from the clutch adjuster at the handlebar end of the cable (see illustration). Fully slacken the lockring, then screw the adjuster fully in. This resets it to the beginning of its adjustment span.


19.4. Pull back the rubber cover, then slacken the lockring and thread the adjuster fully in


5. Align the slots in the adjuster and lockwheel with that In the lever bracket, then pull the outer cable end from the socket in the adjuster and release the inner cable from the lever (see illustrations).


19.5a. With the slots in the adjuster and lockwheel aligned, slip the cable out...


19.5b ...and detach its end from the lever


6. Tako note of the exact routing of the cable

and any guides that hold it - incorrect installation could result in poor steering movement. Carefully withdraw the cable - if it gets stuck do not be tempted to pull it out using force as you will only damage something.

Before removing the cable from the bike, tape the lower end of the new cable to the upper end of the old cable.

Slowly pull the lower end of the old cable out, guiding the new cable down into position. Using this method will ensure the cable is routed correctly.

Installation


7. Installation is the reverse of removal. Apply grease to the cable ends. Make sure the cable is correctly routed. Adjust the clutch cable (see Chapter 1).
See this article in russian language
◀ Previous
Honda XRV750 : Transmission
Next ▶

Clutch — removal, inspection and installation
Gearchange mechanism — removal, inspection and installation
Primary drive gear — removal, inspection and installation
Selector drum and forks — removal, inspection and installation
Transmission shafts — removal and installation
Transmission shafts — disassembly, inspection and reassembly
Similar articles about motorcycles of other brands
Kawasaki ZX6R/ZX600J (2000-2002): Clutch cable — removal and installation Suzuki V-Strom DL-650 (2004-2011): Clutch cable routing Aprilia RS 125/3 (1998-2005): Removing the clutch cable Yamaha FZ1 Fazer (2006-2015): Adjusting the clutch cable free play БМВ F 650 GS (2000-2007): Removing and installing clutch cable Triumph Rocket III (2004-2018): Clutch cable — removal and installation Harley-Davidson V-Rod (2002-2006): Manual clutch lever Ducati ST2 (1997-2003): Changing the clutch fluid
Link to this article in different formats
TEXTHTMLBB Code
Comments and feedback from visitors
No comments yet, you will be the first!


Add up two numbers: 32 + 45


CRF1000L (2015-2020) 
  • Information for owner
  • Introduction to manual
  • Technical characteristics
  • Maintenance
  • Engine and systems
  • Engine repair
  • Cooling system
  • Lubrication system
  • Ignition system
  • Fuel system
  • Fuel injection
  • Transmission
  • Dual clutch transmission
  • Running gear and frame
  • Frame and hinged elements
  • Front suspension and handlebar
  • Rear suspension
  • Brake system
  • ABS (anti-lock brake system)
  • Electric equipment
  • Starting and charging system
  • Equipment and devices
  • Immobilizer system
  • Electrical circuits
XRV750 (1989-2003) 
  • Information for owner
  • Introduction to manual
  • Weekly checks
  • Maintenance
  • Troubleshooting
  • Engine and systems
  • Engine repair
  • Transmission
  • Cooling system
  • Fuel and exhaust systems
  • Ignition system
  • Running gear and frame
  • Brake system
  • Wheels and tires
  • Frame and hinged elements
  • Electric equipment
  • Equipment and devices
  • Lighting and lamps
  • Starting and charging system
  • Electrical circuits
Aprilia BMW Ducati Harley Honda Kawasaki Suzuki Triumph Yamaha
MotoInstruction.ru © 2021–2025 | Sitemap | Articles | Contacts | Site search | Add to bookmarks | Mobile version