- Piston wall
- Cylinder wall
Vertical scratches → Replace the cylinder, and replace the piston and piston rings as a set.
2. Measure:
- Piston-to-cylinder clearance
a. Measure cylinder bore "C" with the cylinder bore gauge.
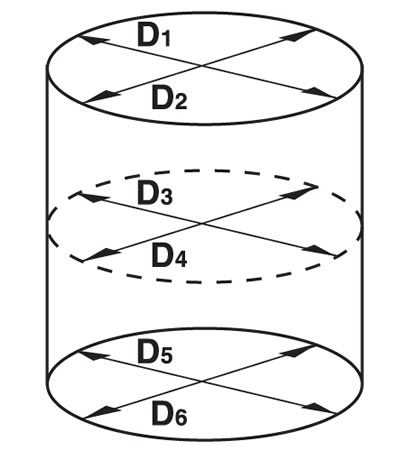
Measure cylinder bore "C" by taking side-to-side and front-to-back measurements of the cylinder. Then, find the average of the measurements.
Bore 78.000-78.010 mm (3.07093.0713 in). Taper limit 0.050 mm (0.0020 in). Out of round limit 0.050 mm (0.0020 in).
Bore = maximum of D1-D2.
Taper limit = maximum of D1 or D2 - maximum of D5 or D6.
Out of round limit = maximum of D1, D3 or D5 - minimum of D2, D4 or D6.

b. If out of specification, replace the cylinder, and replace the piston and piston rings as a set.
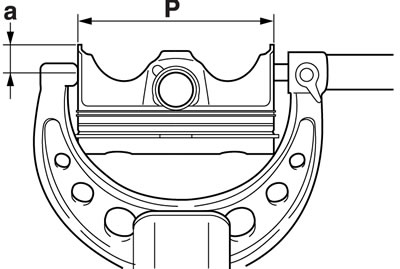
c. Measure piston skirt diameter "P" with the micrometer.
Piston diameter 77.975-77.990 mm (3.0699-3.0705 in).

a. 12 mm (0.47 in) from the bottom edge of the piston
d. If out of specification, replace the piston and piston rings as a set.
e. Calculate the piston-to-cylinder clearance with the following formula.
Piston-to-cylinder clearance = Cylinder bore "C" - Piston skirt diameter "P"
Piston-to-cylinder clearance 0.010-0.035 mm (0.0004-0.0014 in).
Limit 0.150 mm (0.0059 in).
f. If out of specification, replace the cylinder, and replace the piston and piston rings as a set.
