MotoInstruction.ru
Mobile
version
Articles
& news
Site
map
Feed
back
Add to
bookmark
English Русский
Aprilia
BMW
Ducati
Harley
Honda
Kawasaki
Suzuki
Triumph
Yamaha
Aprilia:
RS-series▾
RS125 [3] (1998-2005)
Shiver▾
SL750 (2007-2016)

Removing the front brake control (Aprilia RS125/3)

  • Main
  • Aprilia
  • RS-series
  • RS 125 [3]
  • Running gear and frame
  • Frame and hinged elements
  • Removing the front brake contr…
0
Read 1.2.1 carefully.

Torque wrench settings:
  • Reservoir retaining screw (1): 7 Nm (0.7 kg·m)

Partial removal


Release and remove the reservoir retaining screw (1).

Release and remove the two screws (2) securing the front brake control.

Note. Mark clamp position on the handlebar before removal to ensure correct positioning on assembly.


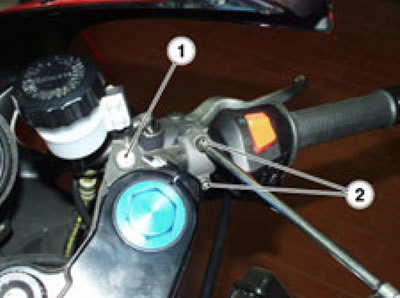
Remove the clamp and slide the front brake control aside. The front brake control is still retained by hose and wiring.

Warning!
  • Do not pull on hoses and wiring.
  • Keep the front brake fluid reservoir in a vertical position to avoid spilling brake fluid, leading to a dangerous condition.


Complete removal


Drain the front brake circuit; see 2.12.2.

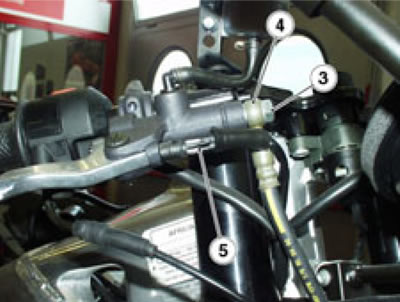
When all fluid has drained out, release and remove the screw (3) and collect the two sealing washers.


Note. Renew the two sealing washers on assembly. Use washers of the same type fitted originally.


Slide a plastic bag onto the fitting (4) and seal the bag using adhesive tape.

Prise the two connectors of the front brake light switch (5) off their seating in the front brake control using a small flat-blade screwdriver and remove.

Release and remove the reservoir mounting screw (1).

Release and remove the two screws (2) securing the front brake control.

Note. Mark clamp position on the handlebar before removal to ensure correct positioning on assembly.


Remove the clamp.

Remove the front brake control together with the front brake fluid reservoir.
See this article in russian language
This article has been reviewed: Artemy Kuzmin
◀ Previous
Aprilia RS125 3: Frame and hinged elements
Next ▶

Removing the throttle cable from intermediate pulley to oil pump
Removing the throttle control
Air scoop removal
Lower chain slider removal
Removing the clutch cable
Complete removal of the gear shift lever
Removing the rear brake lever
Removing the handlebars
Similar articles about motorcycles of other brands
Removing front brake calipers Yamaha FZ1 Fazer (2006-2015)
Removing and installing front brake disc BMW R 1150 GS (1999-2004)
Front Brake Disc — Checking, Removing and Installing Honda CB 400 SF (1992-1999)
Front brake control Ducati Monster 696 (2007-2014)
Exploded view — front brake master cylinder Triumph Rocket III (2004-2018)
Link to this article in different formats
TEXTHTMLBB Code
Comments and feedback from visitors
No comments yet, you will be the first!


Add up two numbers: 43 + 27


RS125 3 (1998-2005) 
  • Information for owner
  • Introduction to manual
  • Maintenance
  • Troubleshooting
  • Engine and systems
  • Engine repair
  • Fuel system
  • Cooling and lube system
  • Running gear and frame
  • Frame and hinged elements
  • Front suspension and handlebar
  • Rear suspension
  • Brake system
  • Wheels and tires
  • Electric equipment
  • Equipment and devices
  • Starting and charging system
Aprilia BMW Ducati Harley Honda Kawasaki Suzuki Triumph Yamaha
MotoInstruction.ru © 2021–2025 | Sitemap | Articles | Contacts | Site search | Add to bookmarks | Mobile version