
Speedometer removal
Warning! To prevent accidental vehicle start-up, which could cause death or serious injury, remove main fuse before proceeding.
Note. This part cannot be repaired. Replace upon failure.
1. Remove main fuse.
2. See Figure 6-7. Remove reset switch boot (11).
3. Remove screws (6) and back cover (5).
4. Disconnect speedometer connector [39B] (8).
5. Push out the speedometer (2) with gasket (3).
6. Inspect gasket (3), speedometer connector [39B] (8), and wiring. Repair or replace as required.
Speedometer installation
| FASTENER | TORQUE VALUE | |
| Speedometer and tachometer mounting screw: XR 1200X | 12-18 in·lbs | 1.4-2.0 Nm |
1. See Figure 6-7. Install gasket (3) on speedometer (2).
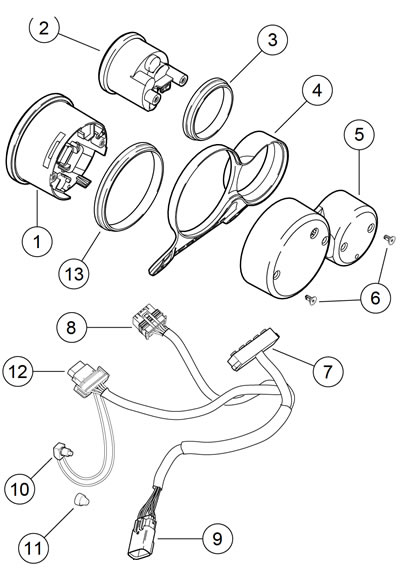
Figure 6-7. Instruments: XR 1200X: 1. Tachometer; 2. Speedometer; 3. Speedometer gasket; 4. Instrument housing/bracket; 5. Back cover; 6. Screw; 7. Indicator lamp module; 8. Speedometer connector [39B]; 9. Instrument harness connector [20A]; 10. Trip odometer reset switch; 11. Reset switch boot; 12. Tachometer connector [108B]; 13. Tachometer gasket
2. Orient face upright and press speedometer (2) into instrument housing/bracket (4).
3. Install speedometer connector [39B] (8).
4. Attach trip odometer reset switch (10) into squared boss on back cover (5) and secure with reset switch boot (11).
5. Place back cover over speedometer and tachometer while positioning harness to avoid damage. Rotate speedometer and tachometer as needed to align mounting holes. Install screws (6). Tighten to 12-18 in·lbs (1.4-2.0 Nm).
6. Install main fuse.
Trip odometer reset switch replacement
| PART NUMBER | TOOL NAME |
| HD-45929 | CRIMPING TOOL |
| FASTENER | TORQUE VALUE | |
| Speedometer and tachometer mounting screw: XR 1200X | 12-18 in·lbs | 1.4-2.0 Nm |
Warning! To prevent accidental vehicle start-up, which could cause death or serious injury, remove main fuse before proceeding.
1. Remove main fuse.
2. See Figure 6-7. Remove reset switch boot (11) from back cover (5).
3. Remove screws (6) and back cover (5).
4. Remove tachometer connector [108B] (12).
5. Follow instructions to push the trip reset socket terminals out the front of the tachometer connector [108B]. See A.10 DELPHI MICRO 64 SEALED CONNECTOR.
6. Cut off the socket terminals. Pull the faulty switch out of the connector.
7. Push the wires of a replacement switch through the tachometer connector [108B] (sockets 8, 11) and crimp new socket terminals using CRIMPING TOOL (Part No. HD-45929), on replacement switch wiring.
8. Draw the terminals back into the connector until the terminal seats.
9. Install tachometer connector [108B] (12).
10. Position reset switch in squared boss on back cover (5). Secure with a new reset switch boot (11).
11. Place back cover over speedometer and tachometer while positioning harness to avoid damage. Align mounting holes. Install screws (6). Tighten to 12-18 in·lbs (1.4-2.0 Nm).
12. Install main fuse.
Tachometer removal
Note. The speedometer and tachometer have backlight LEDs that cannot be replaced. If an LED fails, replace the entire unit.
Warning! To prevent accidental vehicle start-up, which could cause death or serious injury, remove main fuse before proceeding.
1. Remove main fuse.
2. See Figure 6-7. Remove reset switch boot (11) from back cover (5).
3. Remove screws (6) and back cover (5).
4. Open latches on each side of tachometer connector [108B] (12) and separate connector halves.
5. Push out the tachometer with gasket (13).
6. Inspect gasket, tachometer connector, trip odometer reset switch, reset switch boot and wiring. Repair or replace as required.
Tachometer installation
| FASTENER | TORQUE VALUE | |
| Speedometer and tachometer mounting screw: XR 1200X | 12-18 in·lbs | 1.4-2.0 Nm |
1. If replacing the trip odometer reset switch, see 6.5 SPEEDOMETER AND TACHOMETER: XR 1200X, Trip Odometer Reset Switch Replacement.
2. See Figure 6-7. Install gasket (13) on tachometer (1).
3. Orient face upright and press tachometer (1) into instrument housing/bracket (4).
4. Attach tachometer connector [108B] (12) to tachometer.
5. Attach trip odometer reset switch (10) into squared boss on back cover (5) and secure with reset switch boot (11).
6. Place back cover over speedometer and tachometer while positioning harness to avoid damage. Align mounting holes. Install screws (6). Tighten to 12-18 in·lbs (1.4-2.0 Nm).
7. Install main fuse.