
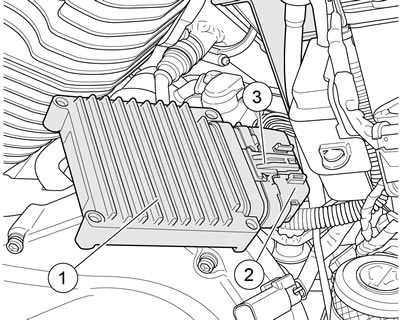
Figure 6-9. ECM: XL models: 1. ECM; 2. ECM connector; 3. ECM connector latch
Note. This part cannot be repaired. Replace upon failure.
XL Models: The ECM is mounted in front of the battery in a caddy.
XR 1200X: The ECM is mounted in a bracket on the rear fender under the seat.
Removal
XL models
Warning! To prevent accidental vehicle start-up, which could cause death or serious injury, remove main fuse before proceeding.
1. Remove main fuse.
2. See Figure 6-8. Remove fuel pump wiring (2) from ECM cover (4). Disconnect fuel pump connector [141].
3. Remove rear oxygen sensor (O2) wiring (3) from rear O2 sensor wiring clip (5) and ECM cover. Disconnect rear O2 connector [85].
4. Remove ECM cover fastener (1).
5. Slide ECM cover out from left side of vehicle.
6. Press the clip holding the ECM to the caddy and remove the ECM.
7. See Figure 6-9. Press the connector latch (3) and unplug ECM wiring harness connector (2) [78B] from ECM (1).
XR 1200X
Warning! To prevent accidental vehicle start-up, which could cause death or serious injury, remove main fuse before proceeding.
1. Remove main fuse.
2. Remove rear fender. See 2.35 REAR FENDER: XR 1200X.
3. See Figure 6-10. Remove fasteners (1) and ECM (2).
Installation
| FASTENER | TORQUE VALUE | |
| ECM cover fastener: XL Models | 30-60 in·lbs | 3.4-6.8 Nm |
| ECM fasteners: XR 1200X | 18-22 in·lbs | 2.0-2.5 Nm |
XL models
1. See Figure 6-9. Plug ECM wiring harness connector [78B] (2) into ECM. Gently press connector until latch (3) clicks in place.
2. Install ECM into caddy. Press ECM into caddy until it is held by clip.
3. See Figure 6-8. Slide ECM cover (4) into position from left side of motorcycle.
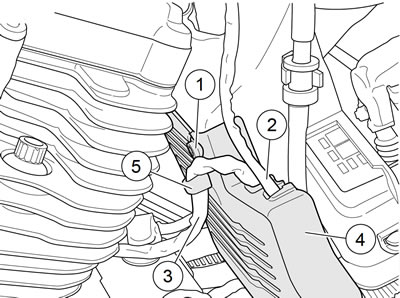
Figure 6-8. ECM cover: XL models: 1. ECM cover fastener; 2. Fuel pump wiring; 3. Rear O2 sensor wiring; 4. ECM cover; 5. Rear O2 sensor wiring clip
4. Install ECM cover fastener (1). Tighten to 30-60 in·lbs (3.4-6.8 Nm).
5. Connect rear O2 connector [85]. Install O2 sensor wiring (3) into ECM cover and clip (5)
6. Connect fuel pump connector [141]. Install fuel pump wiring (2) into ECM cover (4).
7. Install main fuse.
8. Perform password learn procedure. See 6.38 TSM/HFSM: PASSWORD LEARN.
XR 1200X
1. See Figure 6-10. Install ECM (2) and fasteners (1).

Figure 6-10. Electronic control module (ECM): XR 1200X: 1. Fastener (2); 2. Electronic Control Module
2. Tighten fasteners to 18-22 in·lbs (2.0-2.5 Nm).
3. Install rear fender. See 2.35 REAR FENDER: XR 1200X.
4. Install main fuse.
5. Perform password learn procedure. See 6.38 TSM/HFSM: PASSWORD LEARN.
Warning! After installing seat, pull upward on seat to be sure it is locked in position. While riding, a loose seat can shift causing loss of control, which could result in death or serious injury.
6. Install seat.