MotoInstruction.ru
Mobile
version
Articles
& news
Site
map
Feed
back
Add to
bookmark
English Русский
Aprilia
BMW
Ducati
Harley
Honda
Kawasaki
Suzuki
Triumph
Yamaha
Harley:
Street▾
750/500 (2014-2021)
Sportster▾
XL/XR1200 (2012-2023)
V-Rod▾
VRSCA (2002-2006)

Deutsch DTM sealed solid barrel mini terminal repair (Harley Sportster XL1200)

  • Main
  • Harley
  • Sportster
  • XL1200
  • Electric equipment
  • Equipment and devices
  • Deutsch DTM sealed solid barre…
0
PART NUMBERTOOL NAME
HD-42879ELECTRICAL CRIMPER TOOL

Preparing wire leads for crimping


For size 20, 16 and 12 contacts, wire ranges 26-12 AWG.

Strip 1/4 in (6.4 mm) of insulation from the wire lead.

Adjusting crimper tool


1. See Figure A-37. Squeeze the ELECTRICAL CRIMPER TOOL (Part # HD-42879) handles to cycle the crimp tool to open.


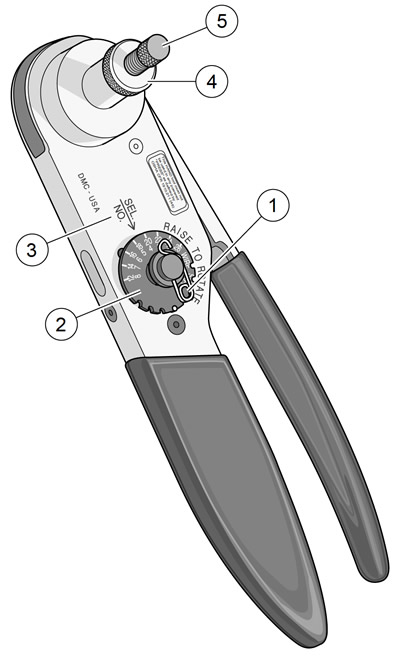
Figure A-37. Electrical crimper tool (HD-42879): 1. Locking pin; 2. Selector knob; 3. SEL. NO. arrow; 4. Knurled locknut; 5. Adjusting screw


2. Remove locking pin (1) from selector knob (2).

3. Raise selector knob. Roate knob until selected wire size stamped on wheel is aligned with "SEL. NO." arrow (3).

4. Loosen knurled locknut (4) and turn adjusting screw (5) clockwise (in) until it stops.

Crimping a barrel contact to wire lead


1. See Figure A-38. Turn tool over and drop contact barrel (1) into indentor cover (2) hole with the wire end out.


Figure A-38. Deutsch solid barrel: 1. Contact barrel; 2. Indentorcover; 3. Indentor point; 4. Stripped wire lead


2. Turn adjusting screw counterclockwise (out) until contact is flush with bottom of recess in indentor cover. Tighten knurled locknut.

3. Slowly squeeze handles of crimp tool until contact centers between the four indentor points (3).

4. Insert bare wire core strands of stripped wire lead (4) into contact barrel. Squeeze handle of crimp tool until tightly closed. Tool automatically opens when the crimping sequence is complete.

5. Remove wire lead with crimped contact from indentor.

Note. Adjust the crimper tool for each contact/wire size.


6. Install pin to lock selector knob.

Inspecting crimps


Inspect the crimp. All core wire strands are to be crimped in the barrel.
See this article in russian language
◀ Previous
Harley XL/XR1200 : Equipment and devices
Next ▶

Deutsch DTM sealed mini terminal repair
Deutsch DT sealed terminal repair
Deutsch DT sealed connector repair
Delphi GT 280 sealed 73-terminal ECM connector
Delphi GT 150 sealed connector repair
Delphi micro 64 sealed connector
JAE MX19 sealed connectors
Molex CMC sealed connectors
Molex MX 150 sealed connector repair
Tyco 070 multilock unsealed connector repair
Tyco GET 64 sealed connector
Tyco MCP sealed connector
Similar articles about motorcycles of other brands
Suzuki V-Strom DL-650 (2004-2011): Special tools for motorcycle repair Triumph Street Triple 765 (2017-2024): Barrel and pistons — exploded view Yamaha Drag Star 1100 (1998-2008): Special tools for motorcycle repair Kawasaki ZX6R/ZX600J (2000-2002): Valve seat — repair Honda CB 400 SF (1992-1999): Operating and repair materials BMW R 1150 GS (1999-2004): Engine repair specifications Ducati ST2 (1997-2003): A word of advice about repair Aprilia SL 750 Shiver (2007-2016): Special tools for motorcycle repair
Link to this article in different formats
TEXTHTMLBB Code
Comments and feedback from visitors
No comments yet, you will be the first!


Add up two numbers: 35 + 40


XL/XR1200 (2012-2023) 
  • Information for owner
  • Maintenance
  • Troubleshooting
  • Engine and systems
  • Engine repair
  • Lubrication system
  • Fuel system
  • Transmission
  • Running gear and frame
  • Frame and hinged elements
  • Front suspension and handlebar
  • Rear suspension
  • Brake system
  • Wheels and tires
  • Electric equipment
  • Equipment and devices
  • Lighting and lamps
  • Starting and charging system
  • Electrical circuits
Aprilia BMW Ducati Harley Honda Kawasaki Suzuki Triumph Yamaha
MotoInstruction.ru © 2021–2025 | Sitemap | Articles | Contacts | Site search | Add to bookmarks | Mobile version