Bulb replacement
1. Insert coin in notch of front or rear turn signal lens cap. Carefully twist coin until lens cap pops out of turn signal housing.
2. Replace bulb.
- a. Push bulb and turn counterclockwise.
- b. Pull bulb from socket when tab on bulb clears opening on socket.
- c. Coat base of new bulb with ELECTRICAL CONTACT LUBRICANT.
- d. Push new bulb in and turn clockwise to lock in place.
3. Snap lens cap back into housing.
All except XL 1200X
| FASTENER | TORQUE VALUE | |
| Turn signal, front, ball head studs | 96-144 in·lbs | 10.8-16.3 Nm |
| Turn signal clamp, front, screw | 96-120 in·lbs | 10.8-13.6 Nm |
Removal
Warning! To prevent spray of fuel, purge system of high-pressure fuel before supply line is disconnected. Gasoline is extremely flammable and highly explosive, which could result in death or serious injury.
1. Purge the fuel supply hose of high pressure gasoline. Disconnect fuel supply hose from fuel pump module. See 4.4 FUEL TANK: XL MODELS or 4.5 FUEL TANK: XR 1200X.
Warning! To prevent accidental vehicle start-up, which could cause death or serious injury, remove main fuse before proceeding.
2. Remove main fuse.
3. Remove fuel tank. See 4.4 FUEL TANK: XL MODELS or 4.5 FUEL TANK: XR 1200X.
4. Separate left and right wire harness caddies. See 6.27 MAIN WIRING HARNESS.
5. See Figure 6-64. Locate turn signal connector [31] (4) mounted on right wire harness caddy (2). Press latch (5) and separate connector halves.

Figure 6-64. Turn signal connector [31]: 1. Frame backbone; 2. Right wire harness caddy; 3. Left wire harness caddy; 4. Turn signal connector [31]; 5. Connector latch
6. Remove the corresponding socket terminals from connector [31B].
7. See Figure 6-65. Loosen the hex screw holding turn signal housing ball end stud to front of hand lever bracket.

Figure 6-65. Turn signal ball stud screw
8. Pull the wire conduit through the coil bracket, the fork clamp and handlebar clips.
Installation
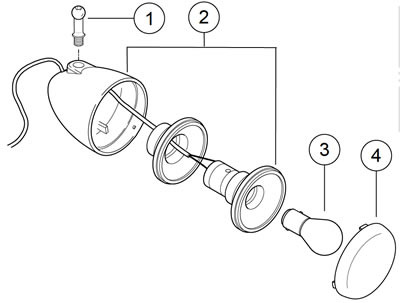
1. See Figure 6-66. Inspect the ball head stud (1) and replace as required. Tighten new ball head studs to 96-144 in·lbs (10.8-16.3 Nm).

Figure 6-66. Front turn signal components: all except XL 1200X: 1. Ball end stud; 2. Turn signal assembly; 3. Bulb; 4. Lens
2. Lay old turn signal housing and wires next to new and cut new wires to length.
3. Trim sheath back approximately 2.5 in (63.5 mm) and crimp new socket terminals onto wires.
4. Route wires through handlebar clips, between fork clamp and head lamp bracket and then through coil bracket.
5. Install housing ball end stud into the lever bracket and aim to front. Tighten to 96-120 in·lbs (10.8-13.6 Nm).
6. Insert socket terminals into turn signal connector.
7. Join the connector [31] halves. Reassemble left and right wire harness caddies. See 6.27 MAIN WIRING HARNESS.
8. Install fuel tank. See 4.4 FUEL TANK: XL MODELS or 4.5 FUEL TANK: XR 1200X.
9. Install main fuse.
Warning! Be sure that all lights and switches operate properly before operating motorcycle. Low visibility of rider can result in death or serious injury.
10. Test the turn signals.
XL 1200X
| FASTENER | TORQUE VALUE | |
| Turn signal housing to bracket: XL 1200X | 12-16 ft·lbs | 16.3-21.7 Nm |
| Fork bracket pinch screw | 30-35 ft·lbs | 40.7-47.5 Nm |
Removal
Warning! To prevent spray of fuel, purge system of high-pressure fuel before supply line is disconnected. Gasoline is extremely flammable and highly explosive, which could result in death or serious injury.
1. Purge the fuel supply hose of high pressure gasoline. Disconnect fuel supply hose from fuel pump module. See 4.4 FUEL TANK: XL MODELS.
Warning! To prevent accidental vehicle start-up, which could cause death or serious injury, remove main fuse before proceeding.
2. Remove main fuse.
3. Remove fuel tank. See 4.4 FUEL TANK: XL MODELS.
4. Separate left and right wire harness caddies. See 6.27 MAIN WIRING HARNESS.
5. Locate the turn signal connector [31] mounted on right wire harness caddy. Press latch and separate connector halves.
6. Remove the corresponding socket terminals from connector [31B].
7. Remove the turn signal bracket fastener (front fork bracket pinch screw) and washer and the bracket.
8. Remove the turn signal nut and lockwasher to remove the turn signal.
Installation
1. See Figure 6-67. Thread the turn signal leads through the bracket (1).

Figure 6-67. Front turn signal components: XL 1200X: 1. Turn signal bracket; 2. Turn signal assembly; 3. Lockwasher; 4. Nut; 5. Washer; 6. Fork pinch screw
2. Install the turn signal (2) with the lockwasher (3) and nut (4) and tighten to 12-16 ft·lbs (16.3-21.7 Nm).
3. Fit the bracket to the upper fork clamp.
4. Install and tighten the turn signal bracket fastener (6) and washer (5) (front fork bracket pinch screw) to 30-35 ft·lbs (40.7-47.5 Nm).
5. Insert socket terminals into turn signal connector.
6. Join the connector [31] halves. Reassemble left and right wire harness caddies. See 6.27 MAIN WIRING HARNESS.
7. Install the cable straps.
8. Install the fuel tank. See 4.4 FUEL TANK: XL MODELS.
9. Install main fuse.
Warning! Be sure that all lights and switches operate properly before operating motorcycle. Low visibility of rider can result in death or serious injury.
10. Verify operation of lighting system.
