
Note:
- This description applies to brake filling and bleeding devices with vacuum extraction of the brake fluid at the brake caliper.
- If other devices are used, comply with their manufacturers’ instructions.
Remove brake calipers.
Caution!
- Keep the brake caliper parallel to the brake disc when removing and installing.
- There is a risk of damage to the brake pads.
Remove the brake pads.
Release clamps securing handlebar.
Turn the front wheel and the handlebar to a position in which the brake fluid reservoir is horizontal.
Tighten the handlebar and secure the front wheel in this position.
Remove reservoir cover with rubber diaphragm.
Caution! Do not allow brake fluid to come into contact with painted parts of the motorcycle as brake fluid destroys paint.

Use resetting tool, BMW No. 341500, to force the pistons of the right-hand brake caliper fully back.
Take out the resetting tool and insert spacer, BMW No. 341520, in its place.
Use resetting tool, BMW No. 341500, to force the pistons of the left-hand brake caliper fully back, and allow the resetting tool to remain in position.
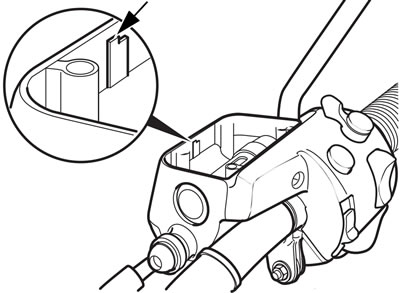
Top up the brake fluid level to the «MAX» mark (arrow).
Caution! When adding brake fluid, do not allow it to enter the holes for the reservoir lid screws.
[ABS] Begin by bleeding the pressure modulator.
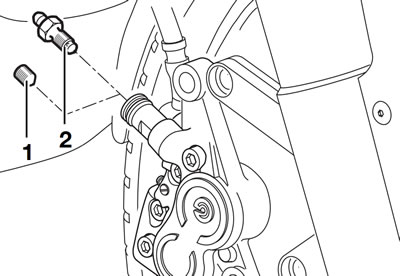
Wrap a cloth around the filler adapter on the right-hand brake caliper.
Remove the socket-head grub screw (1) from the filler adapter on the right-hand brake caliper.
Connect the brake bleeding device to bleed screw (2).
Screw the bleed screw all the way into the filler adapter (valve in filler adapter closed).
Open the bleed screw by half a turn (valve open).
Draw off brake fluid until it emerges clear and free from air bubbles.
Caution!
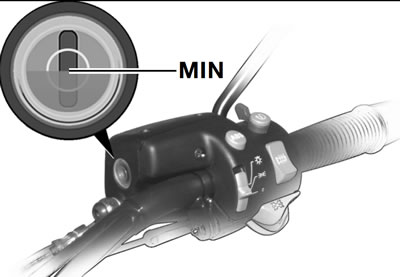
- While bleeding the system, do not allow the brake fluid level to drop below the «MIN» mark, as otherwise air will be drawn into the brake system.
- Bleed the system again if this happens.
Remove the bleed screw.
Disconnect the brake bleeding device from the bleed screw.
Reinstall socket-head grub screw (1) in the filler adapter.
Caution! The motorcycle is not permitted on the road without the grub screw in place and secure in the filler adapter.
Connect the brake bleeding device to the bleed screw of the left-hand brake caliper.
Open the bleed screw by half a turn.
Draw off brake fluid until it emerges clear and free from air bubbles.
Close the bleed screw.
Assembly is the reverse of the disassembly procedure.
Top up the brake fluid until the level reaches the «MAX» mark.
Wipe the rim of the reservoir, the rubber gaiter and the cover to remove brake fluid, and carefully re-assemble the components.
Resecure the handlebar in the correct position (punch marks aligned).
Recheck the brake-fluid level.
Place the motorcycle on its centre stand.
Turn the handlebar to the right.
Check that the front wheel is on the ground.
Required level with new brake pads:
- (Initial fill quantity) make sure that no bubbles are visible in the sight glass
Handlebar centred.
Check that the front wheel is on the ground.
Minimum fluid level:
- Brake pads worn: not less than — half way up sight glass
Check the function of the brake system.
Brake fluid grade — DOT 4
Tightening torque:
- Brake caliper to fork slider tube — 40 Nm
- Grub screw in filler adapter — 10 Nm
- Bleed screw in front brake caliper — 14 Nm
- Handlebar to fork bridge — 21 Nm
Additional information for [ABS]
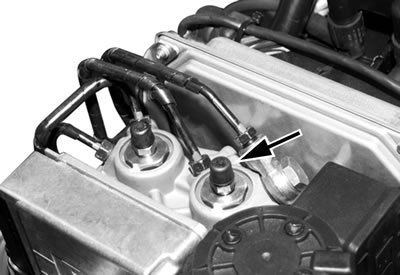
Before bleeding the brake caliper, connect the brake bleeding device to the bleed screw on the pressure modulator for the front brake (arrow) marked VR (mark for rear brake is HR).
Open the bleed screw by half a turn.
Draw off brake fluid until it emerges clear and free from air bubbles.
Close the bleed screw.
Tightening torque: Bleed screw in pressure modulator — 14 Nm