
Note. HDI XL 883N and XL 1200X/V models have a sealed LED tail lamp, stop lamp and turn signal assembly in each rear turn signal housing.
The domestic XL 883N and XL 1200X/V rear turn signal lamps also serve as tail lamps and stop lamps. One filament provides the tail lamp function while the other filament provides the turn signal and stop lamp.
See Figure 6-82. In order for a single filament to function both as turn signal and stop lamp, a converter module is required. The converter module is located in front of the battery, under the frame "Y" section.
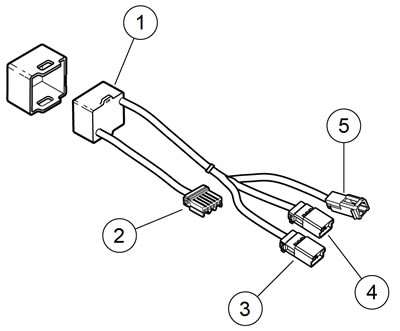
Figure 6-82. Converter and interconnect harness: 1. Converter module; 2. Main harness connector [7]; 3. License plate lamp connector [40]; 4. Right turn signal connector [18]; 5. Left turn signal connector [19]
Removal
1. Remove seat.
Warning! Prevent accidental vehicle start-up, which could cause death or serious injury. First disconnect negative (-) battery cable at engine and then positive (+) cable from battery.
2. Remove battery. See 1.22 BATTERY MAINTENANCE.
3. See Figure 6-83. Unplug the following harness connectors:
- a. Antenna [209] (1) (H-DSSS equipped motorcycles only)
- b. Right rear lighting harness [18] (2)
- c. Left rear lighting harness [19] (3)
- d. License plate lamp harness [40] (4)
- e. Main wiring harness [7] (5)
- f. Engine harness connector [145] (6)
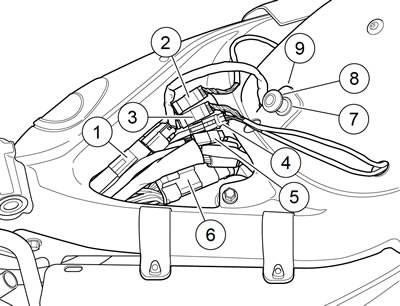
Figure 6-83. Rear lighting harness connectors: XL 883N, XL 1200X/V: 1. Antenna [209] (H-DSSS equipped vehicles only); 2. Right rear lighting harness connector [18]; 3. Left rear lighting harness connector [19]; 4. License plate lamp harness [40]; 5. Main wiring harness connector [7]; 6. Engine harness connector [145]; 7. Flat washer; 8. Seat post; 9. Frame crossmember tab
4. See Figure 6-84. Remove ECM caddy fastener.

Figure 6-84. ECM caddy fastener
5. Remove right side cover.
6. Remove fastener securing bracket to oil tank.
7. Remove barbed cable strap securing temperature sensor harness to bracket.
8. See Figure 6-85. Remove bracket fasteners (2).
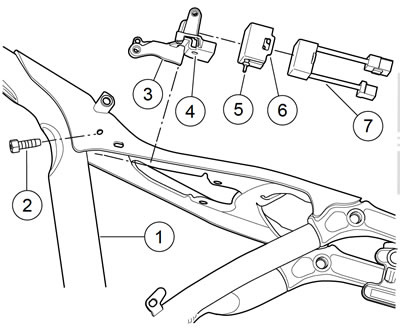
Figure 6-85. Converter module: 1. Frame; 2. Bracket fastener (3); 3. Bracket; 4. Mounting tab hole; 5. Rubber mounting tab; 6. Module holder; 7. Module
9. Remove bracket (3) with converter module (7).
10. Remove cable strap securing temperature sensor wire to oil tank mounting bracket.
11. Remove rubber mounting tab (5) from mounting tab hole
(4) to release module from bracket.
Installation
| FASTENER | TORQUE VALUE | |
| ECM caddy fastener | 72-96 in·lbs | 8.1-10.8 Nm |
| Converter module bracket fasteners, rear lighting | 36-60 in·lbs | 4.1-6.8 Nm |
1. Feed converter module/interconnect harness connectors up through battery compartment, forward of battery strap bracket.
2. See Figure 6-85. Install module (7) and module holder (6) into bracket (3) by pulling rubber mounting tab (5) into mounting tab hole (4).
3. Position bracket up inside frame, under "Y" section.
4. Install but do not tighten bracket fasteners (2).
5. See Figure 6-84. Install ECM caddy fastener. Tighten to 72-96 in·lbs (8.1-10.8Nm).
6. Tighten bracket fasteners to 36-60 in·lbs (4.1-6.8 Nm).
7. Secure temperature sensor wire to oil tank mounting bracket with a cable strap.
8. Install right side cover.
9. See Figure 6-83. Plug in the following harness connectors:
- a. Antenna [209] (1)
- b. Right rear lighting harness [18] (2)
- c. Left rear lighting harness [19] (3)
- d. License plate lamp harness [40] (4)
- e. Main wiring harness [7] (5)
- f. Engine harness connector [145] (6)
10. Install battery. See 1.22 BATTERY MAINTENANCE.
Warning! Be sure headlamp, tail and stop lamp and turn signals are operating properly before riding. Poor visibility of rider to other motorists can result in death or serious injury.
11. Close left side cover. See 2.18 LEFT SIDE COVER.
Warning! After installing seat, pull upward on seat to be sure it is locked in position. While riding, a loose seat can shift causing loss of control, which could result in death or serious injury.
12. Install seat.
13. Verify operation of lighting system.