
Removal
1. Remove left side cover. See 2.18 LEFT SIDE COVER.
2. See Figure 6-13. Slide main fuse and holder (1) toward rear of motorcycle to detach from battery strap (4).

Figure 6-13. Main fuse and battery location: all models: 1. Main fuse and holder; 2. Positive (+) battery cable holder; 3. Positive (+) battery terminal (under protective rubber boot); 4. Battery strap; 5. Screw; 6. Data link connector
3. Remove battery. See 1.22 BATTERY MAINTENANCE.
4. Disconnect negative (-) battery cable from crankcase.
5. Inspect main fuse wiring harness and holder
6. Note routing of negative (-) battery cable around frame downtube.
7. Inspect positive (+) and negative (-) cables for cuts, fraying or other damage. See 1.22 BATTERY MAINTENANCE.
8. See Figure 6-14. As required, pull back rubber cap (3) and using a 12 mm wrench, remove nut with captive lockwasher (5) and positive (+) battery cable (2) from starter post (4).
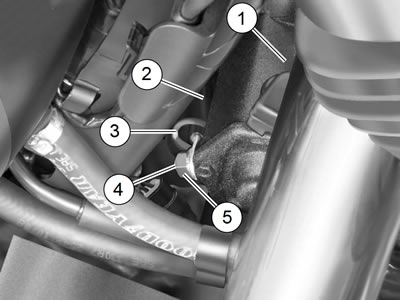
Figure 6-14. Positive (+) cable starter post connection: all models: 1. Starter assembly; 2. Positive (+) battery cable; 3. Rubber cap; 4. Starter post; 5. Nut with captive lockwasher
Installation
| FASTENER | TORQUE VALUE | |
| Battery negative terminal screw | 60-70 in·lbs | 6.8-7.9 Nm |
| Battery positive terminal screw | 60-70 in·lbs | 6.8-7.9 Nm |
| Battery strap screw | 36-60 in·lbs | 4.1-6.8 Nm |
| Battery positive cable to starter post locknut | 60-85 in·lbs | 6.8-9.6 Nm |
| Battery negative cable to crankcase nut | 55-75 in·lbs | 6.2-8.5 Nm |
1. Apply a light coat of petroleum jelly or corrosion retardant material to the negative battery terminal.
2. Slide battery in battery tray. Connect negative (-) battery cable to battery. Tighten to 60-70 in·lbs (6.8-7.9 Nm).
Warning! Connect positive (+) battery cable first. If positive (+) cable should contact ground with negative (-) cable connected, the resulting sparks can cause a battery explosion, which could result in death or serious injury.
3. See Figure 6-13. With negative (-) battery cable disconnected from ground on crankcase, install the fuse cable and the positive (+) battery cable.
- a. Thread fastener through main fuse cable.
- b. Thread fastener through the positive (+) battery cable.
- c. Thread fastener into the positive battery terminal (3).
- d. Tighten to 60-70 in·lbs (6.8-7.9 Nm).
4. Apply a light coat of petroleum jelly or corrosion retardant material to the positive battery terminal. Place protective rubber boot over terminal.
5. Hook top of battery strap (4) to battery tray mount on top of battery. Install screw (5). Tighten to 36-60 in·lbs (4.16.8 Nm).
6. Place positive battery cable into holder on ECM caddy.
7. Hook main fuse and holder (1) to pin on battery strap and slide forward until it snaps into place.
8. Hook data link connector [91A] (6) to pin on battery strap and slide forward until it snaps into place.
9. See Figure 6-14. Install positive (+) battery cable (2) and nut with captive lockwasher (5) on starter post (4). Using a 12 mm wrench, tighten to 60-85 in·lbs (6.8-9.6 Nm).
10. Push rubber cap (3) over starter post.
11. Place negative battery cable connector onto stud on crankcase boss behind starter motor assembly. Thread nut onto crankcase ground stud behind starter motor.
12. See Figure 6-15. Press negative battery cable connector against cable stop on crankcase. Using a swivel socket, tighten to 55-75 in·lbs (6.2-8.5 Nm).
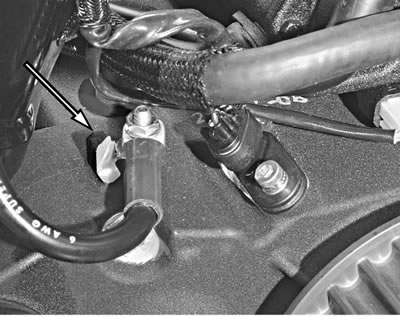
Figure 6-15. Negative battery cable stop on crankcase (typical)
Warning! After installing seat, pull upward on seat to be sure it is locked in position. While riding, a loose seat can shift causing loss of control, which could result in death or serious injury.
13. Install seat.