
General
Warning! Batteries contain sulfuric acid, which could cause severe burns to eyes and skin. Wear a protective face shield, rubberized gloves and protective clothing when working with batteries. KEEP BATTERIES AWAY FROM CHILDREN.
Warning! Never remove warning label attached to top of battery. Failure to read and understand all precautions contained in warning, could result in death or serious injury.
Warning! Batteries, battery posts, terminals and related accessories contain lead and lead compounds, and other chemicals known to the State of California to cause cancer, and birth defects or other reproductive harm. Wash hands after handling.
Notice. Keep battery clean and lightly coat terminals with petroleum jelly to prevent corrosion. Failure to do so could result in damage to battery terminals.
AGM batteries are permanently sealed, maintenance-free, valve-regulated, lead/calcium and sulfuric acid batteries. The batteries are shipped pre-charged and ready to be put into service. Do not attempt to open these batteries for any reason.
Note. For charging information, see 1.22 BATTERY MAINTENANCE, Charging Battery. For testing information, see the electrical diagnostic manual.
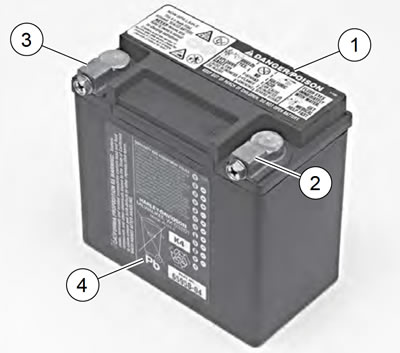
Figure 1-67. Battery: 1. Warning label; 2. Positive (+) terminal; 3. Negative (-) terminal; 4. Warranty/date code label

Figure 1-68. Battery warning label: 1. Contents are corrosive; 2. Wear safety glasses; 3. Contents are explosive; 4. Keep flames away; 5. Read instructions; 6. Keep away from children
Table 1-21. Antidotes for battery acid
| CONTACT | TREATMENT |
| External | Flush with water. |
| Internal | Drink large quantities of milk or water, followed by milk of magnesia, vegetable oil or beaten eggs. Get immediate medical attention. |
| Eyes | Flush with water. Get immediate medical attention. |
Battery disconnection and removal
Warning! Disconnect negative (-) battery cable first. If positive (+) cable should contact ground with negative (-) cable connected, the resulting sparks can cause a battery explosion, which could result in death or serious injury.
1. Open left side cover.
Note. Models with sirens: Verify that fob is present and turn ignition key to IGNITION before removing main fuse or disconnecting battery.
2. See Figure 1-69. Using a swivel socket (2), remove nut that secures the negative (-) battery cable (1) connector to ground stud (4) on crankcase boss behind starter motor assembly (3). Remove cable connector from stud.
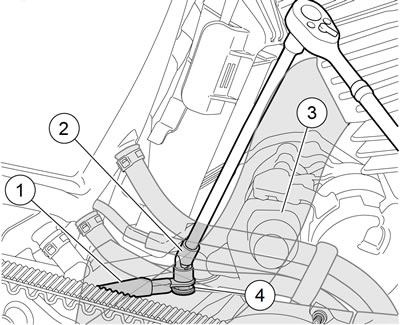
Figure 1-69. Negative (-) Battery Connection: 1. Negative (-) battery cable; 2. Swivel socket; 3. Starter motor assembly; 4. Ground stud
3. See Figure 1-70. Pull end of negative (-) cable (2) forward gently to free it from cable holder (1).

Figure 1-70. Negative (-) Battery Cable Holder: 1. Cable holder; 2. Negative battery cable
4. See Figure 1-71. Press main fuse holder (1) toward the rear of the motorcycle until it pops off its mounting pin on battery strap (4). Remove main fuse holder from battery strap.

Figure 1-71. Main Fuse and Battery Location: All Models: 1. Main fuse and holder; 2. Positive (+) battery cable holder; 3. Positive (+) battery terminal (under protective rubber boot); 4. Battery strap; 5. Screw; 6. Data link connector
5. Press data link connector (6) toward the rear of the motorcycle until it pops off its mounting pin on battery strap. Remove the connector from battery strap.
6. Remove battery strap screw (5). Unhook battery strap from battery tray mount on top of battery and remove strap.
7. Lift up protective rubber boot covering battery positive (+) terminal (3). Remove screw from battery positive (+) terminal and remove positive (+) battery cable.
8. Disconnect positive (+) battery cable from cable holder (2).
9. Slide the battery (with attached negative cable) out the left side until the negative battery cable is accessible.
10. Disconnect the negative battery cable at the battery (-) terminal. Leave the cable on the vehicle.
11. Remove battery from battery tray. Note routing of negative (-) battery cable around frame downtube.
12. If battery is to be stored out of the motorcycle, close left side cover.
Cleaning and inspection
Note. Battery top must be clean and dry. Dirt and electrolyte on top of the battery causes battery to self-discharge.
1. Clean battery top with a solution of baking soda (sodium bicarbonate) and water (5 teaspoons baking soda per quart or liter of water).
2. When the solution stops bubbling, rinse off the battery with clean water.
3. Clean cable connectors and battery terminals using a wire brush or sandpaper. Remove any oxidation.
4. Inspect the battery screws, and cables for breakage, loose connections and corrosion.
5. Check the battery terminals for melting or damage caused by over-tightening.
6. Inspect the battery for discoloration, raised top or a warped or distorted case. This might indicate that the battery has been frozen, overheated or overcharged.
7. Inspect the battery case for cracks or leaks.
Voltmeter test
Warning! Batteries contain sulfuric acid, which could cause severe burns to eyes and skin. Wear a protective face shield, rubberized gloves and protective clothing when working with batteries. KEEP BATTERIES AWAY FROM CHILDREN.
Warning! Never remove warning label attached to top of battery. Failure to read and understand all precautions contained in warning, could result in death or serious injury.
Voltmeter test
The voltmeter test provides a general indicator of battery condition. Check the voltage of the battery to verify that it is fully charged.
1. If the open circuit (disconnected) voltage reading is below 12.6 V:
- a. Charge the battery.
- b. Check the voltage after the battery has set for at least one hour.
2. If the voltage reading is 12.7 V or above:
- a. Perform a battery diagnostic test. See the electrical diagnostic manual for the load test procedure.
- b. Refer to Table 1-22.
Table 1-22. Voltmeter test for battery charge conditions
| VOLTAGE (OCV) | STATE OF CHARGE |
| 12.7 V | 100% |
| 12.6 V | 75% |
| 12.3 V | 50% |
| 12.0 V | 25% |
| 11.8 V | 0% |
Charging battery
Safety precautions
An automatic, constant monitoring battery charger/tender with a charging rate of 5 amps or less at less than 14.6 volts is recommended. The use of constant current chargers (including trickle chargers) to charge sealed AGM batteries is not recommended.
Any overcharge will cause dry-out and premature battery failure. Always review charger instructions before charging a battery. In addition to the manufacturer's instructions, follow these general safety precautions:
- Always wear eye, face and hand protection.
- Always charge batteries in a well-ventilated area.
- Turn the charger off before connecting or disconnecting the leads to the battery to avoid dangerous sparks.
- Never try to charge a visibly damaged or frozen battery.
- Connect the charger leads to the battery. Red positive lead to the positive terminal. Black negative lead to the negative terminal. If the battery is still in the vehicle, connect the negative lead to the chassis ground. Verify that the ignition and all electrical accessories are turned off.
- Verify that charger leads to battery are not separated, frayed or loose.
- If the battery temperature exceeds 110°F (43°C) during charging, discontinue charger and allow the battery to cool.
Using a battery charger
Charge the battery if:
- Vehicle lights appear dim.
- Electric starter sounds weak.
- Battery has not been used for an extended period of time.
Warning! Explosive hydrogen gas, which escapes during charging, could cause death or serious injury. Charge battery in a well-ventilated area. Keep open flames, electrical sparks and smoking materials away from battery at all times. KEEP BATTERIES AWAY FROM CHILDREN.
Notice. If battery releases an excessive amount of gas during charging, decrease the charging rate. Overheating can result in plate distortion, internal shorting, drying out or damage.
1. Check charge state with voltmeter test. If battery voltage is less than 12.7 volts, see the next step.
Notes:
- Most constant monitoring battery chargers are completely automatic. They can be left connected to both AC power and to the battery that is being charged. When leaving this type of charger connected for extended periods of time, periodically check the battery to see if it is unusually warm. This is an indication that the battery may have a weak cell or internal short. Read the manufacturer's instructions for the charger.
- Do not use battery chargers that produce excessively high voltage designed for flooded batteries or excessively high current designed for much larger batteries. Charging should be limited to 5 amps maximum at no more than 14.6 volts.
Warning! Unplug or turn OFF battery charger before connecting charger cables to battery. Connecting cables with charger ON can cause a spark and battery explosion, which could result in death or serious injury.
Notice. Do not reverse the charger connections described in the following steps or the charging system of the motorcycle could be damaged.
2. Connect red battery charger lead to the positive terminal and black battery charger lead to the negative terminal of the battery.
Note. If the battery is still in the vehicle, connect the negative lead to the chassis ground. Be sure that the ignition and all electrical accessories are turned off.
3. Step away from the battery and turn on the charger.
Warning! Unplug or turn OFF battery charger before disconnecting charger cables from battery. Disconnecting clamps with charger ON can cause a spark and battery explosion, which could result in death or serious injury.
4. After the battery is fully charged, turn the charger OFF. Disconnect the black battery charger lead to the negative terminal of the battery.
5. Disconnect the red battery charger lead to the positive terminal of the battery.
6. Mark the charging date on the battery.
7. Perform a battery diagnostic test to determine the condition of the battery. See the electrical diagnostic manual.
8. If charging a battery because voltmeter test reading was below 12.6 V, perform voltmeter test. See the electrical diagnostic manual.
Battery installation and connection
| FASTENER | TORQUE VALUE | |
| Battery negative terminal screw | 60-70 in·lbs | 6.8-7.9 Nm |
| Battery strap screw | 36-60 in·lbs | 4.1-6.8 Nm |
| Battery positive terminal screw | 60-70 in·lbs | 6.8-7.9 Nm |
| Battery cable connector nut | 55-75 in·lbs | 6.2-8.5 Nm |
Notice: Connect the cables to the correct battery terminals. Failure to do so could result in damage to the motorcycle electrical system.
1. Open left side cover.
2. Apply a light coat of petroleum jelly or corrosion retardant material to the negative (-) battery terminal.
3. Slide fully charged battery into battery tray.
4. Insert screw through negative battery cable and into negative battery terminal. Thread screw into terminal. Tighten screw to 60-70 in·lbs (6.8-7.9 Nm).
5. Verify that the negative (-) battery cable is disconnected from the ground stud on crankcase.
6. Hook top of battery strap (4) to battery tray mount on top of battery. Install strap screw (5). Tighten to 36-60 in·lbs (4.1-6.8 Nm).
7. Route main positive battery cable through holders on electrical bracket.
8. Hook main fuse holder (1) to top pin on battery strap and slide forward until it snaps into place.
9. Hook data link connector (6) to bottom pin on battery strap and slide forward until it snaps into place.
10. See Figure 1-70. Press negative (-) battery cable (2) into cable holder (1).
Warning! Connect positive (+) battery cable first. If positive (+) cable should contact ground with negative (-) cable connected, the resulting sparks can cause a battery explosion, which could result in death or serious injury.
11. See Figure 1-71. With negative battery cable disconnected, insert positive terminal screw through main fuse cable then main positive battery cable. Install screw into positive battery terminal (3). Tighten to 60-70 in·lbs (6.8-7.9 Nm).
12. Apply a light coat of petroleum jelly or corrosion retardant material to the positive (+) battery terminal. Place protective rubber boot over terminal.
13. See Figure 1-69. Place negative (-) battery cable connector onto ground stud (4) on crankcase boss behind starter motor assembly (3). Thread nut onto stud.
14. See Figure 1-72 or Figure 1-73. Press negative (-) battery cable connector (1) against cable stop (2) on crankcase and tighten nut (3) to 55-75 in·lbs (6.2-8.5 Nm).
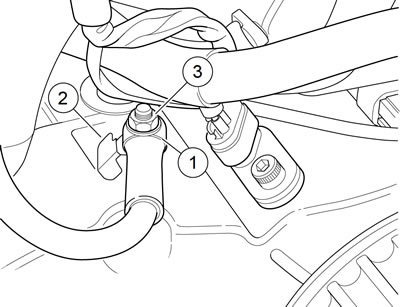
Figure 1-72. Attaching Negative (-) Battery Cable to Ground Stud Crankcase: XL Models: 1. Negative battery cable connector; 2. Cable stop; 3. Nut
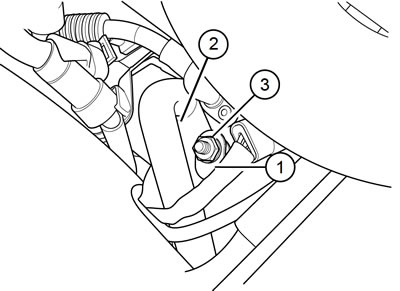
Figure 1-73. Attaching Negative (-) Battery Cable to Ground Stud Crankcase: XR 1200X: 1. Negative battery cable connector; 2. Cable stop; 3. Nut
15. Close left side cover.
Storage
| PART NUMBER | TOOL NAME |
| 99863-01A | GLOBAL BATTERY CHARGER |
Warning! Batteries contain sulfuric acid, which could cause severe burns to eyes and skin. Wear a protective face shield, rubberized gloves and protective clothing when working with batteries. KEEP BATTERIES AWAY FROM CHILDREN.
If the motorcycle is stored with the security system armed, connect an automatic, constant monitoring battery charger/tender to maintain battery charge. Refer to the Harley-Davidson Parts and Accessories catalog.
If the motorcycle is stored with the battery installed, without a GLOBAL BATTERY CHARGER, and with the security system not armed, remove main fuse.
If the motorcycle will not be operated for several weeks, such as during the winter season, remove the battery from the motorcycle and fully charge.
See Figure 1-74. A battery that is removed from the vehicle is affected by self-discharge. A battery that is stored in the vehicle is affected by self-discharge and, more significantly, by parasitic loads. A parasitic load is caused by things like diode leakage or maintaining computer memory with the vehicle turned off.
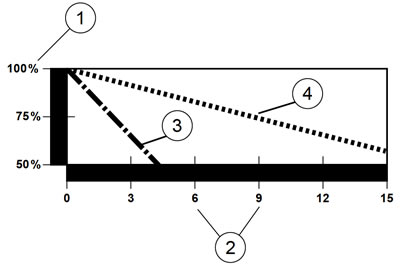
Figure 1-74. Effective Rate of Temperature on Battery Self-discharging Rate: 1. Capacity; 2. Months of non-use; 3. Measured at 105°F (40°C); 4. Measured at 77°F (25°C)
Batteries self-discharge at a faster rate at higher ambient temperatures. To reduce the self-discharge rate, store battery in a cool, dry place.
Charge the battery every two weeks if stored in the vehicle. Charge the battery once per month if stored out of the vehicle.
Note. Use the GLOBAL BATTERY CHARGER (Part No. 99863-01A) to maintain battery charge for extended periods of time without risk of overcharging or boiling.