
Removal
Warning! To prevent spray of fuel, purge system of high-pressure fuel before supply line is disconnected. Gasoline is extremely flammable and highly explosive, which could result in death or serious injury.
1. Purge the fuel supply hose of high pressure gasoline. Disconnect fuel supply hose from fuel pump module. See 4.4 FUEL TANK: XL MODELS or 4.5 FUEL TANK: XR 1200X.
Warning! To prevent accidental vehicle start-up, which could cause death or serious injury, remove main fuse before proceeding.
2. Remove main fuse.
3. Remove seat.
4. Remove fuel tank. See 4.4 FUEL TANK: XL MODELS or 4.5 FUEL TANK: XR 1200X.
5. See Figure 6-24. Remove ignition switch face nut (5).
6. Remove mounting screw (7). Remove switch cover (3). Remove switch (2) from switch cover (3).
7. Remove cable strap securing switch harness to wire harness caddy.
8. Cut switch wires 3.0 in (76.2 mm) from switch.
9. Remove harness covering.
Installation
| PART NUMBER | TOOL NAME |
| HD-39969 | ULTRA TORCH UT-100 |
| FASTENER | TORQUE VALUE | |
| Ignition switch mounting screw | 35-45 in·lbs | 4.0-5.1 Nm |
1. Slide replacement conduit on harness wires.
Warning! Be sure to follow manufacturer's instructions when using the UltraTorch UT-100 or any other radiant heating device. Failure to follow manufacturer's instructions can cause a fire, which could result in death or serious injury.
2. Observing color codes, install seal splice connectors to harness wires. Complete sealed splice to new ignition switch. Seal splice connectors with ULTRA TORCH UT-100 (Part No. HD-39969) or other radiant heating device. See A.23 SEALED SPLICE CONNECTOR.
3. Slide conduit over sealed splice connectors.
4. See Figure 6-24. Insert ignition switch into hole of switch cover. The word "TOP" stamped on the switch body should face upward toward the lettering on the switch position decal. Loosely install face nut (5).
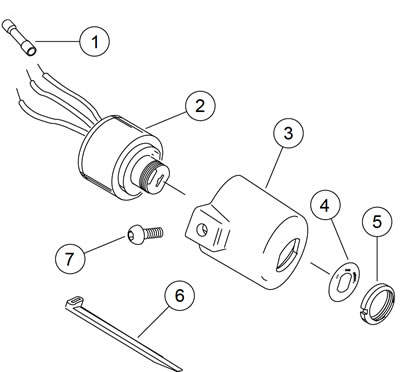
Figure 6-24. Ignition switch: 1. Sealed splice connector; 2. Ignition switch; 3. Switch cover; 4. Decal; 5. Face nut; 6. Cable strap; 7. Mounting screw
5. Install mounting screw (7). Tighten to 35-45 in·lbs (4.05.1 Nm).
6. Tighten face nut (5) to secure switch (2) within cover (3).
7. Using new cable strap (6), secure ignition switch harness to wire harness caddy.
8. Install fuel tank. See 4.4 FUEL TANK: XL MODELS or 4.5 FUEL TANK: XR 1200X.
Warning! After installing seat, pull upward on seat to be sure it is locked in position. While riding, a loose seat can shift causing loss of control, which could result in death or serious injury.
9. Install seat.
10. Install main fuse.
Warning! Be sure that all lights and switches operate properly before operating motorcycle. Low visibility of rider can result in death or serious injury.
11. Check ignition switch.