
The ignition coil is mounted on the left half of a two-piece bracket assembly. The right half of the bracket assembly secures the ignition switch and right wire harness caddy to the vehicle. The two bracket halves are secured together with a screw.
Note. This part cannot be repaired. Replace upon failure.
See the electrical diagnostic manual for troubleshooting.
Removal
Warning! To prevent spray of fuel, purge system of high-pressure fuel before supply line is disconnected. Gasoline is extremely flammable and highly explosive, which could result in death or serious injury.
1. Purge the fuel supply hose of high pressure gasoline. Disconnect fuel supply hose from fuel pump module on bottom left side of fuel tank. See 4.4 FUEL TANK: XL MODELS or 4.5 FUEL TANK: XR 1200X.
Warning! To prevent accidental vehicle start-up, which could cause death or serious injury, remove main fuse before proceeding.
2. Remove main fuse.
3. Remove seat.
4. Remove fuel tank. See 4.4 FUEL TANK: XL MODELS or 4.5FUELTANK: XR 1200X.
5. XL Models Only: See Figure 6-30. Remove screw (1) securing left wire harness caddy (2) to right wire harness caddy. Carefully disengage left wire harness caddy and pull away from frame backbone. See 6.28 ELECTRICAL CADDIES.

Figure 6-30. Ignition coil and left wire harness caddy: XL models: 1. Screw; 2. Left wire harness caddy; 3. Ignition coil
Note. Always grasp rubber boot as close as possible to the spark plug terminal when removing spark plug cables. Do not pull on the cable portion itself. Pulling on the cable will damage the cable's carbon core.
6. See Figure 6-31 or Figure 6-32. Unplug coil harness connector [83B] (2) from ignition coil (1).

Figure 6-31. Ignition coil mounting and connections: XL models only: 1. Ignition coil; 2. Coil harness connector [83B]; 3. Front spark plug boot and cable; 4. Rear spark plug boot and cable; 5. Screw; 6. Mounting bracket

Figure 6-32. Ignition coil mounting and connections: XR 1200X: 1. Ignition coil; 2. Coil harness connector [83B]; 3. Front spark plug boot and cable; 4. Rear spark plug boot and cable; 5. Screw; 6. Mounting bracket
7. Pull front spark plug boot and cable (3) from left ignition coil tower.
8. Pull rear spark plug boot and cable (4) from right ignition coil tower.
9. Remove screw (5) securing coil bracket (6). Remove coil and bracket from vehicle.
10. See Figure 6-33 or Figure 6-34. Remove two screws (4) to separate ignition coil (1) from mounting bracket (2) and plate (3).
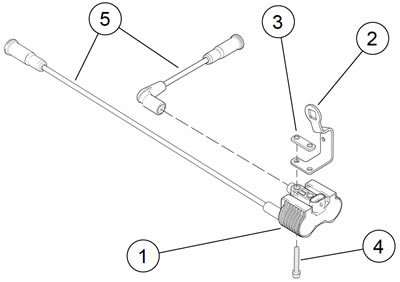
Figure 6-33. Ignition coil mounting: XL models only: 1. Ignition coil; 2. Mounting bracket; 3. Plate; 4. Screw (2); 5. Spark plug cables (2)
Installation
| FASTENER | TORQUE VALUE | |
| Coil mounting screw | 24-72 in·lbs | 2.7-8.1 Nm |
| Coil mounting screw | 24-72 in·lbs | 2.7-8.1 Nm |
| Coil mounting bracket screw | 35-45 in·lbs | 4.0-5.1 Nm |
1. XL Models: See Figure 6-33. Position new ignition coil (1) on underside of mounting bracket (2). Fasten coil to mounting bracket with two screws (4) and nut plate (3). Tighten to 24-72 in·lbs (2.7-8.1 Nm).
2. XR 1200X: See Figure 6-34. Position plate (3) over new ignition coil (1). Place screws (4) through coil and plate and secure to mounting bracket (2). Tighten to 24-72 in·lbs (2.7-8.1 Nm).
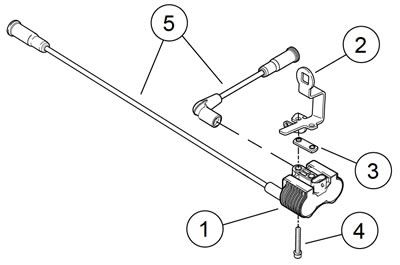
Figure 6-34. Ignition coil mounting: XR 1200X: 1. Ignition coil; 2. Mounting bracket; 3. Plate; 4. Screw (2); 5. Spark plug cables (2)
3. See Figure 6-31 or Figure 6-32. Install the coil:
- a. Slide coil (1) with mounting bracket (6) into position.
- b. Make sure all wiring harnesses from front or motorcycle are positioned between coil bracket upright and vehicle frame.
- c. Secure bracket with screw (5). Tighten to 35-45 in·lbs (4.0-5.1 Nm).
4. Plug spark plug cables into ignition coil towers: front spark plug cable (3) to left side of coil, rear spark plug cable (4) to right side of coil.
5. XL Models: See Figure 6-30. Mate left wire harness caddy (2) to right wire harness caddy. Secure with screw (1) and tighten. See 6.28 ELECTRICAL CADDIES.
6. Install fuel tank. See 4.4 FUEL TANK: XL MODELS or 4.5 FUEL TANK: XR 1200X.
Warning! After installing seat, pull upward on seat to be sure it is locked in position. While riding, a loose seat can shift causing loss of control, which could result in death or serious injury.
7. Install seat.
8. Install main fuse.