
Removal
Warning! To prevent spray of fuel, purge system of high-pressure fuel before supply line is disconnected. Gasoline is extremely flammable and highly explosive, which could result in death or serious injury.
Warning! Do not use solvents or other products that contain chlorine on plastic fuel system components. Chlorine can degrade plastic fuel system components, which can cause a loss of fuel system pressure or engine stalling and could result in death or serious injury.
1. Purge the fuel supply hose of high pressure gasoline. Disconnect fuel supply hose from fuel pump module. See 4.4 FUEL TANK: XL MODELS or 4.5 FUEL TANK: XR 1200X.
Warning! To prevent accidental vehicle start-up, which could cause death or serious injury, remove main fuse before proceeding.
2. Remove main fuse.
3. XL Models with 4.5 gal (17.0 L) fuel tank: Access to the fuel injectors and fuel rail may be easier if the fuel tank is raised up as follows:
- a. Remove seat.
- b. Loosen (but do not remove) front fuel tank mounting screw. Remove rear fuel tank mounting screw, washers and nut. See 4.4 FUEL TANK: XL MODELS.
- c. Place a clean shop cloth between front of fuel tank and front fork upper bracket to protect fuel tank finish. Carefully pivot rear of fuel tank upward and prop in position with a block of soft wood or other suitable device.
4. See Figure 4-72. Unplug engine sub-harness connectors from fuel injector connectors [84A], [85A] (7, 8).
5. Remove screw (5) and retaining bracket (2).
6. If replacing either the fuel supply hose (1) or fuel rail (6), disassemble as follows:
- a. Hold fuel rail in place.
- b. With a gentle twisting motion, pull fuel supply hose straight up out of fuel rail.
7. Hold fuel injectors (9, 10) in place by pressing down on harness connectors (7, 8) and with a gentle rocking motion, pull fuel rail off injectors.
8. With a gentle twisting motion, pull fuel injectors out of intake manifold (XL models) or induction module (XR 1200X).
9. Remove and discard O-rings (11).
Installation
| FASTENER | TORQUE VALUE | |
| Fuel hose retaining bracket screw | 60 in·lbs | 6.8 Nm |
| Fuel tank fasteners: XL Models | 15-20 ft·lbs | 20.3-27.1 Nm |
1. See Figure 4-72. Apply a thin coat of clean engine oil to new fuel injector O-rings (11). Install O-rings onto fuel injectors (9, 10).
2. With harness connectors (7, 8) facing up, push fuel injectors into intake manifold (XL models) or induction module (XR 1200X).
3. See Figure 4-70 or Figure 4-71. Rotate fuel injectors so that harness connectors are positioned as shown.
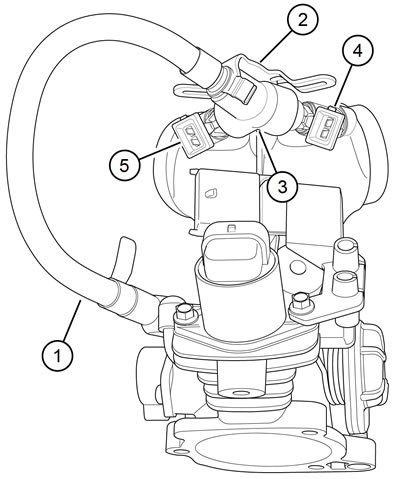
Figure 4-70. Fuel injector assembly location: XL models: 1. Fuel supply hose; 2. Retaining bracket; 3. Fuel rail; 4. Front fuel injector and connector; 5. Rear fuel injector and connector
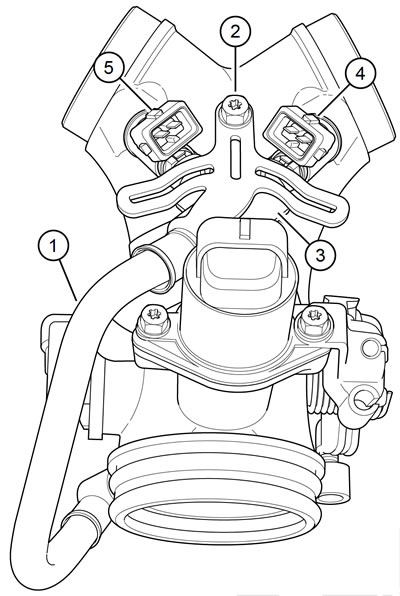
Figure 4-71. Fuel injector assembly location: XR 1200X: 1. Fuel supply hose; 2. Retaining bracket; 3. Fuel rail (not visible); 4. Front fuel injector and connector; 5. Rear fuel injector and connector
4. Gently press fuel rail onto free end of fuel injectors. Press fuel rail down until hole in fuel rail molded-in bracket lines up with mounting hole in intake manifold (12).
5. If the fuel supply hose and fuel rail were separated in the disassembly procedure, reassemble:
- a. See Figure 4-72. Inspect sealing washer (3) and Oring (4) for damage. If either require replacement, install a new fuel line kit.
- b. Lightly coat O-ring with clean engine oil. Push fuel supply hose into fuel rail bore until collar on hose is flush with top of fuel rail.
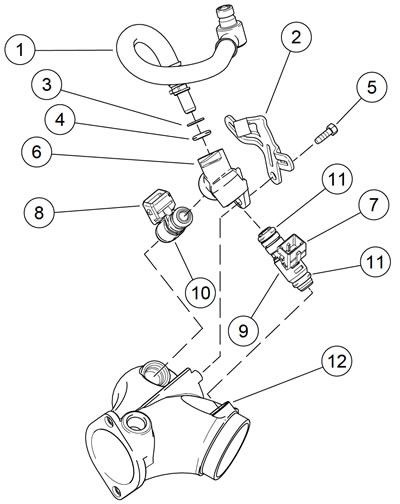
Figure 4-72. Fuel injector assemblies: XL models: 1. Fuel supply hose; 2. Retaining bracket; 3. Sealing washer (only available with fuel supply hose); 4. O-ring (only available with fuel supply hose); 5. Screw; 6. Fuel rail; 7. Front injector connector [84A]; 8. Rear injector connector [85A]; 9. Front fuel injector; 10. Rear fuel injector; 11. O-ring (4) (provided in repair kit); 12. Intake manifold
6. See Figure 4-72. Install retaining bracket (2) and fastener (5) as follows:
- a. See Figure 4-73. Orient fuel supply hose so that locating flange (2) is positioned as shown.
- b. Install retaining bracket (3). Fit the U-shaped opening in bracket around fuel supply hose and locating flange.
- c. See Figure 4-72. Secure retaining bracket (2) with screw (5). Tighten to 60 in·lbs (6.8 Nm).
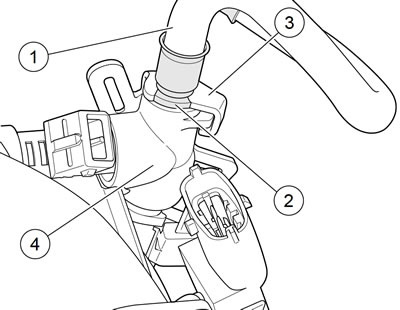
Figure 4-73. Mounting fuel hose and fuel rail: XL models: 1. Fuel supply hose; 2. Locating flange; 3. Retaining bracket; 4. Fuel rail
Notes:
- XL Models: See Figure 4-70. The fuel injector harness leads are mounted between the bracket and induction module.
- XR 1200X: See Figure 4-71. Do not route the fuel injector harness leads between the retaining bracket (2) and induction module body. Improper routing will result in chafing of the insulation resulting in poor engine performance.
7. Connect engine sub-harness connectors to the fuel injectors. Verify that the wire harnesses are routed outside the wings of retaining bracket (2) on XR 1200X.
Warning! After installing seat, pull upward on seat to be sure it is locked in position. While riding, a loose seat can shift causing loss of control, which could result in death or serious injury.
8. XL Models with 4.5 gal (17.0 L) Fuel Tank: if the fuel tank was raised up to gain access to the fuel injectors, install fuel tank and seat:
- a. Remove prop from under rear of fuel tank.
- b. Lower rear of fuel tank into position.
- c. Install fastener, washer and nut in fuel tank rear mounting holes.
- d. Tighten front and rear fasteners to 15-20 ft·lbs (20.327.1 Nm).
- e. Install protective caps on screw ends. See 4.4 FUEL TANK: XL MODELS.
- f. Install seat.
9. Connect fuel hose to fuel pump module. Fill fuel tank. Check for leaks around fuel pump module. See 4.4 FUEL TANK: XL MODELS.
10. Install main fuse.
11. Close left side cover.