General
The front and rear brakes are fully hydraulic disc brake systems that require little maintenance.
Warning! Use denatured alcohol to clean brake system components. Do not use mineral-based solvents (such as gasoline or paint thinner), which will deteriorate rubber parts even after assembly. Deterioration of these components can cause brake failure, which could result in death or serious injury.
Caution! Direct contact of DOT 4 brake fluid with eyes can cause irritation. Avoid eye contact. In case of eye contact flush with large amounts of water and get medical attention. Swallowing large amounts of DOT 4 brake fluid can cause digestive discomfort. If swallowed, obtain medical attention. Use in well ventilated area. KEEP OUT OF REACH OF CHILDREN.
Notice: DOT 4 brake fluid will damage painted and body panel surfaces it comes in contact with. Always use caution and protect surfaces from spills whenever brake work is performed. Failure to comply can result in cosmetic damage.
Notes:
- If DOT 4 brake fluid contacts painted surfaces, IMMEDIATELY flush area with clear water.
- Cover handlebar switches with a shop towel before adding brake fluid to front master cylinder reservoir. Spilling brake fluid on handlebar switches may render them inoperative.
Warning! After repairing the brake system, test brakes at low speed. If brakes are not operating properly, testing at high speeds can cause loss of control, which could result in death or serious injury.
Brake lines
Inspect brake lines for leaks, contact or abrasion. Refer to Table 1-14.
Table 1-14. Brake line inspection
| LINE TYPE | INSPECTION | REMEDY |
| Steel lines | No marks | OK/Monitor |
| Slight mark in paint or plating* | ||
| Copper colored-paint/plating worn off* | ||
| Silver colored base material-no noticeable feel of wear* | ||
| Silver colored base material-noticeable feel of wear* | Replace | |
| Brake fluid leak or other damage | ||
| Rubber hose | No marks | OK/Monitor |
| Slight dent or flattening of ribs* | ||
| Worn to bottom of ribs | Replace | |
| Brake fluid leak or other damage | ||
| Protective cover (steel, rubber, plastic or braided) | No marks | OK/Monitor |
| Slight dent in covering* | ||
| Slight dent or flattening of plastic covering* | ||
| Worn or cut-through covering-exposed brake line material | Replace | |
| Brake fluid leak or other damage |
* If there is line contact, reposition the line. If base material is visible, prevent corrosion with touch-up paint.
Fluid level
1. Front brake: Position vehicle on a flat level surface. Turn handlebar so front brake master cylinder is approximately level. See Figure 1-36.

Figure 1-36. Master Cylinder Sight Glass (typical)
2. Check for fluid through reservoir sight glass.
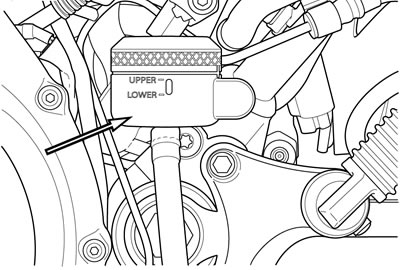
Note. XL Models: See Figure 1-37. Rear brake reservoir cover may be removed to more easily verify fluid level in reservoir.

Figure 1-37. Rear Brake Master Cylinder Reservoir Cover (typical)
3. Rear brake: Prepare vehicle:
- a. Have an assistant hold vehicle upright on a level surface.
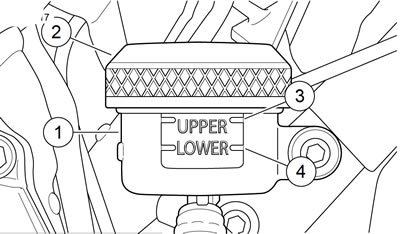
- b. See Figure 1-38 or Figure 1-39. Check that fluid level is between upper (3) and lower (4) marks on reservoir sight window.

Figure 1-38. Rear Brake Master Cylinder Reservoir: XL Models: 1. Reservoir; 2. Reservoir cap; 3. Upper fluid level; 4. Lower fluid level

Figure 1-39. Rear Brake Master Cylinder Reservoir: XR 1200X: 1. Reservoir; 2. Reservoir cap; 3. Upper fluid level; 4. Lower fluid level
4. If fluid is not visible through sight glass (front) or level in sight window is low (rear), check system for leaks. Check that brake pads are properly installed and not worn beyond service wear limits. Perform any necessary repairs. See 1.16 BRAKE PADS AND DISCS: XL MODELS or 1.17 BRAKE PADS AND DISCS: XR 1200X.
5. If fluid is still not visible through sight glass (front) or level in sight window is low (rear), remove cover to verify fluid level. If necessary, add DOT 4 BRAKE FLUID. Replace cover. See 2.17 BLEEDING BRAKES.
6. Front brake hand lever and rear brake foot pedal must have a firm feel when applied. If not, bleed system using only DOT 4 BRAKE FLUID. See 2.17 BLEEDING BRAKES.
Note. XL Models: Replace rear brake reservoir cover if removed.
Troubleshooting
Use the following troubleshooting guide to help in determining probable causes of poor brake operation. Refer to Table 1-15.
Table 1-15. Troubleshooting brakes
| CONDITION | CHECK FOR | REMEDY |
| Excessive lever or pedal travel or spongy feel | Air in system | Bleed brake system. |
| Master cylinder reservoir low on fluid | Fill master cylinder reservoir with approved brake fluid. Bleed brake system. | |
| Chattering sound when brake is applied | Worn brake pads | Replace brake pads. |
| Loose mounting bolts | Tighten bolts. | |
| Warped brake disc | Replace brake disc. | |
| Ineffective brake lever or pedal - travels to limit | Low fluid level | Fill master cylinder reservoir with approved brake fluid and bleed brake system. |
| Piston cup not functioning | Rebuild master cylinder. | |
| Ineffective brake lever or pedal - travel normal | Distorted or glazed brake disc | Replace brake disc. |
| Distorted, glazed or contaminated brake pads | Replace brake pads. | |
| Brake pads drag on disc - do not retract. | Cup in master cylinder blocking relief port | Inspect master cylinder. |
| Master cylinder overfilled | Correct fluid level. |
