Removal
Warning! Disconnecting spark plug cable with engine running can result in electric shock and death or serious injury.
Note. Allow the engine to cool before servicing.
1. Disconnect spark plug cables.
2. Remove spark plugs.
Inspection
Note. Discard plugs with eroded electrodes, heavy deposits or a cracked insulator.
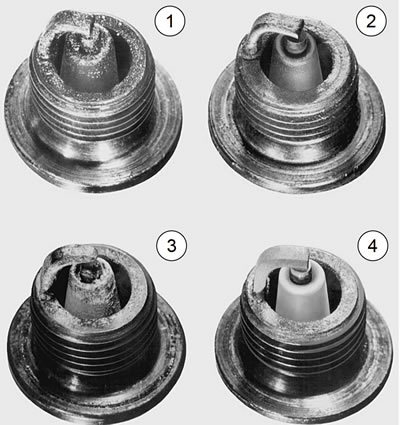
See Figure 1-62. Compare plug deposits to Table 1-16.

Figure 1-62. Spark Plug Deposits
Table 1-16. Spark plug deposit analysis
| PLUG* | DEPOSITS | POSSIBLE CAUSE |
| 1 | Wet, black and shiny | Worn pistons Worn piston rings Worn valves Worn valve guides Worn valve seals Weak battery Faulty ignition system |
| 2 | Dry, fluffy or sooty and black | Air-fuel mixture too rich |
| 3 | Light brown and glassy** May be accompanied by cracks in the insulator or by electrode erosion. | Air-fuel mixture too lean Hot running engine Valves not seating Improper ignition timing |
| 4 | White, gray or tan and powdery | Balanced combustion Clean off deposits at regular intervals. |
* See Figure 1-62.
** The glassy deposit on a spark plug may cause high-speed misfiring.
Cleaning
Warning! Compressed air can pierce the skin and flying debris from compressed air could cause serious eye injury. Wear safety glasses when working with compressed air. Never use your hand to check for air leaks or to determine air flow rates.
If the plugs require cleaning between tune-ups:
1. Clean electrodes and insulator with electrical contact cleaner. Dry plug with compressed air.
2. Use a thin file to flatten electrodes.
Note. Electrodes with sharp edges require 25-40 percent less voltage than ones with rounded edges.
3. Check condition of threads in cylinder head. Use a penetrating oil and clean out with a thread chaser. Verify that plug threads are clean.
4. If necessary, replace with new spark plugs.
Installation
| FASTENER | TORQUE VALUE | |
| Spark plug | 12-18 ft·lbs | 16.3-24.4 Nm |
1. Verify proper gap before installing new or cleaned spark plugs.
- a. Select a wire-type feeler gauge within specification. Refer to Table 1-17.
- b. Pass the wire gauge between the center and the outer electrodes.
- c. If necessary use the proper tool to bend the outer electrode to bring the gap to within specification.
Note. The spark plug gap is within specification when there is a slight drag on the gauge.
2. Apply ANTI-SEIZE LUBRICANT to the spark plug threads. Tighten to 12-18 ft·lbs (16.3-24.4 Nm).
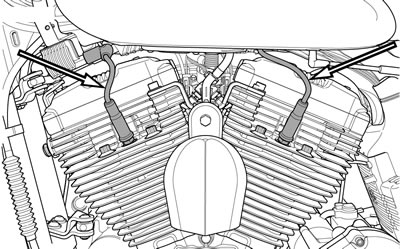
3. See Figure 1-63. Connect spark plug cables. Verify cables are connected to coil, spark plugs and anchor clips or harness caddies.

Figure 1-63. Spark Plug Cable Routing: All Models
Table 1-17. Spark plug gap
| MODEL | TYPE | in | mm |
| XL | 6R12 | 0.038-0.043 | 0.97-1.09 |
| XR | 10R12X | 0.032-0.038 | 0.81-0.97 |
Spark plug cable inspection
1. Inspect spark plug cables. Replace if necessary.
- a. Check for cracks or loose terminals.
- b. Check for loose fit on ignition coil and spark plugs.
2. Check cable boots/caps for cracks or tears. Replace boots/caps that are worn or damaged.
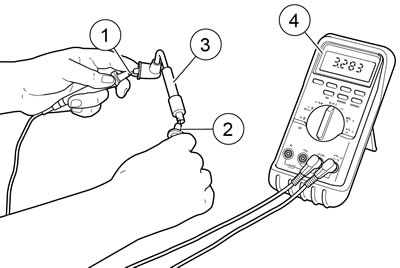
3. See Figure 1-64. Check spark plug cable resistance with an ohmmeter. Replace cables not meeting resistance specifications. Refer to Table 1-18.

Figure 1-64. Testing Resistance: 1. Ohmmeter positive lead 2. Ohmmeter negative lead 3. Spark plug cable 4. Ohmmeter
Table 1-18. Spark plug cable resistance
| CABLE | RESISTANCE (OHMS) |
| Front | 1,750-4,836 |
| Rear | 4,843-15,420 |
