Front fork: XR 1200X
Warning! Adjust both forks equally. Improper fork adjustment can lead to loss of control, which could result in death or serious injury.
Notice: Compression and rebound adjusting valves may be damaged if too much force is used at either end of the adjustment range.
Spring preload
1. See Figure 1-79. With a hex key, turn the preload adjuster counterclockwise until it stops. This is the minimum preload setting.
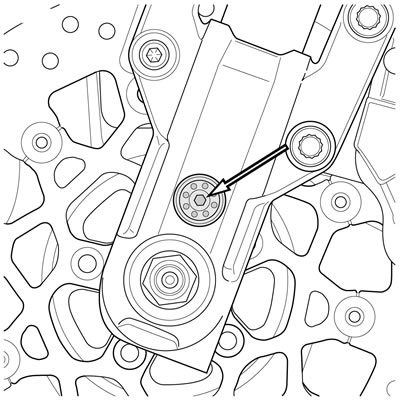
Figure 1-79. Spring preload adjuster: XR 1200X
2. Calculate the total load and turn the adjuster clockwise to specification. Refer to Table 1-23.
Table 1-23. Recommended Spring Preload: XR 1200X
| LOAD* | TURNS** FROM MINIMUM |
| Less than 165 lb (75.0 kg) | 0-4 |
| 165-195 lb (75.0-89.0 kg) | 4-6 |
| 195-225 lb (89.0-102.0 kg) | 6-8 |
| 225-255 lb (102.0-116.0 kg) | 8-10 |
| 255 lb (116.0 kg) to maximum added weight allowed. Refer to Table 2-4. | More than 10 |
* Add the weight of the rider, passenger, riding gear, accessories, and cargo.
** Turns are clockwise turns in from minimum.
To increase preload, turn the adjuster clockwise.
To decrease preload, turn the adjuster counterclockwise.
Rebound damping
1. See Figure 1-80. Turn the rebound damping adjuster (1) clockwise H (hard) until it stops. This is the maximum rebound setting.
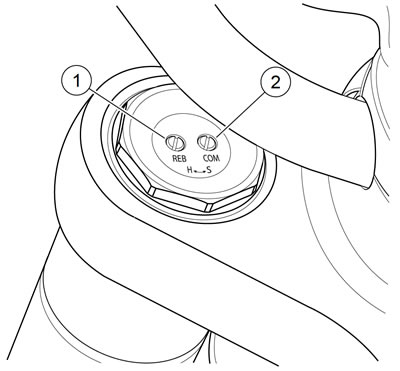
Figure 1-80. Fork rebound and compression damping adjusters: XR 1200X: 1. Rebound damping adjuster; 2. Compression damping adjuster
2. Turn adjuster counterclockwise S (soft) to specification. Refer to Table 1-24.
Table 1-24. Recommended fork rebound and compression damping: XR 1200X
| DAMPING* | TURNS FROM MAX** |
| Rebound (REB) | 3 |
| Compression (COM) | 5 |
* Turns are counterclockwise out from maximum.
To increase damping, turn adjuster clockwise (H).
To decrease damping, turn adjuster counterclockwise (S).
Compression damping
1. See Figure 1-80. Turn the compression damping adjuster (2) clockwise H (hard) until it stops. This is the maximum compression setting.
2. Turn the adjuster counterclockwise S (soft) to specification. Refer to Table 1-24.
Shock absorber preload: all models
| PART NUMBER | TOOL NAME |
| 94448-82B | SHOCK ADJUSTMENT SPANNER |
Warning! Adjust both shock absorbers equally. Improper adjustment can adversely affect stability and handling, which could result in death or serious injury.
Notice: Do not turn the shock absorber adjustment collar clockwise beyond adjustment setting 5. Doing so may result in equipment damage.
Notes:
- Five position shocks: See Figure 1-83. Do not turn the preload cam past position five (5) to position one (1) or from position one (1) to position five (5).
- Three position shocks: Do not turn the preload cam past position three to position one or from position one (1) to position three.
XL Models: See Figure 1-81. Using SHOCK ADJUSTMENT SPANNER (Part No. 94448-82B), turn the adjustment cam to specification.
- Five position shocks: Refer to Table 1-25.
- Three position shocks: Refer to Table 1-26.
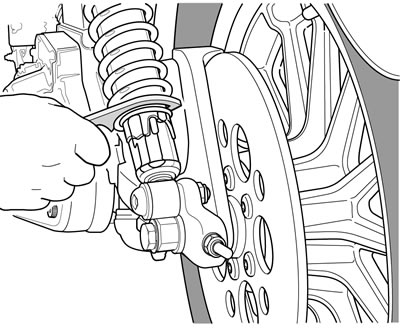
Figure 1-81. Shock absorber preload adjustment: XL Models
XR 1200X: See Figure 1-82. Use the spanner wrench with extension handle from the tool kit to turn the adjustment cam to specification. Refer to Table 1-25.

Figure 1-82. Shock absorber preload adjustment: XR 1200X
XL 883L/N, XL1200X/V and certain XL1200CP models are configured for solo operation. If you choose to add a passenger and/or cargo to the vehicle, the ride quality may be compromised. See a Harley-Davidson dealer for two-up seats, passenger pegs and suspension options.
Table 1-25. Recommended shock preload: five position
| LOAD* | POSITION** |
| Less than 165 lb (75.0 kg) | 1 |
| 165-195 lb (75.0-89.0 kg) | 2 |
| 195-225 lb (89.0-102.0 kg) | 3 |
| 225-255 lb (102.0-116.0 kg) | 4 |
| 255 lb (116.0 kg) to maximum added weight allowed. Refer to Table 2-3 and Table 2-4. | 5 |
* Add the weight of the rider, passenger, riding gear, accessories, and cargo.
** See Figure 1-83.

Figure 1-83. Shock Preload Cam Positions (typical)
Table 1-26. Recommended shock preload: three position
| LOAD* | POSITION |
| Less than 165 lb (75.0 kg) | 1 |
| 165-225 lb (75.0-102.0 kg) | 2 |
| 225 lb (102.0 kg) to maximum added weight allowed. Refer to Table 2-4 and Table 2-3. | 3 |
* Add the weight of the rider, passenger, riding gear, accessories, and cargo.
Table 1-27. Maximum added weight allowed: Sportster models
| MODEL | MAX LOAD | |
| lb | kg | |
| XL 883L | 437 | 198.2 |
| XL 883N | 435 | 197.3 |
| XL 883R | 427 | 193.7 |
| XL 1200C/C ANV/CP | 418 | 189.6 |
| XL 1200CA | 427 | 193.7 |
| XL 1200CB | 427 | 193.7 |
| XL 1200X | 433 | 196.4 |
| XL 1200V | 445 | 201.8 |
| XR 1200X | 427 | 193.7 |
Shock absorber rebound and compression: XR 1200X
Warning! Adjust both shock absorbers equally. Improper adjustment can adversely affect stability and handling, which could result in death or serious injury.
Notice: Compression and rebound adjusting valves may be damaged if too much force is used at either end of the adjustment range.
Shock absorber rebound damping adjustment
1. See Figure 1-84. Turn the rebound adjuster in the direction of the embossed H (hard) until it stops. This is the maximum rebound damping setting.
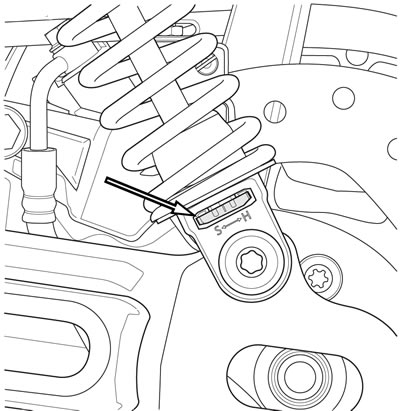
Figure 1-84. Rebound damping adjuster: XR 1200X
2. Turn the rebound adjuster toward the embossed S (soft) the recommended number of clicks. Refer to Table 1-28.
Shock absorber compression damping adjustment
1. See Figure 1-85. Using fingers, turn the compression adjuster clockwise H (hard) until it stops. This is the maximum compression damping setting.
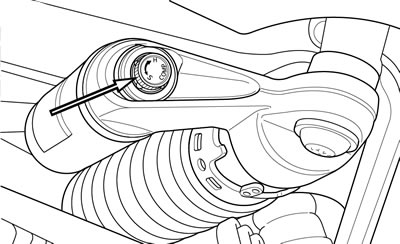
Figure 1-85. Compresson damping adjuster: XR 1200X
2. Turn the compression adjuster counterclockwise (H to S) (hard to soft) the recommended number of clicks. Refer to Table 1-28.
Table 1-28. Recommended rear shock rebound and compression damping: XR 1200X
| DAMPING | CLICKS FROM MAX (H to S) |
| Rebound (REB) | 5 |
| Compression (COMP) | 7 |
Suspension tuning: XR 1200X
After the suspension has been set to the recommend settings and the tires have been inflated to recommended pressures, ride the motorcycle and adjust the suspension damping as required. Refer to Table 1-29.
Table 1-29. Suspension damping adjustment guidelines: XR 1200X
| MOTORCYCLE BEHAVIOR | SUGGESTED REMEDY |
| Soft or unsettled feeling around corners or after bumps | Increase rebound damping. |
| Leaping feeling or topping after large bumps | Increase rebound damping. |
| Harsh/sharp feedback over bumps | Decrease rebound damping. |
| Feels like motorcycle drops down over chatter bumps | Decrease rebound damping. |
| Excessive bottoming through potholes | Increase compression damping. |
| Excessive dive when applying front brake | Increase compression damping (forks). |
| Hard feeling or inadequate absorption over bumps | Decrease compression damping. |
| Feels excessively stiff or busy around corners | Decrease compression damping. |
