MotoInstruction.ru
Mobile
version
Articles
& news
Site
map
Feed
back
Add to
bookmark
English Русский
Aprilia
BMW
Ducati
Harley
Honda
Kawasaki
Suzuki
Triumph
Yamaha
Honda:
Africa Twin▾
XRV750 (1989-2003) CRF1000L (2015-2020)
CB series▾
CB400SF [1] (1992-1999)
VTX series▾
VTX1800C (2001-2008)

Suspension — adjustments (Honda XRV750 Africa Twin)

  • Main
  • Honda
  • Africa Twin
  • XRV 750
  • Running gear and frame
  • Frame and hinged elements
  • Suspension — adjustments
0

Front forks


1. On XRV750-L to S (1990 to 1995) models only, the forks are air-assisted arid the air pressure can be varied within the specified range (see Specifications). The air valve is incorporated in the top bolt of each fork.

2. To check the air pressure use a gauge which is suitable for reading low pressures: do not use a tyre pressure gauge. Gauges and hand-operated pumps are available for suspension system use.

3. Ensure that all weight is off the front suspension when the air pressure is checked. Place the motorcycle on an auxiliary stand so that the front wheel is off the ground. Take care not to increase air pressure beyond the range - excess pressure will damage the fork oil seals - and ensure that the pressure in both forks is equal.

Rear shock absorber


Spring pre-load - all models


4. Slacken the adjuster lockring using a suitable G-spanner (see illustration). Now thread the adjuster up or down as required, again using the C-spanner - thread it up to decrease pre-load or lower the ride height, and down to increase pre-load or raise the ride height.


13.4. Slacken the locknut (A) and turn the adjuster (B) as required


5. Make sure you stay within the adjustment limits as defined by the installed length of the spring according to the Specifications at the beginning of the Chapter. Tighten the locknut securely against the adjuster on completion.

Compression damping - XL650V models


6. Adjustment is made using a flat bladed screwdriver via the aperture in the left-hand side panel (remove the side panel for improved access - see Chapter 8) (see illustration). Turn the adjuster clockwise to increase damping for a firmer ride, and turn it anti-clockwise to reduce damping for a softer ride.


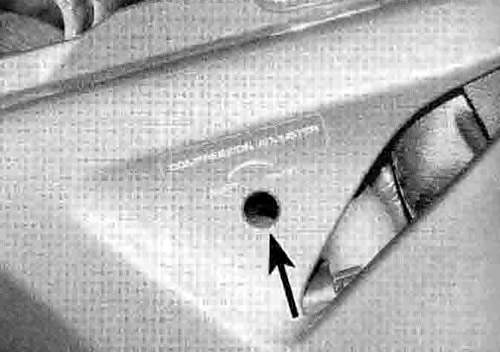
13.6. On XL650V models, adjust compression damping via the aperture (arrowed)


7. To set the damping at the standard (factory set) amount, turn the adjuster clockwise until it lightly seats (do not force it), then turn it anticlockwise approximately one full turn until the punch marks on the adjuster and the reservoir body are aligned - remove the side panel (see Chapter 8) to make the punch marks easier to see.
See this article in russian language
◀ Previous
Honda XRV750 : Frame and hinged elements
Next ▶

Rear suspension linkage — removal, inspection and installation
Rear shock absorber — removal, inspection and installation
Steering head bearings — inspection and replacement
Steering stem — removal and installation
Forks — disassembly, inspection and reassembly
Forks — oil change
Swingarm — removal and installation
Swingarm — inspection, bearing check and replacement
Drive chain — removal, cleaning, and installation
Sprockets — check and replacement
Rear sprocket coupling/rubber dampers — check and replacement
Bodywork — general information
Similar articles about motorcycles of other brands
Harley-Davidson XL1200 (2012-2023): Suspension adjustments Triumph Rocket III (2004-2018): Exploded view — rear suspension units Yamaha FZ1 Fazer (2006-2015): Lubricating the rear suspension Suzuki DRZ 250 (1996-2007): Steering and suspension Kawasaki ZX6R/ZX600J (2000-2002): Front suspension exploded view Ducati ST2 (1997-2003): Suspension — description and specification Aprilia RS 125/3 (1998-2005): Front suspension maintenance BMW R 1150 GS (1999-2004): Front suspension specifications
Link to this article in different formats
TEXTHTMLBB Code
Comments and feedback from visitors
No comments yet, you will be the first!


Add up two numbers: 46 + 27


CRF1000L (2015-2020) 
  • Information for owner
  • Introduction to manual
  • Technical characteristics
  • Maintenance
  • Engine and systems
  • Engine repair
  • Cooling system
  • Lubrication system
  • Ignition system
  • Fuel system
  • Fuel injection
  • Transmission
  • Dual clutch transmission
  • Running gear and frame
  • Frame and hinged elements
  • Front suspension and handlebar
  • Rear suspension
  • Brake system
  • ABS (anti-lock brake system)
  • Electric equipment
  • Starting and charging system
  • Equipment and devices
  • Immobilizer system
  • Electrical circuits
XRV750 (1989-2003) 
  • Information for owner
  • Introduction to manual
  • Weekly checks
  • Maintenance
  • Troubleshooting
  • Engine and systems
  • Engine repair
  • Transmission
  • Cooling system
  • Fuel and exhaust systems
  • Ignition system
  • Running gear and frame
  • Brake system
  • Wheels and tires
  • Frame and hinged elements
  • Electric equipment
  • Equipment and devices
  • Lighting and lamps
  • Starting and charging system
  • Electrical circuits
Aprilia BMW Ducati Harley Honda Kawasaki Suzuki Triumph Yamaha
MotoInstruction.ru © 2021–2025 | Sitemap | Articles | Contacts | Site search | Add to bookmarks | Mobile version