| PART NUMBER | TOOL NAME |
| HD-48856-A | AXLE ALIGNMENT PLUGS |
| FASTENER | TORQUE VALUE | |
| Axle, rear, nut | 95-105 ft·lbs | 129-142 Nm |
Checking wheel alignment
Warning! Check vehicle alignment according to following procedures. Incorrect alignment can adversely affect stability and handling, which could result in death or serious injury.
Note. Some models may require muffler removal.
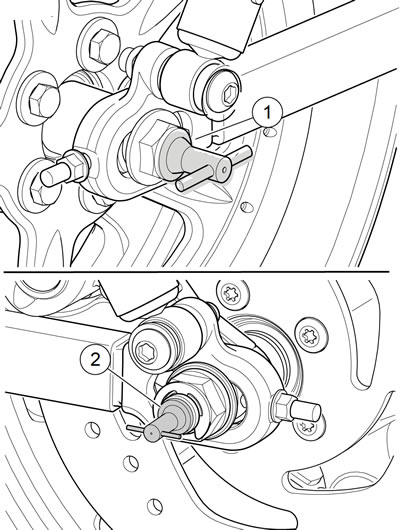
1. See Figure 1-75. Insert alignment plugs (1, 2) from the AXLE ALIGNMENT PLUGS (Part No. HD-48856-A) into right and left ends of rear axle. Turn handle until plug is firmly held in the axle.

Figure 1-75. Axle Alignment Plugs: 1. RH alignment plug; 2. LH alignment plug
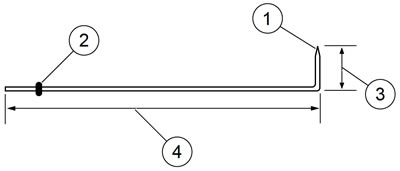
2. XL Models: See Figure 1-76. Fabricate an alignment tool using a piece of 1/8 in (3.175 mm) diameter aluminum welding rod 21.5 in (546 mm) long:
- a. Grind one end down to a blunt point.
- b. Use pliers to bend rod at a 90 degree angle, 2.25 in (57 mm) from the blunt point.
- c. Place a snug-fitting rubber grommet (2) on rod to act as a slide measurement indicator.

Figure 1-76. Wheel Alignment Tool: XL Models: 1. Blunt point; 2. Rubber grommet; 3. 2.25 in (57 mm); 4. 19.25 in (489 mm)
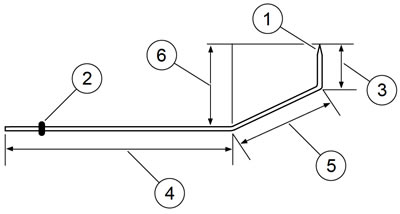
3. XR 1200X: See Figure 1-77. Fabricate an alignment tool using a piece of 1/8 in (3.175 mm) diameter aluminum welding rod 22.375 in (568 mm) long:
- a. Grind one end down to a blunt point.
- b. Use pliers to bend rod as shown.
- c. Place a snug-fitting rubber grommet (2) on rod to act as a slide measurement indicator.

Figure 1-77. Wheel Alignment Tool: XR 1200X: 1. Blunt point; 2. Rubber grommet; 3. 5/8 in (16 mm); 4. 15-1/4 in (387 mm); 5. 6-1/2 in (165 mm); 6. 3-7/8 in (98 mm)
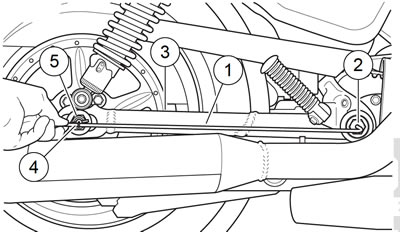
4. Gauge distance between rear fork pivot bolt and rear axle alignment plug center:
- a. See Figure 1-78. Insert blunt point of alignment tool in rear fork pivot bolt dimple (2) on right side of rear fork (3).
- b. Slide rubber grommet along tool shaft until it aligns with hole in center of alignment plug (5).
- c. Without moving grommet, position alignment tool on left side of rear fork.

Figure 1-78. Checking Wheel Alignment Using Wheel Alignment Tool: XL Models: 1. Wheel alignment tool; 2. Rear fork pivot bolt dimple; 3. Rear fork; 4. Rubber grommet; 5. Axle alignment plug
5. Verify measurements match on both sides of axle. Adjust if necessary.
Adjusting wheel alignment
1. Remove and discard E-clip.
2. Loosen rear axle nut.
3. On side of rear fork that has longer distance from pivot bolt to axle center, turn nut on axle adjuster counterclockwise to shorten distance. Adjust axle until left and right side alignment measurements are equal.
Notes:
- Keep axle adjuster mechanisms firmly seated (under tension) on each side of rear fork during wheel alignment procedures above. Do so by applying moderate upward force on lower span of drive belt. This tensions drive belt, which holds rear axle forward against both adjuster mechanisms.
- Do not tighten rear axle nut or install new E-clip until after checking drive belt tension.
4. Verify drive belt deflection after aligning rear wheel. Adjust if required. See 1.12 DRIVE BELT AND SPROCKETS, Drive Belt Deflection.
Note. If rear axle has been moved, verify slack in rear brake line between clamp and rear caliper. If necessary, reposition brake line. See 1.12 DRIVE BELT AND SPROCKETS, Drive Belt Deflection.
Warning! Do not exceed specified torque when tightening axle nut. Exceeding torque can cause wheel bearings to seize during vehicle operation, which could result in death or serious injury.
5. Tighten axle nut to 95-105 ft·lbs (129-142 Nm) and install new E-clip.
6. Install muffler if removed.
