Removing and installing starter motor
- Remove gearbox complete with starter motor.
See Group 23.

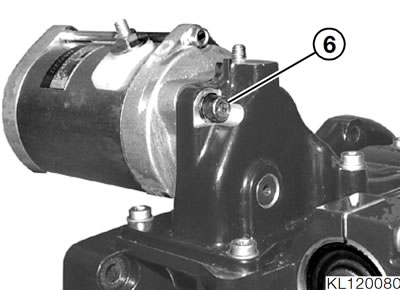
- Remove screw (6) and remove the starter motor.
- When reinstalling begin by introducing the starter motor into the intermediate flange, then install the gearbox and tighten screw (6).
Tightening torques:
- Starter to gearbox — 6 Nm
- Positive cable to starter motor — 6 Nm
- Earth (ground) lead to cross-tube — 6 Nm

Disassembling/assembling starter motor
- Clamp the starter motor into a vise with soft jaws.
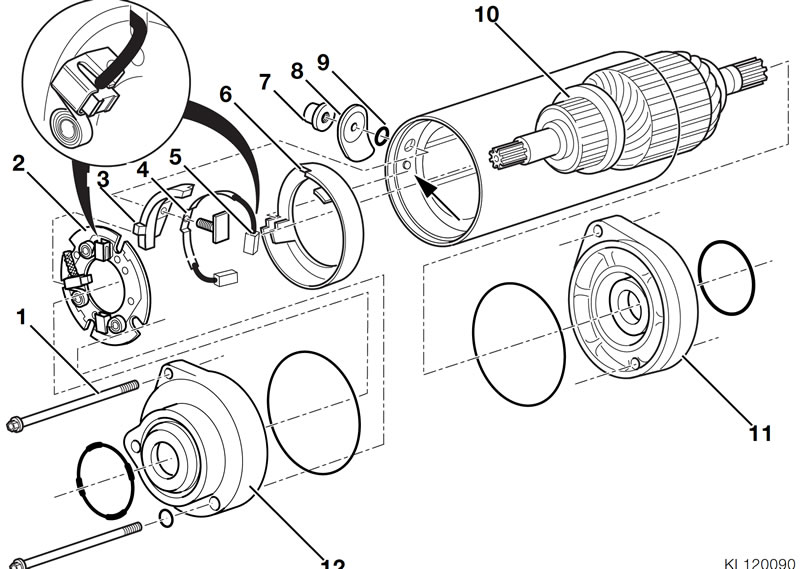
- Unscrew tie-rods (1).
Caution: Before removing or installing the housing cover, always fit a length of shrinkable PVC tubing over the splines on the armature.
- Remove gearbox-side housing cover (12).
- Remove engine-side housing cover (11).
- Pull out armature (10).
- Remove 2 carbon brushes (5) from brush-holder plate (2).
- Remove brush-holder plate (2).
- Remove nut (7) from starter-motor housing and remove rubber ring (9) and outer insulator (8).
- Remove inner insulator (3) with carbon-brush holder.
- Remove plastic retainer (6).
Replacing carbon brushes
- Replace brush-holder plate (2) and 2 carbon brushes (5).
- Installation is the reverse of the removal procedure: pay particular attention to the following.
Note: Align plastic retainer (6), brush holder (4) and inner insulator (3) with the stud (arrow) inside the housing.
- Install plastic retainer with insulator, carbon brush holder and screw in the housing.
- Hand-tighten nut (7).
- Install brush-holder plate (2) aligned with lug of insulator (3).
Note: Insert the carbon brushes with the angled side towards the spring.
Do not damage the carbon brushes when installing.
- Carefully press back the brushes and insert the armature.
- Mount the gearbox-side housing cover with tie rods and O-rings in the housing.
- Install the engine-side housing cover.
Tightening torques:
- Tie rods, starter-motor housing — 6 Nm
- Nut on housing — 6 Nm
