
Change the brake fluid once a year at the latest (Inspection IV)
Note: This description applies for the brake filling and bleeding unit with extraction of the brake fluid by a partial vacuum at the brake calliper.
If other devices are used, comply with their manufacturers' instructions.
Front brake
- Place the motorcycle on its centre stand so that it is level.
Forcing back the brake pistons
Caution: Do not scrape the wheel - mask it off if necessary.
- Remove the brake calliper.
- Remove the brake pads.
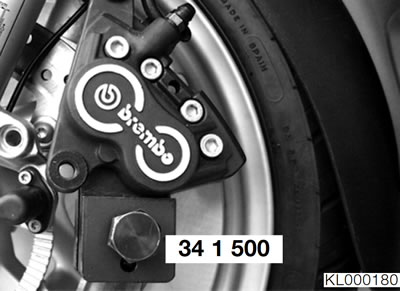
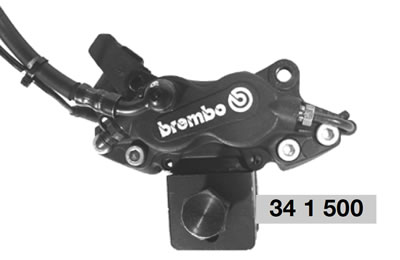
- Using resetting tool, BMW No. 34 1 500, force the pistons fully back.
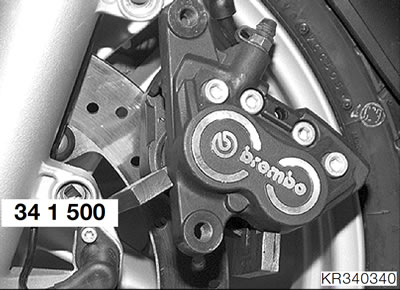
- Take out the resetting tool and insert spacer, BMW No. 341520, in its place.
- Press the pistons back in the second brake calliper but do not remove the resetting tool.
- Fill and bleed the front brake circuit.
- Installation is the reverse of the removal procedure.
Tightening torque:
- Brake calliper to fork tube — 40 Nm
Opening the brake fluid reservoir
Caution: Do not allow brake fluid to come into contact with painted parts of the motorcycle, because brake fluid destroys paint.
- Remove the top and bottom right handlebar trim panels.
- Remove the combination switch.
- Turn the handlebars to full left lock.
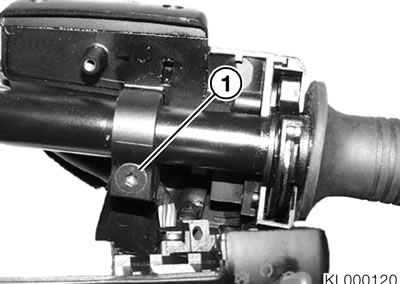
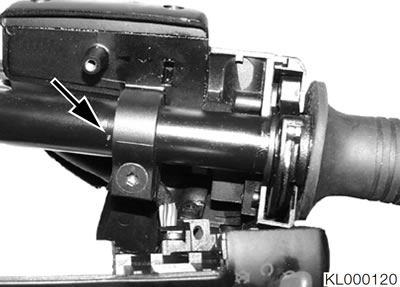
- Loosen the clamping screw (1).
- Rotate the brake fitting so that the sealing surface on the reservoir cap is horizontal when viewed from the side.
- Tighten the clamping screw.
- Remove the reservoir cap together with the diaphragm.
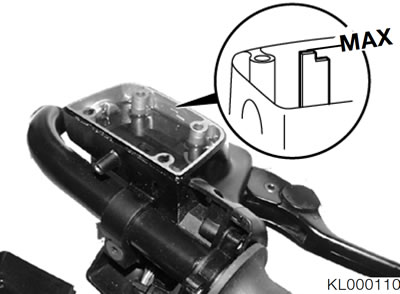
Caution: When adding brake fluid, do not allow it to enter the holes for the reservoir cap screws.
- Add brake fluid up to the MAX mark (arrow).
Bleeding the front brake pressure modulator
Note: It is only necessary to bleed the pressure modulator if the brake systemhas been opened or drained.
- Remove the left-hand battery cover.
See Group 46.
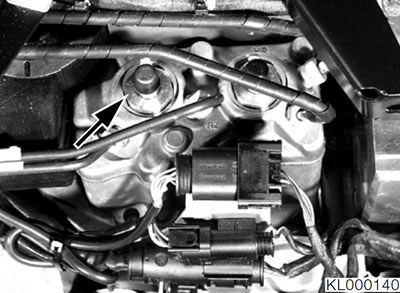
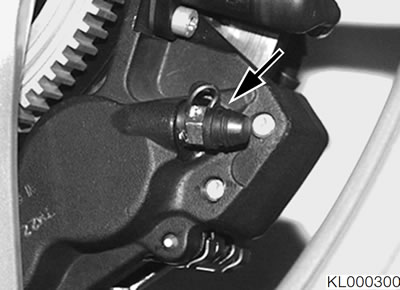
- Connect the brake bleeding device to the bleed screw on the pressure modulator for the front brakes (arrow).
Caution: During the bleeding process, do not permit the brake fluid level to drop below the "MIN" mark, or else air will be drawn into the brake system. Bleed the system again if this happens.
- Open the bleed screw by half a turn.
- Draw off brake fluid until it emerges clear and free from air bubbles.
- Close the bleed screw.
Brake fluid grade - DOT 4
Tightening torques:
- Bleed screw - 10 Nm
Bleeding the left brake calliper
- Connect the brake bleeding device to the left brake calliper.
- Open the bleed screw by half a turn.
Caution: During the bleeding process, do not permit the brake fluid level to drop below the MIN mark, or else air will be drawn into the brake system. Bleed the system again if this happens.
- Draw off brake fluid until it emerges clear and free from air bubbles.
- Tighten the bleed screw.
Brake fluid grade — DOT 4
Tightening torques:
- Bleed screw — 10 Nm
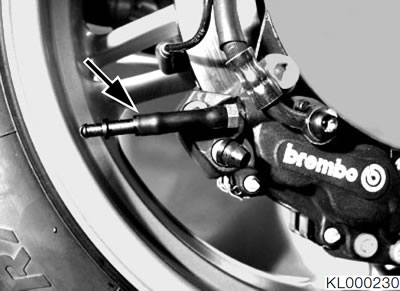
Bleeding the front right brake calliper
Note: Remove the grubscrew from the filler adapter and install a bleed screw instead so that the brakes can be bled.
- Wrap a cloth around filler adapter (2) of the right brake calliper.
- Remove socket-head grubscrew (1) from the filler adapter (2).
Caution: Installing the bleed screw opens the valve in filler adapter (2), and the flow of brake fluid starts immediately. It is therefore important to connect the brake bleeding device to the bleed screw before installing the bleed screw in the filler adapter.
- Connect the brake bleeding device to the bleed screw.
- With brake bleeding device connected, install the bleed screw in the port in filler adapter (2) and fully tighten it (valve in filter adapter closes).
- Open the bleed screw by half a turn (to open the valve).
Couton: When adding brake fluid, do not allow it to enter the holes for the reservoir cap screws. During the bleeding process, do not permit the brake fluid level to drop below the "MIN" mark, or else air will be drawn into the brake system. Bleed the system again if this happens.
- Draw off brake fluid until it emerges clear and free from air bubbles.
Warning: The motorcycle must not be ridden without the grub screw screwed into the filling port.
Take care when removing the bleed screw and installing the grub screw: do not permit brake fluid to come into contact with the brake pads or other parts of the motorcycle.
- Remove the bleed screw.
- Disconnect the brake bleeding device from the bleed screw.
- Install socket-head grub screw (1) in filler adapter and tighten.
- Installation is the reverse of the removal procedure: pay particular attention to the following.
Note: Wipe the rim of the reservoir, the rubber gaiter and the cover to remove brake fluid, and carefully re-assemble the components.
Brake fluid grade — DOT 4
Tightening torque:
- Grub screw — 10 Nm
- Return the brake fitting to the marked position (arrow).
Note: Take care with the routing of the wires and cables when fitting the handlebar trim.
- Check the function of the brake system.
Tightening torques:
- Clamping screw — 5 Nm
Rear brake
- Place the motorcycle on its centre stand so that it is level.
- Remove the right-hand battery cover.
See Group 46.
- Remove rear seat.
Caution: Do not allow brake fluid to come into contact with painted parts of the motorcycle, because brake fluid destroys paint.
- Remove the lid of the brake fluid reservoir.
- Add brake fluid up to the MAX mark.
Bleeding the rear brake pressure modulator
Note: It is only necessary to bleed the pressure modulator if the brake system has been opened or drained.
- Remove the left-hand battery cover.
See Group 46.
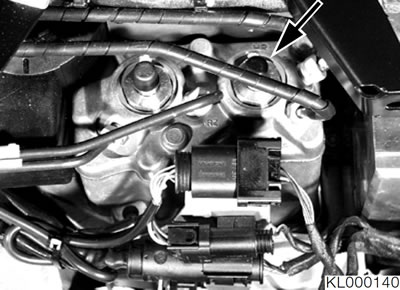
Connect the bleeding device to the pressure modulator for the rear brake (arrow).
Open the bleed screw by half a turn.
Caution: During the bleeding process, do not permit the brake fluid level to drop below the MIN mark, or else air will be drawn into the brake system. Bleed the system again if this happens.
- Draw off brake fluid until it emerges clear and free from air bubbles.
- Close the bleed screw.
Brake fluid grade — DOT 4
Tightening torque:
- Bleed screw — 10 Nm
Forcing back the brake pistons
Caution: Do not scrape the wheel - mask it off if necessary.
- Take off the brake calliper.
- Remove the brake pads.
Using resetting tool, BMW No. 34 1 500, force the pistons fully back.
Fill and bleed the rear brake circuit.
Installation is the reverse of the removal procedure.
Tightening torque:
- Brake calliper to rear wheel drive — 40 Nm
Bleeding the brake calliper
- Connect the brake bleeding device to the brake calliper on the rim side (arrow).
- Open the bleed screw by half a turn.
Caution: During the bleeding process, do not permit the brake fluid level to drop below the MIN mark, or else air will be drawn into the brake system. Bleed the system again if this happens.
- Draw off brake fluid until it emerges clear and free from air bubbles.
- Close the bleed screw.
- Bleed the brake calliper on the drive side, using an extension if necessary (arrow).
- Hand-tighten the lid of the brake fluid reservoir.
- Check the function of the brake system.
Caution: Dispose of old brake fluid in an environmentally friendly manner.
Brake fluid grade — DOT 4
Tightening torque:
- Bleed screw — 10 Nm