
Removal and disassembly
1. Cover the fuel tank.
2. Remove the fork assemblies. See 2.19 FRONT FORK: XL MODELS or 2.20 FRONT FORK: XR 1200X.
3. See Figure 2-159. Loosen fork stem pinch screw (7). Remove fork stem bolt (9) and washer (8).
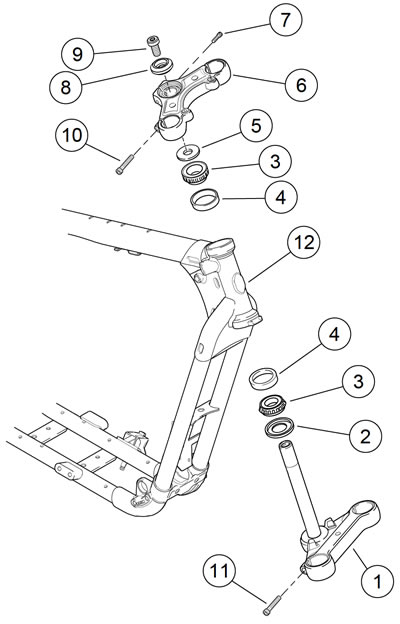
Figure 2-159. Fork stem and bracket assembly: typical: 1. Fork stem and lower bracket; 2. Seal, lower; 3. Bearing cone (2); 4. Bearing cup (2); 5. Seal, upper; 6. Fork upper bracket; 7. Fork stem pinch screw; 8. Washer; 9. Fork stem bolt; 10. Pinch screw, upper (2); 11. Pinch screw, lower (2); 12. Steering head (part of frame)
4. Lift handlebar assembly from steering head with fork upper bracket (6) attached. Carefully position assembly out of the way. Exercise caution to avoid damaging control cables, wiring harnesses, clutch cable or brake lines.
Note. Only disconnect handlebar connections if removing as an assembly.
5. Remove upper seal (5) and upper bearing cone (3). Slide fork stem and lower bracket (1) from frame.
Cleaning, inspection and repair
| PART NUMBER | TOOL NAME |
| HD-33416 | UNIVERSAL DRIVER HANDLE |
| HD-39301-A | STEERING HEAD BEARING RACE REMOVAL TOOL |
1. See Figure 2-159. Clean the seals (2, 5), bearing cones (3), fork stem and lower bracket (1) and steering head (12) with solvent.
2. Inspect fork stem and lower bracket (1). Replace as necessary.
Note. Replace bearings and bearing cups as a set.
3. Inspect bearings. Replace as necessary.
- a. Pitting or scoring
- b. Wear
- c. Scoring
4. Turn the bearings in the races to check for roughness. Replace as necessary.
Notice: Replace both bearing assemblies even if one assembly appeares to be good. Mismatched bearings can lead to excessive wear and premature replacement.
5. Replace bearings and bearing cups as follows:
- a. The lower bearing cone is a slip fit on the fork stem. Remove lower bearing cone by sliding it up and off fork stem. If necessary, gently pry bearing cone off fork stem with a pair of flat blade screw drivers. Remove lower seal (2).
- b. Drive bearing cups from steering head using STEERING HEAD BEARING RACE REMOVAL TOOL (Part No. HD-39301-A) and UNIVERSAL DRIVER HANDLE (Part No. HD-33416). If bearing cups are removed, the bearings cannot be reused. They must be replaced.
Assembly and installation
| PART NUMBER | TOOL NAME |
| HD-39302 | STEERING HEAD BEARING RACE INSTALLATION TOOL |
| FASTENER | TORQUE VALUE | |
| Fork, front, stem bolt, 1st torque | 23-27 ft·lbs | 31.2-36.6 Nm |
| Fork, front, stem bolt, final torque | 72-96 in·lbs | 8.1-10.9 Nm |
| Fork stem pinch bolt | 30-35 ft·lbs | 40.7-47.5 Nm |
| Fork stem pinch bolt | 30-35 ft·lbs | 40.7-47.5 Nm |
1. See Figure 2-159. If bearing cups (4) were removed, obtain new bearings and bearing cups. Install new bearing cups into frame steering head using STEERING HEAD BEARING RACE INSTALLATION TOOL (Part No. HD-39302).
Warning! Properly seat bearing cups in steering head bore. Improper seating can loosen fork stem bearings adversely affecting stability and handling, which could result in death or serious injury.
2. Liberally coat the bearing cones (3) with SPECIAL PURPOSE GREASE. Work the grease thoroughly into the bearing rollers.
3. Place lower bearing seal (2) over fork stem. Install lower bearing cone (3) onto fork stem and bracket (1).
4. Insert fork stem and bracket (1) through the steering head. Install bearing cone (3) and seal (5) onto the stem.
5. Install the upper bracket (6) including the handlebar assembly and loosely install fork stem bolt (9) with washer (8).
6. Install fork slider and tube assemblies. See 2.19 FRONT FORK: XL MODELS or 2.20 FRONT FORK: XR 1200X. Leave both lower fork bracket pinch screws (11) loose.
7. Tighten fork stem bolt (9) to 23-27 ft·lbs (31.2-36.6 Nm). Loosen fork stem bolt, then retighten to 72-96 in·lbs (8.110.9 Nm).
8. Tighten lower fork bracket pinch bolt to 30-35 ft·lbs (40.747.5 Nm).
9. Tighten fork stem pinch screw (7) to 30-35 ft·lbs (40.747.5 Nm).
10. Adjust steering head bearing fall-away. See 1.19 STEERING HEAD BEARINGS, Fall-Away.