
Caution: To ensure that the fork is installed without trapped stresses, observe the following instructions and the specified working sequence precisely.
- The front suspension strut is removed.
Caution: Protect painted parts from scratching: apply adhesive masking tape if necessary.
- Secure fork bridge to frame.
Tightening torque:
- Threaded stud to frame (clean thread + Loctite 243) — 130 Nm
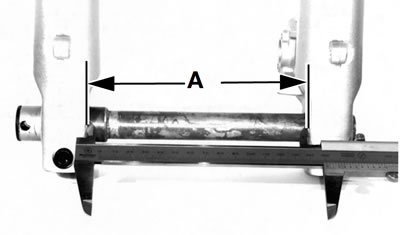
- Pre-assemble fork legs with quick-release axle/adjust distance A.
Distance A: 165±0.5
Tightening torque:
- Quick-release axle clamps mm (6.50±0.02 in) — 21 Nm
- Secure slider tube bridge/do not tighten to specified torque at this point.
- Secure slider tube bridge to leading link.
Tightening torque:
- Leading link to ball joint (clean thread + Loctite 2701) — 130 Nm
- Using a strap or similar, pull fork towards frame until the fully retracted fixed tubes only need to be pulled out slightly to secure them to the fork bridge.
- Secure fixed tubes to the fork bridge.
Tightening torque:
- Screw connection between fixed tube and fork bridge (free from oil and grease) — 45 Nm
- Tighten down slider tube bridge.
Tightening torque:
- Bridge to slider tube (clean thread + Loctite 243) — 21 Nm
- Check that the system moves freely by compressing and extending the suspension (but without the suspension strut) in the straightahead and left/right steering lock positions.
- Remove quick-release axle.
Caution: The quick-release axle must line up correctly with the locating bores and install easily, requiring no more than a slight turn back and forth.
- Install suspension strut.
Tightening torque:
- Suspension strut to frame — 43 Nm
- Suspension strut to leading link — 43 Nm