

Front fork parts: 1 - pen plug; 2 - spring thrust washer; 3 - top guide; 4 - carrier pipe; 5 - bottom guide; 6 - shock absorber bolt with copper washer; 7 - movable pipe; 8 - spring; 9 - shock absorber tip; 10 - rebound spring; 11 - shock absorber body; 12 - stuffing box thrust washer; 13 - stuffing box; 14 - seal retaining ring; 15 - anther
Assembly is carried out in reverse order.
1. We tighten the shock absorber bolt with a torque of 20 Nm, having previously applied an anaerobic fixative to the thread.
2. Before installing the carrier tube into the movable one, lubricate the rubbing sliding surfaces of the lower guide with fork oil.
3. Before installing the upper rail on the carrier tube, also lubricate the inner and outer surfaces with fork oil.

4. Install the oil seal thrust washer.
Attention! It is not allowed to install a previously removed oil seal. When removed, the steel frame of the oil seal is deformed. After reinstallation, the seal will inevitably leak.
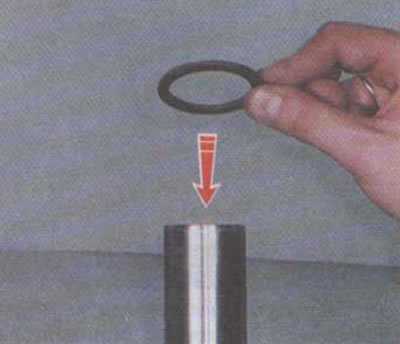
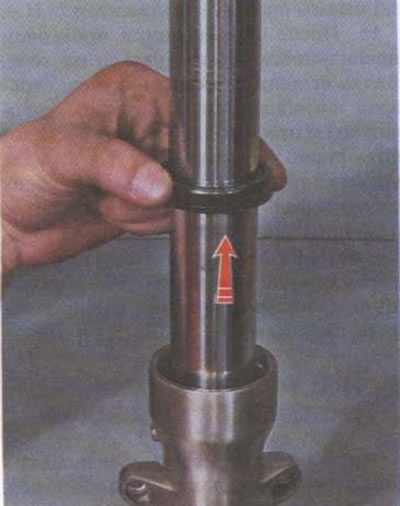
5. Lubricate the working edge and seating surface of the new oil seal with fork oil and put the seal on the supporting pipe. We lower the oil seal all the way down, align it horizontally with respect to the landing plane of the feather and recess it a little into the socket so as not to disturb the alignment of the oil seal.
Attention! It is necessary to work extremely carefully near the mirror of the moving pipe. Any, even the most insignificant scratch is, in fact, a groove through which oil will flow out.
Attention! The oil seal provides a high-quality seal only if the working surface of the moving part is absolutely smooth. Be extremely careful.
6. In professional workshops, special mandrels are used to press in oil seals and guides. If there is no such mandrel, pressing in the oil seal and guide using a drift is allowed.
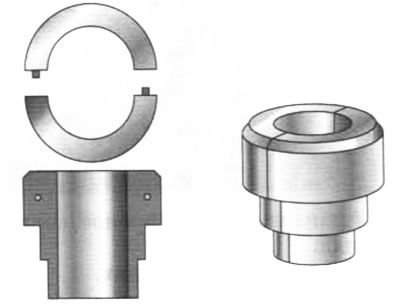
Mandrel for pressing in fork seals. The inner diameter of the mandrel must be equal to the diameter of the fork support pipes
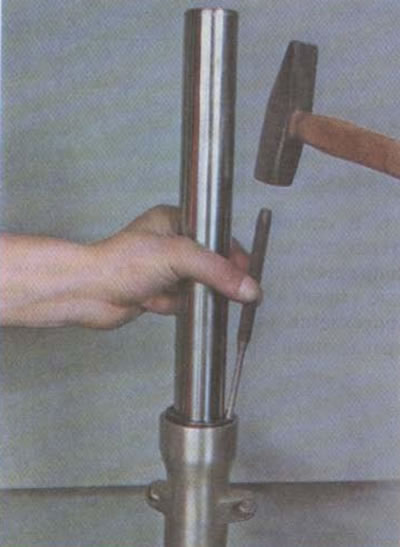
Attention! It is very important, when pressing the stuffing box, not to deform its steel frame, and since the impact area of the beard is small enough, this is quite easy to do. It is better to give twenty light blows than ten strong ones. A deformed oil seal will inevitably leak!
7. Applying light blows to the diametrically opposite sides of the stuffing box, we press it and the upper guide under it into the movable pipe.
8. Install the stuffing box circlip.
9. Install boot.
10. Pour fork oil into the pen. The manufacturer recommends using SAE 10W fork oil.
499 ml of oil must be poured into each pen.
Attention! The motorcycle fork uses variable pitch coil springs to provide progressive compression characteristics. It is necessary to correctly install the spring in the feather: the winding pitch should increase from bottom to top.
11. Lower the spring into the pen. (If short springs with spacers are installed in the fork, after the spring we install the spring thrust washer and spacer).
12. Install the upper spring washer.

13. We wrap the pen cork.
14. After installing the pen in the traverses, tighten the pen plug with a torque of 22 Nm.
15. After assembling the fork, we check the correct operation of the stays while driving. The fork should not make knocking, grinding or any sounds at all; the working stroke and rebound of the fork should occur smoothly, without jamming. There should be no traces of oil on the surface of the supporting pipes. If noticeable even the slightest «sweating» oil, it means that when pressing the oil seal was deformed or skewed. It is necessary to re-replace the current oil seal.