
General
The relay/fuse block assembly consists of two relay/fuse blocks and is located under the airbox cover, next to the radiator cap. All relays and fuses (with the exception of the main battery fuse - see 8.5 Maxi-fuse) are contained in these two relay/fuse blocks.
Relay/fuse block removal
1. Remove maxi-fuse. See 8.5 Maxi-fuse.
2. Unlock and open seat.
3. Remove airbox cover. See 1.4 Airbox and air filter.
4. See Figure 8-1. Gently lift up each relay/fuse block cover release tab (2) and slide each relay/fuse block assembly out of the cover.
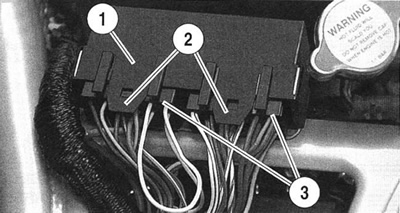
Figure 8-1. Relay/fuse block assembly
See Figure 8-2. Each relay/fuse block assembly contains both fuses (1) and relays (3). There is one unused, empty fuse socket (2).

Figure 8-2. Relays and fuses: 1. Fuses; 2. Empty fuse socket; 3. Relays
Fuse replacement
1. See Figure 8-3. Grasp the suspect fuse and gently pull straight out of the fuse socket.
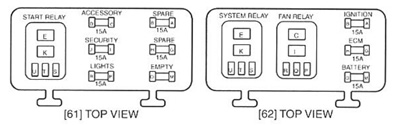
Figure 8-3. Relay/fuse block layout
2. Inspect the fuse element. Replace the fuse if the element is burned or broken.
3. Line up the pins of the fuse with the socket holes in the relay/fuse block. Push gently down on the fuse body until it bottoms out in the socket.
Note. Two spare fuses are located in the left relay/fuse block.
Always use replacement fuses that are of the correct type and amperage rating. Use of incorrect fuses can result in damage to the electrical system.
Note. Use only automotive type ATO fuses as replacements.
Relay replacement
1. See Figure 8-3. If a relay is diagnosed as defective, grasp the body of the relay and with a gentle rocking motion, pull straight out of the socket.
2. Line up the pins of the new relay with the socket holes in the relay/fuse block. Push gently down on the relay body until it bottoms out in the socket.
Relay/fuse block installation
1. See Figure 8-1. Slide each relay/fuse block assembly back into relay/fuse block cover. Push relay/fuse block assembly into the cover until cover release tab locks into place.
2. Replace airbox cover. See 1.4 Airbox and air filter.
3. Turn ignition switch to the FUEL position and close seat. Then turn ignition switch to the LOCK position.
Caution! When closing the seat, make sure the ignition switch is in the FUEL position. If the ignition switch is in any other position when the seat is closed, the seat latch mechanism could be damaged.
4. Replace maxi-fuse. See 8.5 Maxi-fuse.
5. Test the vehicle system that is controlled by the relay or fuse that was replaced.