General
The instrument cluster contains the speedometer, tachometer, fuel gauge and indicator lamps. It is a sealed unit. If any of the instruments or indicator lamps becomes defective, the entire instrument cluster must be replaced.
Removal
1. Remove maxi-fuse. See 8.5 Maxi-fuse.
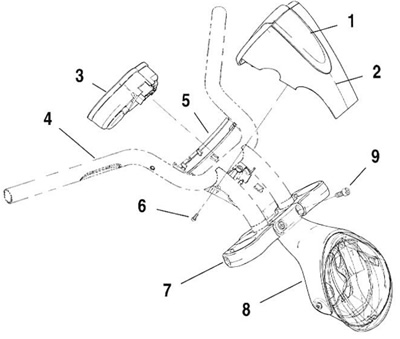
2. See Figure 8-31. To free lower end of top handlebar cover, loosen two mounting fasteners (9) holding headlamp bracket (8) to upper triple clamp (7).

Figure 8-31. Instrument cluster removal: 1. Instrument housing bezel; 2. Handlebar top cover; 3. Instrument cluster; 4. Handlebars; 5. Handlebar bottom cover; 6. Fastener (2) @ 1.3-1.9 Nm (12-16 in-lbs); 7. Upper triple clamp; 8. Headlamp and headlamp bracket; 9. Fastener (2) @ 11 -18 Nm (8-13 ft-lbs)
3. Without removing cover, remove two fasteners (6) securing handlebar top cover (2) and instrument housing bezel (1) to handlebar bottom cover (5).
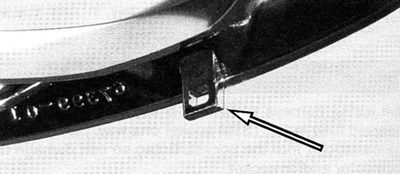
Caution! See Figure 8-32. Bezel hook holds bottom of bezel and top cover to lower handlebar cover and can be damaged if forced during removal or installation.

Figure 8-32. Bezel hook
4. From headlamp bracket end of cover, gently tilt top handlebar cover and instrument bezel up and back to remove cover and bezel.
Note. Bezel can remain snapped to upper handlebar cover.
5. See Figure 8-33. Squeeze two release latches (4) together and gently pull wiring harness connector (3) [39] from instrument cluster socket (2).

Figure 8-33. Instrument cluster harness connector: 1. Instrument cluster; 2. Instrument cluster socket; 3. Wiring harness connector [39]; 4. Release latch (2)
6. Remove instrument cluster (1) from handlebar bottom cover.
Installation
1. Set new instrument cluster into handlebar bottom cover.
2. See Figure 8-33. Install wiring harness connector (3) into instrument cluster socket (2). Gently push connector into socket until release latches (4) lock into place.
Caution! See Figure 8-32. Bezel hook holds bottom of bezel and top cover to lower handlebar cover and can be damaged if forced during removal or installation.
3. See Figure 8-31. Orient instrument housing bezel (1) and handlebar top cover (2), and fit bezel hook over tab on handlebar bottom cover (5). Gently press handlebar top cover and instrument housing bezel down until bezel hook snaps onto tab.
4. Fit bottom end of handlebar top cover behind headlamp mounting bracket. Bezel edge should fit snugly to grooved rim of lower and upper cover.
5. Secure handlebar covers with two fasteners (6). Tighten fasteners to 1.3-1.9 Nm (12-16 in-lbs).
6. Tighten headlamp bracket fasteners (9) to 11-18 Nm (8-13 ft-lbs).
7. Replace maxi-fuse. See 8.5 Maxi-fuse.
8. Verify that instrument cluster is operational:
- a. Turn ignition/seat release switch to the ACC position. Instrument background lighting will illuminate, gauge needles will sweep their full range of motion and the battery, security, coolant temperature and check engine indicator lamps will illuminate.
- b. Turn ignition/seat release switch to the LOCK position.
