General
The alternator is located behind the alternator cover, on the lower left side of the engine. The alternator cover is secured with 14 fasteners. The derby cover is located on the alternator cover, secured with two fasteners.
Note. For diagnostic information, see the VRSCA Electrical Diagnostic Manual.
Caution! The alternator stator is mounted in the alternator cover. The alternator rotor is mounted on the end of the engine crankshaft. Be careful to keep fingers away from the edges of the alternator cover when removing or installing the cover. The magnetic attraction between the stator and rotor is strong and could cause the cover to be pulled toward the engine case with enough force to cause moderate injury.
Removal
1. Remove maxi-fuse. See 8.5 Maxi-fuse.
2. Remove fastener securing bottom of left radiator trim cover. Remove trim cover.
3. See Figure 8-8. Remove voltage regulator 3-wire harness connector clip from left side of radiator cover. Disconnect voltage regulator connector [46B] from alternator stator connector [46А].

Figure 8-8. Stator-to-regulator connector
4. Unlatch cable clip on top of jiffy stand and remove alternator wiring harness.
5. Remove two fasteners securing derby cover. Remove cover.
6. See Figure 8-9. Place drip pan underneath alternator cover to catch any residual oil that may drain out when cover is removed.

Figure 8-9. Removing alternator cover: 1. Alternator cover; 2. Gasket alignment dowel (2); 3. Derby cover fasteners; 4. Alternator cover remover/installer tool (HD-45304)
7. Using two derby cover fasteners (3), position ALTERNATOR STATOR COVER REMOVER/INSTALLER TOOL (Part Number HD-45304) (4) as shown.
8. Remove 14 fasteners securing alternator cover (1).
9. Install two GASKET ALIGNMENT DOWELS (Part Number HD-45340) (2) in two of the alternator cover holes to steady cover as it is removed.
10. Remove alternator cover.
11. See Figure 8-10. Remove fastener (5) and harness clip (6) from alternator cover.

Figure 8-10. Removing stator from alternator cover: 1. Alternator cover; 2. Stator assembly; 3. Stator mounting fasteners (3) @ 8.2-10.7 Nm (72-95 in-lbs); 4. Fastener with captive washer @ 8.2-10.7 Nm (72-95 in-lbs); 5. Fastener @ 8.2-10.7 Nm (72-95 in-lbs); 6. Harness clip; 7. Grommet; 8. Stator wiring harness connector
12. Remove fastener and captive washer (4) from alternator cover.
13. Remove grommet (7) from slot in alternator cover.
14. Remove three stator mounting fasteners (3) and pull stator straight up out of alternator cover.
Installation
1. Thoroughly clean alternator cover and gasket sealing surface on engine case. Remove any sealing material from gasket sealing surfaces.
2. See Figure 8-10. Install stator assembly (2) in alternator cover (1). Make sure to orient stator so that wiring harness exits stator housing at approximately 3 O’clock position. Line up three fastener holes in stator with holes in alternator cover. Install three stator mounting fasteners and tighten to 8.2-10.7 Nm (72-95 in-lbs).
3. Put a thin film of silicone sealant on stator wiring harness grommet (7). Press grommet down into slot in alternator cover. Make sure flat surface of grommet is flush with gasket sealing surface of alternator cover.
4. Install fastener with captive washer (4). Make sure wiring harness is fully seated in slot and not pinched between washer and alternator cover. Tighten to 8.2-10.7 Nm (72-95 in-lbs).
5. Install harness clip (6) into alternator cover. Secure with fastener (5). Tighten to 8.2-10.7 Nm (72-95 in-lbs).
6. See Figure 8-9. Make sure ALTERNATOR STATOR COVER REMOVER/INSTALLER TOOL (Part Number HD-45304) (4) is installed as shown. Secure to alternator cover with two derby cover fasteners. Turn handle of tool clockwise (CW) several turns.
7. Make sure two GASKET ALIGNMENT DOWELS (Part Number HD-45340) (2) are installed in case.
8. Slide new alternator cover gasket onto alignment dowels and press flush against engine case.
9. Slide alternator cover onto alignment dowels. Turn handle of remover/installer counterclockwise (CCW) until it turns freely. Remove two derby cover fasteners and remover/installer tool.
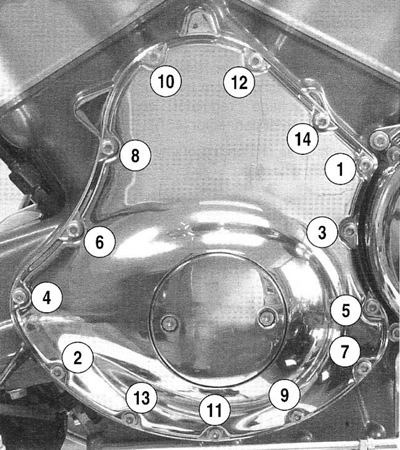
Note. To avoid oil leaks caused by warping of alternator cover, in next step, tighten fasteners in alternating pattern back and forth across face of cover. See Figure 8-11.

Figure 8-11. Alternator cover. Fastener tightening sequence @ 9.7 Nm (85 in-lbs)
10. Secure alternator cover to engine case with 14 fasteners. Tighten to 9.7 Nm (85 in-lbs).
11. Clean derby cover. Inspect о-ring on derby cover. Replace if damaged.
12. Install derby cover on alternator cover with two fasteners. Tighten to 8.2-10.7 Nm (72-95 in-lbs).
13. Route stator wiring harness through cable clip on top of jiffy stand. Latch cable clip.
14. Plug stator connector into three-wire voltage regulator connector. Secure connector to left side of radiator cover with connector clip.
15. Install radiator trim cover onto radiator cover. Make sure no wires become pinched under cover. Secure with fastener. Tighten to 3-4 Nm (26-35 in-lbs).
16. Replace maxi-fuse. See 8.5 Maxi-fuse.
17. Test alternator output according to instructions in VRSCA Electrical Diagnostic Manual.
