MotoInstruction.ru
Mobile
version
Articles
& news
Site
map
Feed
back
Add to
bookmark
English Русский
Aprilia
BMW
Ducati
Harley
Honda
Kawasaki
Suzuki
Triumph
Yamaha
BMW:
F-series▾
F650GS (2000-2007)
R-series▾
R1150GS (1999-2004)
K-series▾
K1200LT (1998-2009)

Replacing primary sealing boot, rear brake master cylinder (BMW F650GS)

  • Main
  • BMW
  • F-series
  • F 650 GS
  • Information for owner
  • Maintenance
  • Replacing primary sealing boot…
0
(Inspection III, every 40,000 km/24,000 miles for motorcycles with ABS)

Place the motorcycle on its main (centre) stand.

Caution! Do not allow brake fluid to come into contact with painted parts of the motorcycle, because brake fluid destroys paint.


Drain the rear brake system.


Disengage piston thrust rod (1).

Remove the piston thrust rod complete with sealing boot (2).

Carefully force back the brake piston.

Remove the circlip.

Use pliers to remove the brake piston.


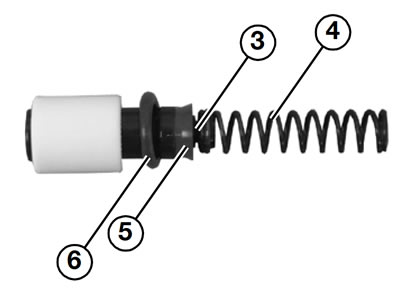
Remove spring (4) with insert (3).

Caution! Note the washer between the brake piston and the boot.


Remove front boot (5).

Installation is the reverse of the removal procedure: pay particular attention to the following.

Caution! Sealing lip of the boot toward the pressure chamber.


Note: Replace O-ring (6) prior to installation.


Install new front boot.

Prior to installation, coat the brake piston and the boots with the assembly fluid supplied.

Lightly grease the thrust rod with Shell Retinax A.

Fill and bleed the brake system.
See this article in russian language
◀ Previous
BMW F650GS : Maintenance
Next ▶

Replacing primary sealing boot, front brake master cylinder
Changing brake fluid
Checking operation of brake system and freedom from leaks, replacing if necessary
Checking the brake fluid level and topping up if necessary
Checking brake pads and discs for wear, replacing if necessary
Checking wheel spoke tension, adjusting if necessary
Inspecting front and rear wheel bearings, replacing if necessary
Checking chain, chainwheel and chain sprocket, replacing if necessary
Checking chain tension, adjusting if necessary
Checking battery acid level, adding distilled water if necessary
Cleaning and greasing the battery terminals, if necessary
Checking and adjusting steering head bearing play, replacing if necessary
Similar articles about motorcycles of other brands
Triumph Tiger 800 (2010-2019): Exploded View — Rear Brake Master Cylinder Yamaha FZ1 Fazer (2006-2015): Disassembling the rear brake master cylinder Suzuki DRZ 250 (1996-2007): Master Brake Cylinder (Rear) — Removal and Disassembly Honda CB 400 SF (1992-1999): Rear Brake Master Cylinder — Removal and Installation Harley-Davidson V-Rod (2002-2006): Rear brake master cylinder and reservoir Ducati ST2 (1997-2003): Removing the rear brake cylinder support and rear brake pedal Aprilia RS 125/3 (1998-2005): Replacing the rear brake pads Kawasaki ZX6R/ZX600J (2000-2002): Rear master cylinder — disassembly
Link to this article in different formats
TEXTHTMLBB Code
Comments and feedback from visitors
No comments yet, you will be the first!


Add up two numbers: 38 + 21


F650GS (2000-2007) 
  • Information for owner
  • Introduction to manual
  • Maintenance
  • Engine and systems
  • Engine repair
  • Ignition system
  • Fuel and exhaust systems
  • Cooling system
  • Transmission
  • Running gear and frame
  • Frame and hinged elements
  • Handlebar
  • Rear suspension
  • Brake system
  • Wheels and tires
  • Electric equipment
  • Equipment and devices
  • Lighting and lamps
Aprilia BMW Ducati Harley Honda Kawasaki Suzuki Triumph Yamaha
MotoInstruction.ru © 2021–2025 | Sitemap | Articles | Contacts | Site search | Add to bookmarks | Mobile version