
The spherical ball end of the stabilizer may rotate loosely, but should not have lateral movement. Replace the link if lateral movement exists.
Upper front stabilizer link
| FASTENER | TORQUE VALUE | |
| Stabilizer link, upper front, engine bracket mounting screw | 55-65 ft·lbs | 74.6-88.2 Nm |
| Stabilizer link, upper front, frame bracket mounting screw | 25-35 ft·lbs | 33.9-47.5 Nm |
| Stabilizer link screw | 25-35 ft·lbs | 33.9-47.5 Nm |
Removal
1. See Figure 2-167. Remove screws (4) and stabilizer link (2).
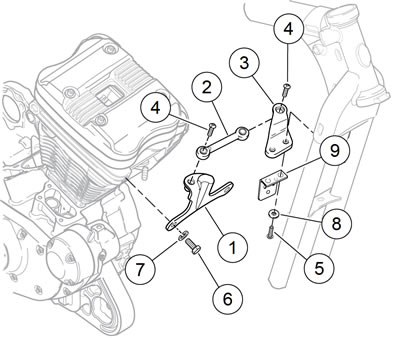
Figure 2-167. Upper front stabilizer link assembly: 1. Engine bracket; 2. Upper stabilizer link; 3. Upper frame bracket; 4. Screw; 5. Screw (2); 6. Screw (2); 7. Lockwasher (2); 8. Washer (2); 9. Horn bracket (front mount models)
Note. Models with a side-mounted horn do not include a horn bracket (9).
2. Remove screws (5), washers (8), horn bracket (9) and upper frame bracket (3) from frame.
3. Remove screws (6), lockwashers (7) and engine bracket (1) from front cylinder head.
Installation
1. See Figure 2-167. Install screws (6), lockwashers (7) and engine bracket (1) to front cylinder head. Tighten to 55-65 ft·lbs (74.6-88.2 Nm).
Note. Models with a side-mounted horn do not include a horn bracket (9).
2. Install upper frame bracket (3), horn bracket (9), screws (5) and washers (8). Tighten to 25-35 ft·lbs (33.9-47.5 Nm).
3. Install stabilizer link (2) with screws (4). Tighten to 25-35 ft·lbs (33.9-47.5 Nm).
Lower front stabilizer link
| FASTENER | TORQUE VALUE | |
| Stabilizer link, lower front, frame bracket mounting screw | 25-35 ft·lbs | 33.9-47.5 Nm |
| Stabilizer link screw | 25-35 ft·lbs | 33.9-47.5 Nm |
Removal
1. Position motorcycle upright on suitable lift.
2. See Figure 2-168. Remove screws (3) and stabilizer link (1).
3. Remove screws (4), washers (5) and lower frame bracket (2) from frame.
Installation
1. See Figure 2-168. Install screws (4), washers (5) and lower frame bracket (2) to frame. Tighten to 25-35 ft·lbs (33.947.5 Nm).
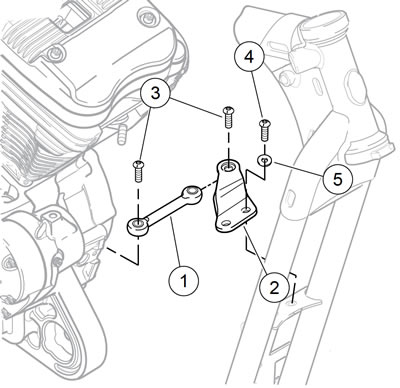
Figure 2-168. Lower front stabilizer link assembly (typical): 1. Lower stabilizer link; 2. Lower frame bracket; 3. Screw (2); 4. Screw (2); 5. Washer (2)
2. Install stabilizer link (1). Secure with screws (3). Tighten to 25-35 ft·lbs (33.9-47.5 Nm).
Rear stabilizer link
| FASTENER | TORQUE VALUE | |
| Stabilizer link screw | 25-35 ft·lbs | 33.9-47.5 Nm |
Removal
1. Motorcycles Equipped with EVAP Controls: Remove EVAP canister and mounting bracket. See 4.20 EVAPORATIVE EMISSIONS CONTROL, Charcoal Canister.
2. See Figure 2-169. Remove short screw (3), long screw (4), ground strap (2), stabilizer link (1) and spacer (5).

Figure 2-169. Rear stabilizer link assembly (typical): 1. Stabilizer link; 2. Grounding strap; 3. Screw; 4. Screw; 5. Spacer
Installation
1. See Figure 2-169. Install short screw (3) through ground strap (2) and stabilizer link (1). Thread screw into frame on right side of motorcycle. Do not tighten at this time.
2. Install long screw (4) through ground strap, stabilizer link and spacer (5) into engine case.
Notes:
- XL Models: Orient the ground strap so it does not come into contact with the EVAP canister mounting hardware.
- XR 1200X: Check that the ground strap does not contact the rear stop switch harness before tightening stabilizer link screws.
3. Tighten both screws to 25-35 ft·lbs (33.9-47.5 Nm).
4. Motorcycles Equipped with EVAP Controls: Install EVAP canister and mounting bracket. See 4.20 EVAPORATIVE EMISSIONS CONTROL, Charcoal Canister.