Removal
Warning! To avoid accidental start-up of vehicle and possible personal injury, remove the maxi-fuse before proceeding. Inadequate safety precautions could result in death or serious injury.
1. Remove right side cover and remove maxi-fuse. See 8.5 Maxi-fuse.
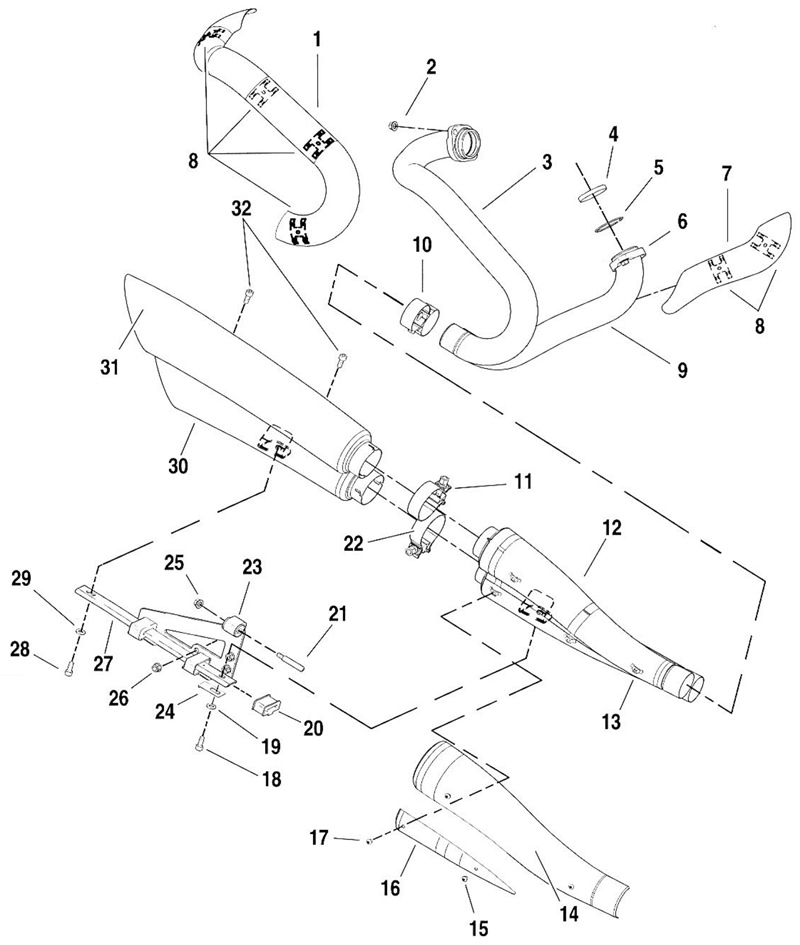
2. See Figure 2-6. Loosen upper muffler clamp (11).

Figure 2-6. Exhaust system: 1. Front heat shield; 2. Exhaust flange hex-nut; 3. Rear header pip; 4. Gasket; 5. Snap ring; 6. Mounting flange; 7. Rear heat shield; 8. Clamp (6); 9. Front header pipe; 10. Exhaust clamp; 11. Upper muffler clamp; 12. Auxiliary volume; 13. Nut; 14. Shield upper exhaust; 15. Screw; 16. Shield lower exhaust; 17. Screw; 18. Screw; 19. Washer; 20. Rubber mount; 21. Pin; 22. Lower muffler clamp; 23. Isolator mount; 24. L-bracket; 25. Hex-nut; 26. Nut; 27. Exhaust support; 28. Screw; 29. Washer; 30. Lower muffler; 31. Upper muffler; 32. Screw
3. Remove the two fasteners (32) holding the upper muffler (31) to the bottom muffler (30).
4. Slide upper muffler rearward to disconnect from the auxiliary volume (12).
5. Remove both heat shields (1, 7) from front and rear header pipes. It’s not necessary to remove the heat shield (14) from the auxiliary volume (12).
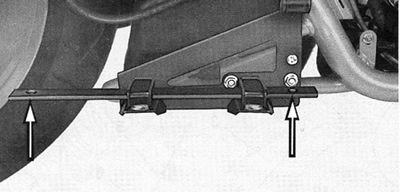
6. Remove the auxiliary volume fastener (18) and the lower muffler fastener (28) from the lower part of the exhaust support bracket. Save the L-bracket (24) found under the exhaust support.
Note. Remove the left side drive sprocket cover for easier access to rear cylinder lower exhaust flange bolt.

Figure 2-7. Exhaust support fastener locations (exhaust system removed)
7. Remove flanged hex-nuts (2) holding exhaust flange to front and rear cylinders.
8. Remove hex-nut (25) and pin (21) on exhaust support bracket.
9. Remove header pipes with the auxiliary volume and lower muffler attached. Lift and adjust assembly until header pipes slide out and away from the cylinder heads.
Note. To maintain the alignment of these components, keep the lower muffler, the auxiliary volume, the exhaust clamp, and the front and rear header pipes firmly connected.
Installation
Note. Do not torque fasteners until required to do so by the following installation instructions. Hand tightening each fastener will pull the exhaust system into a position that will allow the crush of the exhaust gaskets during the torquing sequence to to draw the exhaust system up to the engine.
1. Install new exhaust header gaskets.
2. See Figure 2-6. Gently lift the lower muffler, auxiliary volume, and header pipe assembly into position.
Note. A second technician may be required to hold the header pipes when aligning the exhaust header flanges with the studs in the cylinder heads.
3. Slip both front and rear header flanges over the studs in the cylinder heads. Thread hex-nuts (2) on header flange studs. Do not tighten.
4. Install support pin (21) in isolator mount (23) on the exhaust support. Thread on the hex-nut (25). Do not tighten.
5. Hold a 1/2 in. spacer between the frame rail and the header pipe exhaust clamp.
6. Thread in the lower muffler fastener (28) through the exhaust support.
7. Thread in the auxiliary volume fastener (18) through the L-bracket (24) and the exhaust support. Do not tighten.
8. Torque the pin hex-nut to 23 Nm (17 ft-lbs).
9. Place clamp (11) on upper muffler (31). Slide muffler over upper opening of auxiliary volume (12). Position clamp with compression fastener to inboard with tightening nut upward.
10. Thread upper muffler fasteners (32) into the lower muffler (30). Do not tighten.
11. Torque the fasteners to the indicated torque in the following order:
- a. Upper muffler clamp - 65 Nm (48 ft-lbs).
- b. Upper muffler fasteners - 23 Nm (17 ft-lbs).
- c. Lower muffler and auxiliary volume fasteners to support bracket - 23 Nm (17 ft-lbs).
- d. Exhaust flange hex-nuts - 6-10 Nm (53-88 in-lbs).
12. Check the tightness of the exhaust clamp by tightening the clamp nut to 32-37 Nm (24-27 ft-lbs).
13. Replace front and rear heat shields. Tighten the heat shield screws to 10 Nm (88 in-lbs).
14. If removed, replace drive sprocket cover. Tighten to 6-10 Nm (53-88 in-lbs).
15. Replace the maxi-fuse and the right side cover.
