General
The cooling fans are mounted one above the other, behind the radiator. The cooling fans are controlled electronically and are turned on and off as necessary to maintain an acceptable coolant temperature range.
Removal
1. Remove maxi-fuse. See 8.5 Maxi-fuse.
2. Remove exhaust system. See 2.7 Exhaust system.
3. See Figure 8-13. Remove fasteners (1) and left and right radiator trim covers (2).
Note. Before removing wiring harnesses, carefully note wire routing. In particular, pay close attention to locations of cable straps that must be replaced.
4. See Figure 8-16. Pull rear brake master cylinder reservoir straight away from its mounting slots in right side of radiator cover.
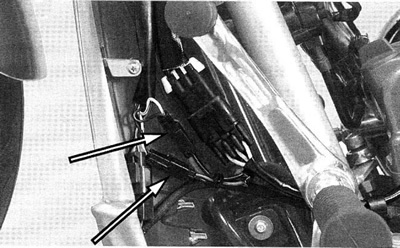
5. See Figure 8-42. Clip cable straps securing cooling fan wiring harnesses to other harnesses on left side of radiator cover. Disconnect appropriate cooling fan wiring harness connector.

Figure 8-42. Cooling fan wiring harness connectors
6. See Figure 8-13. Remove all other wiring harness cable straps and clips attached to left side of radiator cover (5).
7. Remove mounting fasteners (3), washers (4) and radiator cover (5).
8. See Figure 8-43. Remove fasteners (4) and washers (5). Slide front cross member (3) off bottom radiator mounting studs.
9. Loosen nuts (6) and carefully pull bottom of radiator forward a few inches to gain access to cooling fans.

Figure 8-43. Radiator mounting: 1. Frame; 2. Radiator; 3. Front cross member; 4. Fastener (2) @ 20-26 Nm (15-19 ft-lbs); 5. Washer (2); 6. Nut (2) @ 19-27 Nm (14-20 ft-lbs)
10. See Figure 8-44. Remove cooling fan.
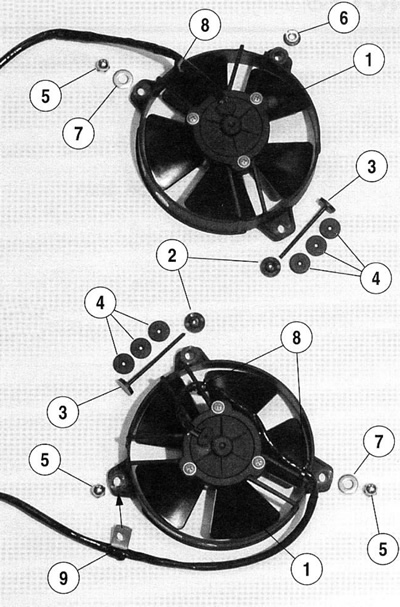
- a. To detach top fan, remove acorn nut (5), washer (7) and flange nut (6). To detach bottom fan, remove acorn nuts (5), washer (7) and P-clamp (9).
- b. Carefully pry retainer (2) off retainer shaft (3). Retainer is on front side of radiator. Remove retainer shaft and rubber washers.
- c. Slide cooling fan off mounting studs and remove from vehicle.

Figure 8-44. Cooling fan orientation and mounting: 1. Fan; 2. Retainer; 3. Retainer shaft; 4. Rubber washer (3); 5. Acorn nut @ 4.5-5.5 Nm (40-48 in-lbs); 6. Flange nut @ 4.5-5.5 Nm (40-48 in-lbs); 7. Washer; 8. Cable strap; 9. P-clamp
Installation
Note. Cooling fans are identical with the exception of the location of cable straps securing wiring harness to cooling fan. Note location(s) of cable strap(s) (8) in Figure 8-44. When installing new cooling fan (1), secure wiring harness to cooling fan with cable strap(s) in same location(s), routing harness appropriately.
1. See Figure 8-44. Note orientation of cooling fans and locations of mounting hardware and cable straps. Mount cooling fan.
- a. Note location of retainer assembly. See Figure 8-45. Pass new retainer shaft (1) through mounting hole in cooling fan (2).
- b. Slide two rubber washers (3) on retainer shaft.
- c. Carefully push retainer shaft through opening in cooling fins in radiator core (4).
- d. Install one rubber washer (3) on retainer shaft.
- e. Press retainer (5) on retainer shaft so entire assembly is a snug fit.
- f. Clip off excess length of retainer shaft.
- g. See Figure 8-44. To mount top fan, install acorn nut (5), washer (7) and flange nut (6). To mount bottom fan, install P-clamp (9), acorn nuts (5) and washer (7). Tighten nuts to 4.5-5.5 Nm (40-48 in-lbs).

Figure 8-45. Retainer assembly: 1. Retainer shaft; 2. Cooling fan; 3. Rubber washer (3); 4. Radiator core; 5. Retainer
2. Route fan wiring harness to left side of radiator.
3. See Figure 8-43. Slide front cross member (3) onto mounting studs on bottom of radiator (2).
4. Attach front cross member to motorcycle frame with fasteners (4) and washers (5). Tighten to 20-26 Nm (15-19 ft-lbs).
5. Tighten nuts (6) to 19-27 Nm (14-20 ft-lbs).
6. See Figure 8-13. Mount radiator cover (5) with fasteners (3) and washers (4). Tighten to 4.1-6.8 Nm (36-60 in-lbs).
7. Connect cooling fan wiring harness connector. Attach all harnesses to left side radiator cover as appropriate, with clips and/or cable straps.
8. See Figure 8-16. Push rear brake master cylinder reservoir into mounting slots in right side of radiator cover.
9. See Figure 8-13. Install left and right radiator trim covers and fasteners. Tighten to 3-4 Nm (26-35 in-lbs).
10. Install exhaust system. See 2.7 Exhaust system.
11. Replace maxi-fuse. See 8.5 Maxi-fuse.
12. Test cooling fan operation. See the VRSCA Electrical Diagnostic Manual.
