Inspection
The horn is located on the left side of the motorcycle, mounted under the top frame rail, between the engine cylinder heads.
If the horn fails to sound or does not sound satisfactorily, check for loose, frayed or damaged horn terminal wires, discharged battery or corroded ground.
The horn is permanently sealed and non-repairable. If defective, it must be replaced.
Note. No tonal adjustments can be made to this horn.
Replacement
1. See Figure 8-40. Remove acorn nut (1) and washer (2) and detach horn assembly from motorcycle.

Figure 8-40. Horn: 1. Acorn nut @ 9-15 Nm (80-132 in-lbs); 2. Washer; 3. Motorcycle Frame; 4. Horn cover; 5. Rubber mount; 6. Horn mounting bracket; 7. Flange nut @ 6-8 Nm (53-70 in-lbs); 8. Horn; 9. Ground wire; 10. Horn power wire
2. Remove ground and power wires (9, 10) from posts on back side of horn (8).
3. Remove nut (7) securing horn to mounting bracket (6).
Note. When tightening the flange nut in the next step, make certain the horn does not come in contact with the horn cover. If it does, loosen the flange nut, reposition the horn, and retighten the flange nut.
Caution! Overtightening the flange nut can cause permanent horn damage resulting in reduced volume and tone quality.
4. Install new horn on bracket. Secure with flange nut (7). Tighten to 6-8 Nm (53-70 in-lbs).
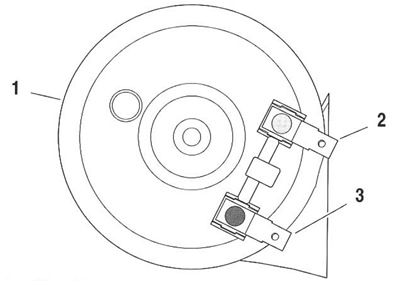
5. See Figure 8-41. Attach wiring.
- a. Connect BK ground wire to silver post (2).
- b. Connect Y/BK horn power wire to copper post (3).

Figure 8-41. Horn wiring: 1. Horn (back side view); 2. Silver post (BK ground wire); 3. Copper post (Y/BK power wire)
Note. When tightening the acorn nut in the next step, make certain the horn cover does not come in contact with the fins on the cylinder heads. If it does, loosen the acorn nut, reposition the horn assembly and retighten the nut.
6. See Figure 8-40. Attach horn assembly to motorcycle using washer (2) and acorn nut (1). Tighten to 9-15 Nm (80-132 in-lbs).
