General information
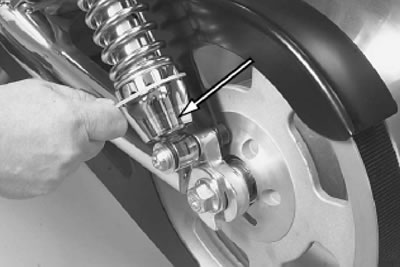
See Figure 12. The rear shock spring load can be adjusted to suit the weight carried by the motorcycle. The spring load adjuster has five positions. The positions of the load regulator are marked on the ring; they become visible when the ring is turned.
Adjustment
Warning! Make sure both shock absorbers are adjusted to the same load position. Incorrect adjustment may adversely affect motorcycle stability and handling. This, in turn, can result in severe injury or death.
If only the driver is on the motorcycle (normal weight), you can use the position corresponding to the stretched spring (position 1 or 2).
1. Install the shock absorber adjustment tool onto the lower shock absorber adjusting ring.
2. Turn the ring clockwise (towards larger numbers) - while the load (pressure) will increase by the spring.
Using the numbers on the ring, adjust the shock absorbers equally on the right and left sides of the motorcycle. If the driver is heavy, the spring may need to be compressed (set the position of the regulator 3).
Warning! Do not turn the shock absorber adjusting ring counterclockwise, or turn the ring to a position less than 1. Failure to observe this caution may damage the shock absorbers.
It may be necessary to compress the springs as much as possible to transport a passenger (set the ring to position 5).
To reduce spring compression and pressure on them, turn the ring counterclockwise. See Figure 12.

Figure 12. Rear shock absorber adjustment
To adjust the rear shock spring pressure, turn the spring adjuster cam to the desired position using a wrench.
When returning to the free position, the cams should move in the opposite direction. WRENCH (Part No. 94700-52C) Available from your Harley-Davidson dealer.

Figure 13. Wrench
