The hydraulic unit operation can be tested by the following two methods.
- Hydraulic unit operation test 1: this test generates the same reaction-force pulsating action that is generated in the brake lever and brake pedal when the ABS is activated.
- Hydraulic unit operation test 2: this test checks the function of the ABS after the system was disassembled, adjusted, or serviced.
Hydraulic unit operation test 1
Warning! Securely support the vehicle so that there is no danger of it falling over.
1. Place the vehicle on the centerstand.
2. Set the main switch to «OFF».
3. Remove:
- Seat . Refer to «General chassis».
- Fuel tank. Refer to «Fuel tank».
Front cowling inner panel (left side) Refer to «General chassis».
4. Check:
- Battery voltage
Battery voltage: Higher than 12.8 V
Lower than 12.8 V → Charge or replace the battery.
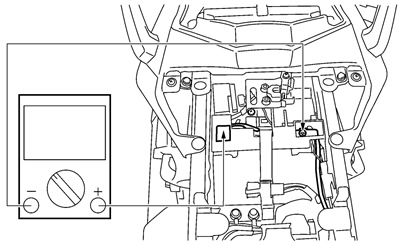
Notes:
- If the battery voltage is lower than 12.8 V, charge the battery and perform hydraulic unit operation test 2.
- If the battery voltage is lower than 10 V, the ABS warning light comes on and the ABS does not operate.
5. Connect the test coupler adaptor «1» to the test coupler «2».
Test coupler adapter: 90890-03149.
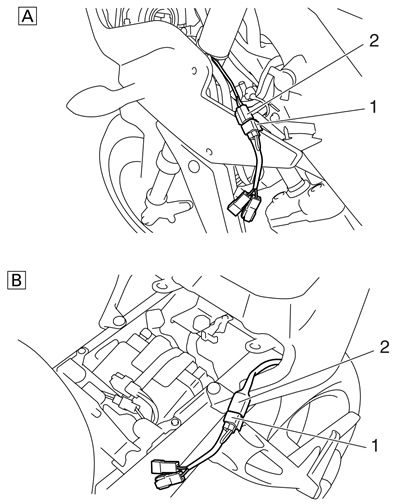
A. FZ1-SA; B. FZ1-NA
6. Set the main switch to «ON» while operating the brake lever and the brake pedal simultaneously.
Caution! When the main switch is set to «ON», be sure to operate both the brake levers and the brake pedal simultaneously. If only the brake levers or brake pedal are operated, set the main switch to «OFF» and start the procedure again.

7. Check:
- Hydraulic unit operation
When the main switch is set to «ON», the ABS warning light comes on for 2 seconds, goes off for 3 seconds, then starts flashing. When the ABS warning light starts flashing, the brake lever «1» will return to its home position. The brake pedal «2» will then return to its home position, then the brake lever will return to its home position again.
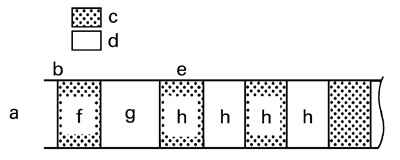
a. ABS warning light; b. Main switch «ON»; c. Comes on; d. Goes off; e. Flashes; f. 2.0 seconds; g. 3.0 second; h. 0.5 second

Cautions!
- Check that the brake lever returns to its home position before the brake pedal returns to its home position.
- If the brake pedal returns to its home position before the brake lever does, check that the brake hoses are connected correctly to the hydraulic unit.
- If either the brake lever or brake pedal returns its home position slowly, check that the brake hoses are connected correctly to the hydraulic unit.
If the operation of the hydraulic unit is normal, delete all of the malfunction codes.
Hydraulic unit operation test 2
Warning! Securely support the vehicle so that there is no danger of it falling over.
1. Place the vehicle on the centerstand.
2. Set the main switch to «OFF».
3. Remove:
- Seat. Refer to «General chassis».
- Fuel tank. Refer to «Fuel tank».
4. Check:
- Battery voltage
Battery voltage: Higher than 12.8 V.
Lower than 12.8 V → Charge or replace the battery.
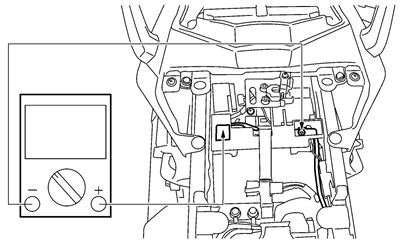
Notes:
- If the battery voltage is lower than 12.8 V, charge the battery and perform hydraulic unit operation test 1.
- If the battery voltage is lower than 10 V, the ABS warning light comes on and the ABS does not operate.
5. Connect the test coupler adaptor «1» to the coupler «2».
Test coupler adapter: 90890-03149.
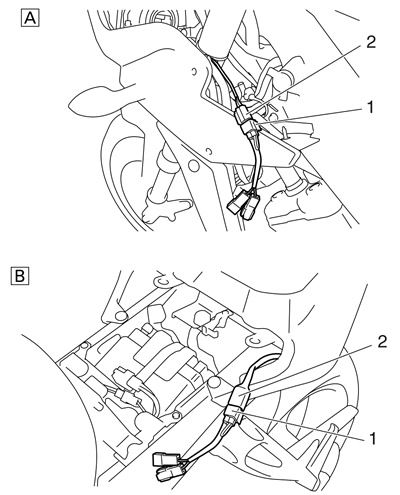
A. FZ1-SA; B. FZ1-NA
6. Set the engine stop switch to «
7. Set the main switch to «ON».
Note: After setting the main switch to «ON», wait (approximately 2 seconds) until the ABS warn- ing light goes off.
8. Push the start switch for at least 4 seconds.
Caution: Do not operate the brake lever or the brake pedal.
9. After releasing the start switch, operate the brake lever and the brake pedal simulta- neously.
Notes:
- A reaction-force pulsating action is gener- ated in the brake lever «1» 0.5 second after the brake lever and the brake pedal are oper- ated simultaneously and continues for approximately 1 second.
- Be sure to continue to operate the brake lever and brake pedal even after the pulsat- ing action has stopped.

10. After the pulsating action has stopped in the brake lever, it is generated in the brake pedal «2» 0.5 second after and continues for approximately 1 second.
Note: Be sure to continue to operate the brake lever and brake pedal even after the pulsating action has stopped.
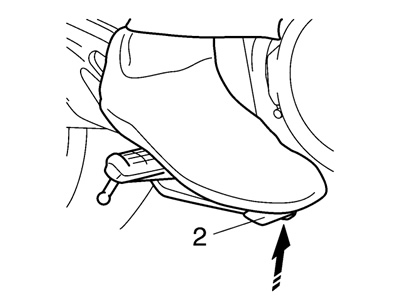
11. After the pulsating action has stopped in the brake pedal, it is generated in the brake lever 0.5 second after and continues for approximately 1 second.
Cautions!
- Check that the pulsating action is felt in the brake lever, brake pedal, and again in the brake lever, respectively.
- If the pulsating action is felt in the brake pedal before it is felt in the brake lever, check that the brake hoses are connected correctly to the hydraulic unit.
- If the pulsating action is hardly felt in either the brake lever or brake pedal, check that the brake hoses are connected correctly to the hydraulic unit.
12. Set the main switch to «OFF».
13. Remove the test coupler adaptor from the test coupler.
14. Set the main switch to «ON».
15. Set the engine stop switch to «o».
Trial run
After all checks and services are completed, always ensure the scooter has no problems by performing the trial running at a speed of faster than 10 km/h.
