
Mainshaft assembly
| PART NUMBER | TOOL NAME |
| J-5586-A | RETAINING RING PLIERS |
Warning! Wear safety glasses or goggles when removing or installing retaining rings. Retaining rings can slip from the pliers and could be propelled with enough force to cause serious eye injury.
Notes:
- Use correct retaining ring pliers and correct tips. Verify that tips are not excessively worn or damaged.
- Lubricate spit bearings and internal bores of gears with SCREAMIN' EAGLE ASSEMBLY LUBE prior to assembly.
1. See Figure 5-62. Install new split bearing (5) in 4th gear position on mainshaft.

Figure 5-62. Transmission mainshaft assembly once removed from left crankcase/disassembly: 1. Mainshaft 1st gear; 2. Retaining ring; 3. Thrust washer; 4. Mainshaft 4th gear; 5. Split bearing; 6. Mainshaft; 7. Mainshaft 3rd gear (integral to shaft); 8. Mainshaft 2nd gear (integral to shaft)
2. Install 4th gear (4) and thrust washer (3).
3. Using RETAINING RING PLIERS (Part No. J-5586-A), expand and install new retaining ring (2).
4. Install 1st gear (1).
Countershaft assembly
| PART NUMBER | TOOL NAME |
| J-5586-A | RETAINING RING PLIERS |
Warning! Wear safety glasses or goggles when removing or installing retaining rings. Retaining rings can slip from the pliers and could be propelled with enough force to cause serious eye injury.
Notes:
- Use correct retaining ring pliers and correct tips. Verify that tips are not excessively worn or damaged.
- During assembly, the split bearings and the internal bores of the gears must be lubricated with SCREAMIN' EAGLE ASSEMBLY LUBE prior to assembly. Leaving these parts dry could accelerate wear at start-up.
1. See Figure 5-63. Install new split bearing (3) in 1st gear position on mainshaft.
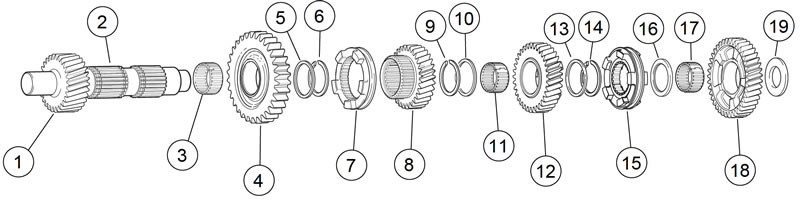
Figure 5-63. Transmission countershaft assembly once removed from left crankcase/disassembly: 1. Countershaft 5th gear (integral to shaft); 2. Countershaft; 3. Split bearing; 4. Countershaft 1st gear; 5. Thrust washer; 6. Retaining ring; 7. Dog ring; 8. Countershaft 4th gear; 9. Retaining ring; 10. Thrust washer; 11. Split bearing; 12. Countershaft 3rd gear; 13. Thrust washer; 14. Retaining ring; 15. Dog ring; 16. Spacer; 17. Split bearing; 18. Countershaft 2nd gear; 19. Spacer
2. Install 1st gear (4) and thrust washer (5).
3. Using RETAINING RING PLIERS (Part No. J-5586-A), expand and install new retaining ring (6).
4. Install dog ring (7) onto 4th gear (8). Now install dog ring and gear assembly onto countershaft.
5. Expand and install new retaining ring (9).
6. Install thrust washer (10).
7. Install new split bearing (11) in 3rd gear position on mainshaft.
8. Install 3rd gear (12) and thrust washer (13).
9. Expand and install new retaining ring (14).
10. Install dog ring (15). Make sure to install with dog ring facing same direction as when it was removed.
11. Install spacer (16).
12. Install new split bearing (17) in 2nd gear position on shaft.
13. Install 2nd gear (18) and spacer (19).
Note. At this point both mainshaft and countershaft sub-assemblies are ready to be pressed into the left crankcase half.