MotoInstruction.ru
Mobile
version
Articles
& news
Site
map
Feed
back
Add to
bookmark
English Русский
Aprilia
BMW
Ducati
Harley
Honda
Kawasaki
Suzuki
Triumph
Yamaha
Aprilia:
RS-series▾
RS125 [3] (1998-2005)
Shiver▾
SL750 (2007-2016)

Headstock re-assembly (Aprilia RS125/3)

  • Main
  • Aprilia
  • RS-series
  • RS 125 [3]
  • Running gear and frame
  • Front suspension and handlebar
  • Headstock re-assembly
0
Read 1.2.1 carefully.

Torque wrench settings:
  • Brake caliper mounting bolts: 22 Nm (2.2 kg·m)

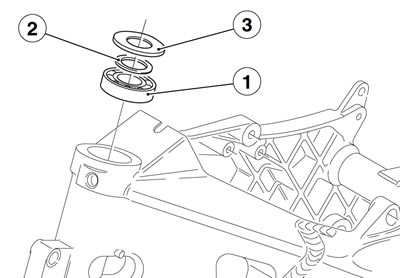
Note. Make sure to have a drift with the same diameter as the bearing outer ring available.


Fit the bearing (1) to the top end of the steering tube using the drift.

Position the washer (2) and the oil seal (3) in the order.


Fit the bearing (4) to the bottom end of the steering tube using the drift.

Position the bottom dust seal (5).

Grease the steering stem and install the bottom yoke and steering stem (6); see 1.8.1.


Before finally tightening the adjusting ring, turn the steering in both directions repeatedly. This will allow the bearings to seat themselves properly.

Adjust play in the bearings; see 2.16.1.


Turn the handlebars to ensure that cables and hoses do not bind. Ensure that cables and hoses are not twisted or twisted around one another.

Lower the hoist arm.

Warning! Ensure that the rear wheel stand (OPT) is positioned correctly before removing the slings.


Install the brake caliper to the brake disc.

Install the mudguard; see 7.1.10.

Detach the slings from the frame.

Install the air scoop; see 7.1.17.

Install the front fairing.
See this article in russian language
◀ Previous
Aprilia RS125 3: Front suspension and handlebar
Next ▶

Steering component inspection
Headstock removal
Steering construction
Front fork construction
Removing the stanchion tubes — sliders
Disassembling the stanchion tubes — sliders
Changing front fork oil
Front fork component inspection
Stanchion tube — slider assembly
Similar articles about motorcycles of other brands
Suzuki DRZ 250 (1996-2007): Transmission assembly Triumph Rocket III (2004-2018): Pistons — disassembly and assembly Yamaha FZ1 Fazer (2006-2015): Adjusting the Shock Absorber Assembly Kawasaki ZX6R/ZX600J (2000-2002): Carburetor — assembly Honda CB 400 SF (1992-1999): Radiator electric fan — removal, disassembly, assembly and installation Ducati Monster 696 (2007-2014): Removal of the tail light-protection-number plate holder assembly Harley-Davidson V-Rod (2002-2006): Cylinder head — assembly BMW K 1200 LT (1998-2009): Completing assembly of gearbox
Link to this article in different formats
TEXTHTMLBB Code
Comments and feedback from visitors
No comments yet, you will be the first!


Add up two numbers: 50 + 21


RS125 3 (1998-2005) 
  • Information for owner
  • Introduction to manual
  • Maintenance
  • Troubleshooting
  • Engine and systems
  • Engine repair
  • Fuel system
  • Cooling and lube system
  • Running gear and frame
  • Frame and hinged elements
  • Front suspension and handlebar
  • Rear suspension
  • Brake system
  • Wheels and tires
  • Electric equipment
  • Equipment and devices
  • Starting and charging system
Aprilia BMW Ducati Harley Honda Kawasaki Suzuki Triumph Yamaha
MotoInstruction.ru © 2021–2025 | Sitemap | Articles | Contacts | Site search | Add to bookmarks | Mobile version