Prepare
1. Raise front wheel. See Motorcycle general maintenance, Secure the Motorcycle for Service.
2. Check wheel bearing end play. See Sealed wheel bearings.

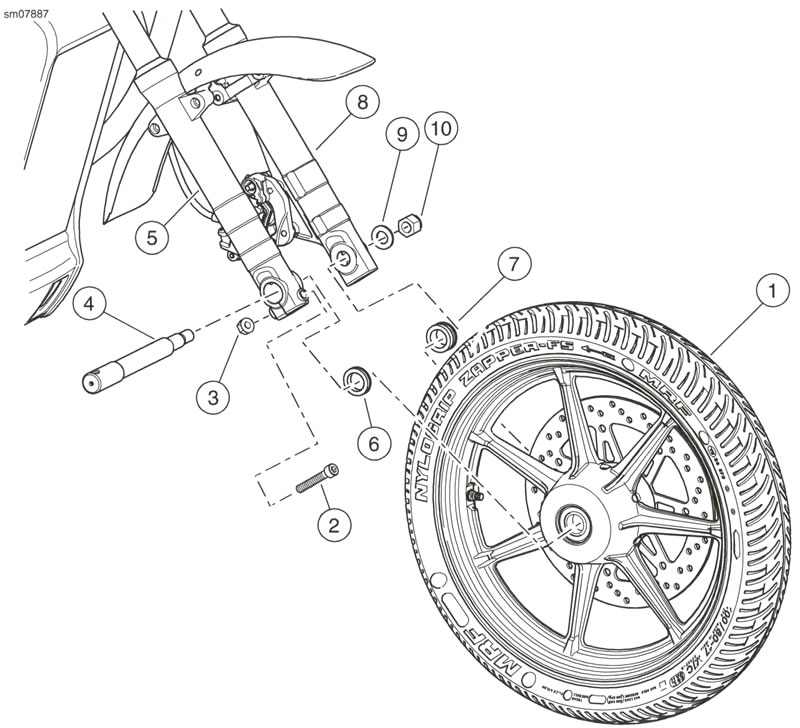
Figure 3-3. Front Wheel: 1. Front wheel; 2. Pinch bolt; 3. Nut; 4. Front axle; 5. Right fork leg; 6. Right external spacer; 7. Left external spacer; 8. Left fork leg; 9. Washer; 10. Nut
Remove
1. Raise front wheel. See Motorcycle general maintenance, Secure the Motorcycle for Service.
2. Check wheel bearing end play. See Sealed wheel bearings.
1. See Figure 3-3. Remove front wheel.
- a. Loosen pinch bolt (2).
- b. Remove nut (10) and washer (9).
- c. Remove front axle (4), left external spacer (7) and right external spacer (6).
- d. Remove front wheel (1).
Install
| FASTENER | TORQUE VALUE | |
| Front axle nut | 81.3-88.1 Nm | 60-64 ft·lbs |
| Front axle pinch bolt | 12.5-14.4 Nm | 111-127 in·lbs |
1. See Figure 3-3. Install front wheel.
- a. Apply a light coat of ANTI-SEIZE LUBRICANT to front axle (4), wheel bearing bores, and bore of the inner sleeve.
- b. Align front wheel (1) between front fork legs (5, 8).
- c. Install front axle through right fork leg (5), right external spacer (6), front wheel, left external spacer (7) and left fork leg (8).
- d. Install washer (9) and nut (10).
2. Tighten front axle nut to 81.3-88.1 Nm (60-64 ft·lbs).
3. See Figure 3-3. Tighten pinch bolt (2) to 12.5-14.4 Nm (111-127 in·lbs).
Disassemble
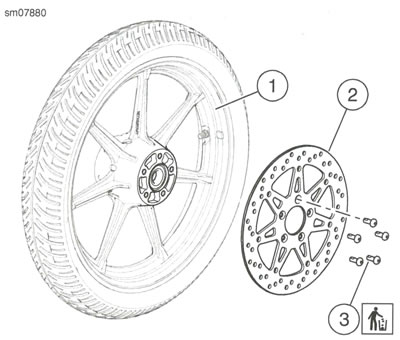
1. See Figure 3-4. Remove front brake disc.
- a. Discard screws (3).
- b. Remove front brake disc (2)
2. Remove front tire. See Removing and installing tires.
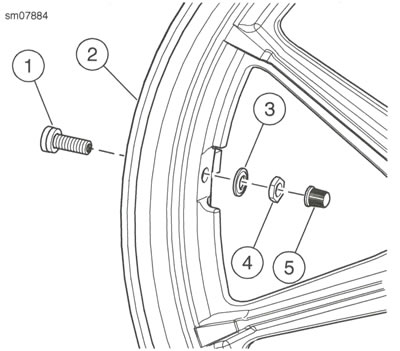
3. See Figure 3-5. Remove valve stem.
- a. Remove valve stem cap (5).
- b. Remove nut (4).
- c. Remove washer (3).
- d. Remove valve stem (1) from wheel (2).
4. Remove sealed wheel bearings. See Sealed wheel bearings.
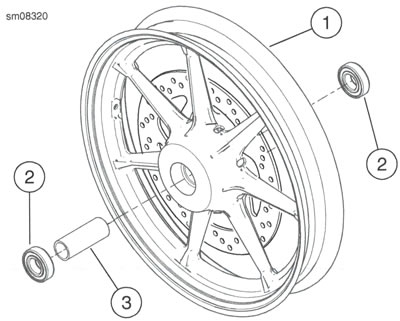
5. See Figure 3-6. Remove front axle spacer (3).

Figure 3-4. Front Brake Disc: 1. Front wheel; 2. Front brake disc; 3. Screw (5)

Figure 3-5. Tire Valve Stem: 1. Valve stem; 2. Wheel; 3. Washer; 4. Nut; 5. Valve stem cap

Figure 3-6. Front Wheel Asssembly: 1. Front wheel; 2. Sealed wheel bearing (2); 3. Front axle spacer
Clean and inspect
1. Clean all parts thoroughly.
2. Inspect front wheel for damage. Replace or repair as necessary.
3. Check wheel runout. See Wheel runout.
Assemble
| FASTENER | TORQUE VALUE | |
| Valve stem nut | 1.4-1.7 Nm | 12-15 in·lbs |
| Front brake disc screw | 21.7-32.5 Nm | 16-24 ft·lbs |
1. See Figure 3-5. Install valve stem.
- a. Install valve stem (1) in wheel (2).
- b. Install washer (3).
- c. Install nut (4). Tighten to 1.4-1.7 Nm (12-15 in·lbs)
- d. Install valve stem cap (5).
2. Install tire. See Removing and installing tires.
3. See Figure 3-6. Install front axle spacer (3).
4. Install sealed wheel bearings. See Sealed wheel bearings.
Notice: Do not re-use brake disc/rotor screws. Re-using these screws can result in torque loss and damage to brake components.
5. See Figure 3-4. Install front brake disc.
- a. Align front brake disc (2) with front wheel (1).
- b. Install new screws (3). Tighten to 21.7-32.5 Nm (16-24 ft·lbs).
Complete
1. Lower front wheel.
