
1. Check that the clutch lever operates smoothly and easily.
2. If the clutch lever operation is heavy or stiff, remove the cable (see Chapter 2) and lubricate it (see Section 7). If the cable is still stiff, replace it with a new one. Install the lubricated or new cable (see Chapter 2).
3. With the cable operating smoothly, check that the clutch cable is correctly adjusted. Periodic adjustment is necessary to compensate for wear in the clutch plates and stretch of the cable. Check that the amount of freeplay in the cable, measured in terms of the amount of free movement at the clutch lever end. Is within the specifications listed at the beginning of the Chapter.
4. If adjustment is required, pull back the rubber boot covering the adjuster at the lever end of the cable, then loosen the adjuster lockring and turn the adjuster in or out until the required amount of freeplay is obtained (see illustrations). To increase freeplay. thread the adjuster into the lever bracket. To reduce freeplay, thread the adjuster out of the bracket. Tighten the lockring securely.
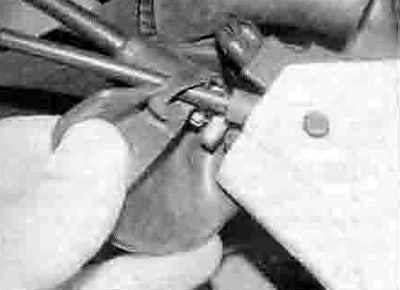
4.4a. Pull back the rubber boot to access the adjuster
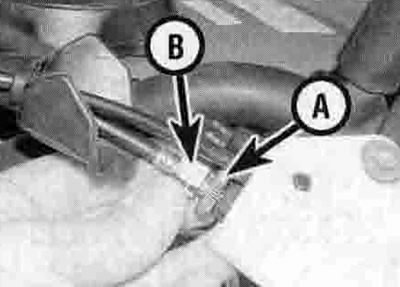
4.4b. Slacken the lockring (A) and turn the adjuster (B) in or out as required
5. When adjusting the cable make sure that the slots in the adjuster and lockring are not aligned with each other and the slot in the lever bracket - these slots are to allow removal of the cable, and if they are all aligned while the bike is in use the cable could jump out.
6. If all the adjustment has been taken up at the lever, reset the adjuster to give the maximum amount of freeplay (i.e. thread It all the way into the bracket), then set the correct amount of Ireeplay using the adjuster on the clutch end of cable. The adjuster (a threaded section in the cable with two locknuts) is set in a bracket on the clutch cover on the righthand side of the engine. Access to it can be improved by removing either the belly-pan. the fairing side panel (XL600V and XRV750) or the fairing (XL650V), though this is not essential (just be careful not to let the spanner slip).
Caution: Take care not to bum your hands on the exhaust system if the engine has just been run.
7. Use the nuts on each end of the threaded section in the cable to adjust freeplay (see illustration). To increase freeplay. slacken the front nut and tighten the rear nut until the freeplay is as specified, then tighten the front nut. To reduce freeplay, slacken the rear nut and tighten the front nut until the freeplay is as specified, then tighten the rear nut. Subsequent adjustments can now be made using the lever adjuster only.

4.7. Slacken and adjust the nuts (arrowed) as described