Clutch removal
Remove:
- Right Engine Cover (see Right engine cover removal)
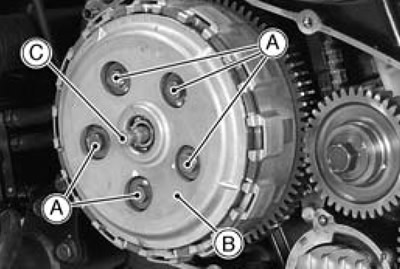
- Clutch Spring Bolts [A]
- Clutch Springs
- Clutch Spring Plate [B] (with thrust bearing and pusher [C])
Remove:
- Friction Plates, Steel Plates
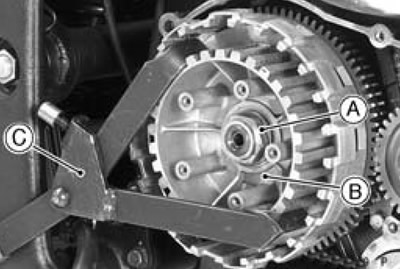
- Clutch Hub Nut [A]
Holding the clutch hub [B], remove the nut.
- Special Tool - Clutch Holder [C]: 57001-1243
Remove:
- Clutch Hub
Remove:
- Spacer [A]
- Clutch Housing [B], Needle Bearing and Bushing
- Thrust Spacer

Clutch installation
Install the thrust spacer [A] to the drive shaft so that the tapered side [B] faces inward.
Apply molybdenum disulfide oil to the needle bearing.
Install the bushing and needle bearing to the drive shaft.

Install:
- Clutch Housing [A]
- Spacer [B]
- Clutch Hub

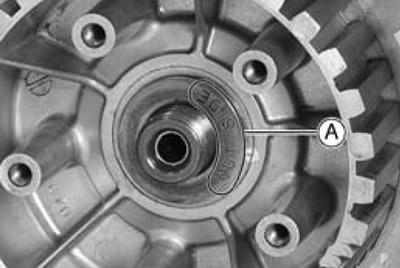
Install the washer so that the OUTSIDE mark [A] faces outward.
Replace the clutch hub nut with a new one.
Apply molybdenum disulfide oil to seating surface of the hub nut.
Holding the clutch hub, tighten the clutch hub nut.
- Special Tool - Clutch Holder: 57001-1243
- Torque - Clutch Hub Nut: 130 N·m (13.3 kgf·m 95.9 ft·lb)
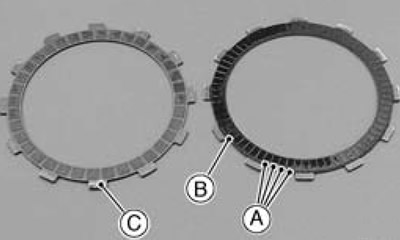
Install the friction plates and steel plates, starting with a friction plate and alternating them.
Install the friction plates so that the plates of having more lining blocks [A] than other plate [C] are placed at both end [B].
Caution! If new dry friction plates and steel plates are installed, apply engine oil to the surfaces of each plate to avoid clutch plate seizure.
OInstall the last friction plate [A] fitting the tangs in the grooves in the housing as shown.

Install the clutch spring plate and spring, and tighten the clutch spring bolts.
- Torque - Clutch Spring Bolts: 9.8 N·m (1.0 kgf·m, 87 in·lb)
Install the right engine cover (see Right engine cover installation).
Clutch plate, wear, damage inspection
Visually inspect the friction and steel plates for signs of seizure, overheating (discoloration), or uneven wear.
Measure the thickness of each friction plate [A] at several points.

★ If any plates show signs of damage, or if they have worn past the service limit, replace them with new ones.
Friction plate thickness:
- Standard: 2.9-3.1 mm (0.114-0.122 in.)
- Service Limit: 2.8 mm (0.110 in.)
Clutch plate warp inspection
Place each friction plate or steel plate on a surface plate and measure the gap between the surface plate [A] and each friction plate or steel plate [B] with a thickness gauge [C]. The gap is the amount of friction or steel plate warp.
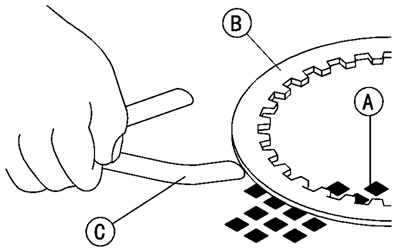
★ If any plate is warped over the service limit, replace it with a new one.
Friction and steel plate warp:
- Standard: 0.2 mm (0.008 in.) or less
- Service Limit: 0.3 mm (0.01 in.)
Clutch spring free length measurement
Measure the free length of the clutch springs [A].
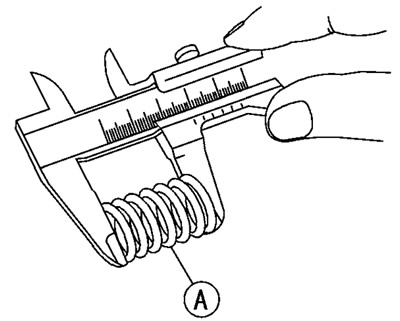
★ If any spring is shorter than the service limit, it must be replaced.
Clutch spring free length:
- Standard: 33.6 mm (1.32 in.)
- Service Limit: 32.6 mm (1.28 in.)
