Note. Take the special tool (0276040).
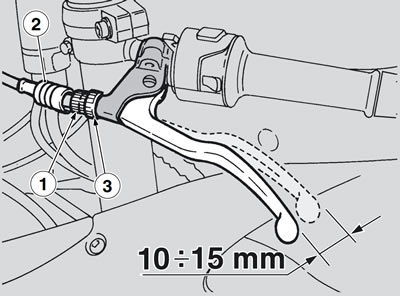
Slide out the protective guard (2).
Loosen the ring nut (3).
Turn the adjuster (1) until reaching a free play on the clutch lever end of about 10 to 15 mm.

Tighten the ring nut (3), lock the adjuster (1).
Check the free play on the clutch lever end.
Refit the protective guard (2).
In case the adjuster (1) is fully tightened, fully loose or if the free play cannot be set to a correct value, proceed as follows:
Slide out the guard (2).
Fully tighten the ring nut (3) on the adjuster (1).
Fully tighten the adjuster (1).
Remove the left side fairing, see 7.1.2.
Undo and remove the cap (4).

Use the special wrench (5) to loosen the inner nut (6).
Fit a flat screwdriver into the special wrench (5) and fully screw the adjuster (7).
Loosen the adjuster (7) by half of a turn, namely 3 to 4 mm of the lever travel (8).
Keep the adjuster (7) locked using the flat screwdriver, turn the special wrench (5) and tighten the inner nut (6).
Screw the cap (4).

Check the clutch lever end free play (10 to 15 mm).
Refit the left side fairing.
Start the engine.
Pull the clutch lever fully and engage the first gear.
Make sure that the engine does not stop and that the vehicle does not tend to move, or that the clutch does not "slip" during acceleration or running.
Note. Check that the clutch cable is in good conditions: the sheaths should be free from squeezing or wear.
To avoid early wear or corrosion, lubricate the clutch cable with suitable lubricant at regular intervals, see 1.8.1.
