- Washer
- Bearing
- Clutch housing assembly "1"
- Thrust washer
- Conical spring washer
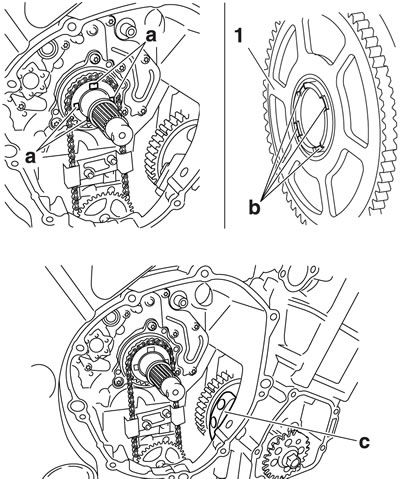
Notice: Make sure to fit the projections "a" of the oil pump drive sprocket to the concave "b" of the clutch housing assembly.
When installing the clutch housing assembly, turn the crankshaft so that the crankshaft web "c" cannot be seen.
2. Install:
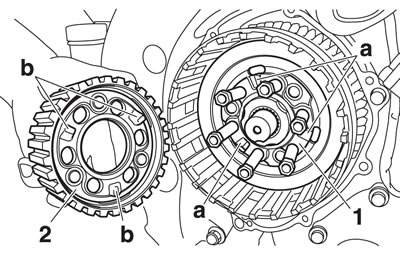
- Pressure plate 2 "1"
- Clutch boss "2"
Fit the groove "a" of the pressure plate 2 to the projection "b" of the clutch boss to assemble.
3. Install:
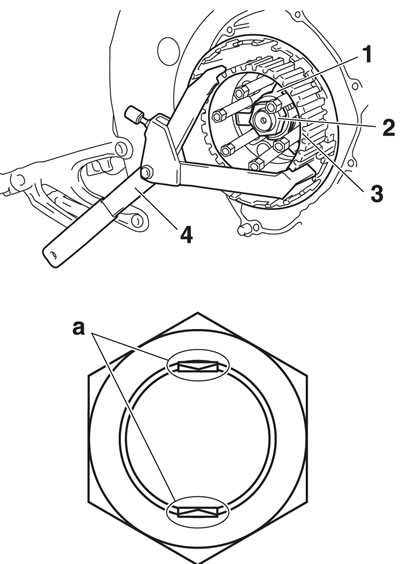
- Springs "1"
- Clutch boss nut "2" New
- Clutch boss nut 115 Nm (11.5 mr·kgf, 85 ft·lbf).
- Lubricate the clutch boss nut threads with engine oil.
- While holding the clutch boss "3" with the universal clutch holder "4", tighten the clutch boss nut.
- Stake the clutch boss nut at a cutout "a" in the main axle.
Universal clutch holder 90890-04086 YM-91042.
4. Lubricate:
- Friction plates
- Clutch plates (with the recommended lubricant)
Recommended lubricant: Engine oil.
5. Install:
- Friction plates
- Clutch plates
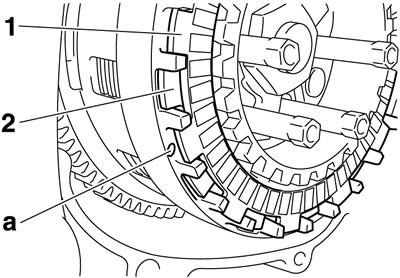
- First, install a friction plate and then alternate between a clutch plate and a friction plate.
- Install the last friction plate "1" offset from the other friction plates "2", making sure to align a projection on the friction plate with the punch mark "a" on the clutch housing.
6. Install:
- Bearing (into the pressure plate 1)
- Pullrod
- Pressure plate 1
7. Install:
- Clutch springs
- Clutch spring bolts "1"
Clutch spring bolt 10 Nm (1.0 m·kgf, 7.2 ft·lbf).
Tighten the clutch spring bolts in stages and in a crisscross pattern.
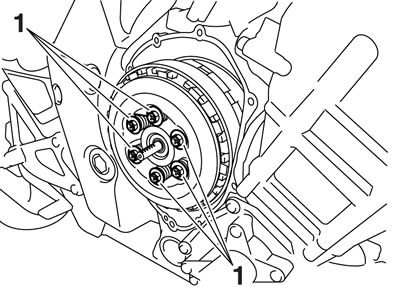
8. Install:
- Dowel pins
- Clutch cover gasket New
- Clutch cover "1"
- Clutch cover bolt 12 Nm (1.2 m·kgf, 8.7 ft·lbf).
- Position the pull rod so that the teeth "a" face towards the rear of the vehicle. Then, install the clutch cover.
- Apply locking agent (LOCTITE®) to the threads of only the clutch cover bolts "b" shown in the illustration.
- Tighten the clutch cover bolts in stages and in a crisscross pattern.
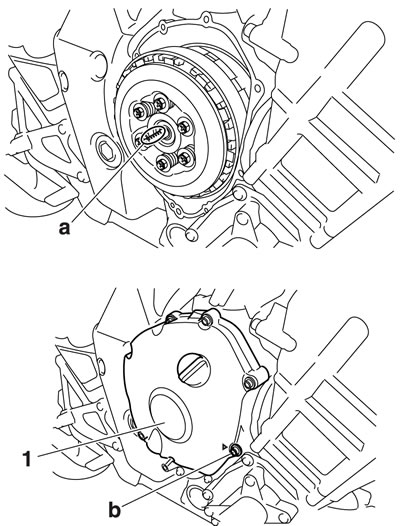
9. Install:
- Pull lever spring "1"
- Pull lever "2"
- Washer
- Circlip New
- Make sure that the mark "a" on the pull lever is facing down.
- The end of the pull lever should be closest to the clutch cover match mark "b" when there is no free play of the pull lever.
- Make sure that the pull rod teeth and pull lever shaft pinion gear are engaged.
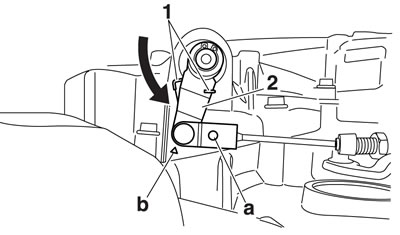
10. Adjust:
- Clutch cable free play
Refer to "Adjusting the clutch cable free play".
