MotoInstruction.ru
Mobile
version
Articles
& news
Site
map
Feed
back
Add to
bookmark
English Русский
Aprilia
BMW
Ducati
Harley
Honda
Kawasaki
Suzuki
Triumph
Yamaha
Aprilia:
RS-series▾
RS125 [3] (1998-2005)
Shiver▾
SL750 (2007-2016)

Installing the swinging arm (Aprilia RS125/3)

  • Main
  • Aprilia
  • RS-series
  • RS 125 [3]
  • Running gear and frame
  • Rear suspension
  • Installing the swinging arm
0
Read 1.2.1 carefully.

Torque wrench settings:
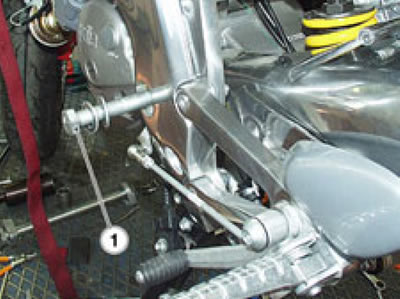
  • Swinging arm spindle (1): 100 Nm (10.0 kg·m).
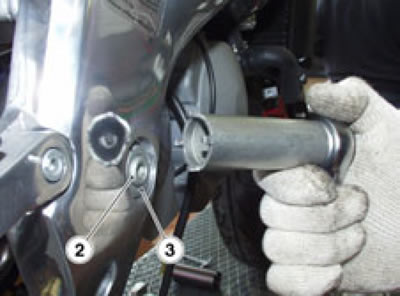
  • Adjusting bush (2): 12 Nm (1.2 kg·m)
  • Lockring (3): 35 Nm (3.5 kg·m)
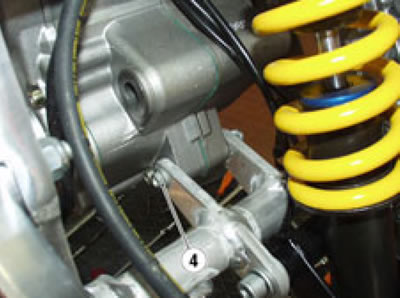
  • Rear screw (4): 22 Nm (2.2 kg·m)
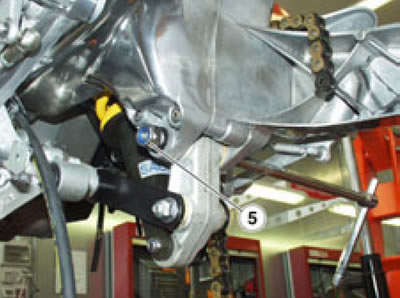
  • Linkages to swinging arm (5): 80 Nm (8.0 kg·m)
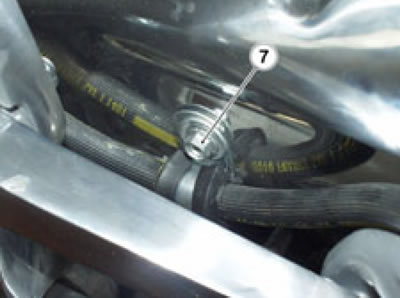
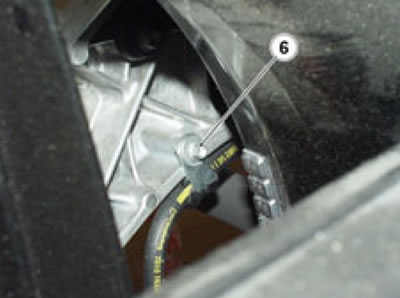
  • Brake hose clips (6-7): 3 Nm (0.3 kg·m)

Fit the two washers to the spindle (1).

Smear the thread of the swinging arm spindle (1) with oil.


Warning! The tail section is heavy. An assistant will be required to perform the following operations. When working with an assistant, plan the whole procedure carefully together.


Locate the swinging arm to the frame.

Position the swinging arm so as to match the holes. At the same time, push the spindle (1) fully home from the left-hand side.

Correct adjustment of swinging arm spindle play is obtained by screwing the adjusting bush (2) all the way in and tightening an additional 1/4 turn.

Note. Make sure to have the special tool no. 8101945 (socket for swinging arm spindle adjustment) ready at hand.


Lock out bush (2) rotation and tighten the lockring (3) using the special tool.

Adjust the rear swinging arm; see 2.17.3.


Tighten the engine-to-frame mounting bolt (4).


Position the linkages to the swinging arm.

Insert the screw from the right-hand side.

Position the washer and tighten the nut (5).


Route the brake hose along the swinging arm.

Secure the brake hose inner clip with the screw (6).


Secure the brake hose outer clip with the screw (7).

Install the rear wheel; see 7.6.6.

Install the drive chain; see 7.13.2.

Lower the hoist arm.

Disconnect the slings from the frame.

Install the fuel tank; see 4.1.1.

See this article in russian language
◀ Previous
Aprilia RS125 3: Rear suspension
Next ▶

Reassembling the swinging arm
Rear swinging arm component inspection
Dismantling the swinging arm
Removing the rear swinging arm
Rear shock absorber removal
Rear shock absorber installation
Removing the rear suspension linkages
Dismantling the rear suspension linkage system
Rear suspension component inspection
Removing the drive chain
Similar articles about motorcycles of other brands
BMW R 1150 GS (1999-2004): Installing rear swinging arm Triumph Rocket III (2004-2018): Exploded view — swinging arm Yamaha FZ1 Fazer (2006-2015): Installing the engine Suzuki DRZ 250 (1996-2007): Installing the side stand spring Honda CB 400 SF (1992-1999): Front Brake Disc — Checking, Removing and Installing Ducati ST2 (1997-2003): Removing and overhauling the swinging arm Harley-Davidson V-Rod (2002-2006): Installing and timing the cams Kawasaki Versys 650 (2007-2025): Removing and installing water pump
Link to this article in different formats
TEXTHTMLBB Code
Comments and feedback from visitors
No comments yet, you will be the first!


Add up two numbers: 33 + 36


RS125 3 (1998-2005) 
  • Information for owner
  • Introduction to manual
  • Maintenance
  • Troubleshooting
  • Engine and systems
  • Engine repair
  • Fuel system
  • Cooling and lube system
  • Running gear and frame
  • Frame and hinged elements
  • Front suspension and handlebar
  • Rear suspension
  • Brake system
  • Wheels and tires
  • Electric equipment
  • Equipment and devices
  • Starting and charging system
Aprilia BMW Ducati Harley Honda Kawasaki Suzuki Triumph Yamaha
MotoInstruction.ru © 2021–2025 | Sitemap | Articles | Contacts | Site search | Add to bookmarks | Mobile version